I had a workbench that wobbled every time I reached for a clamp. It was the kind of wobble that made simple tasks feel risky and ruined any hope of precision. After months of frustration I decided enough was enough. I designed and built a practical, heavy-duty upgrade that eliminated the shake, improved safety, and made my workshop tasks easier and more enjoyable. In this guide I will walk you through the full process — the problem, the design goals, the materials, the step-by-step fabrication, welding tips, testing, and maintenance. This is the exact approach I used to go from shaky to solid, and it will work for hobbyists and small professional shops alike.
🔧 The Problem: Why a Shaky Workbench Is Dangerous and Unproductive
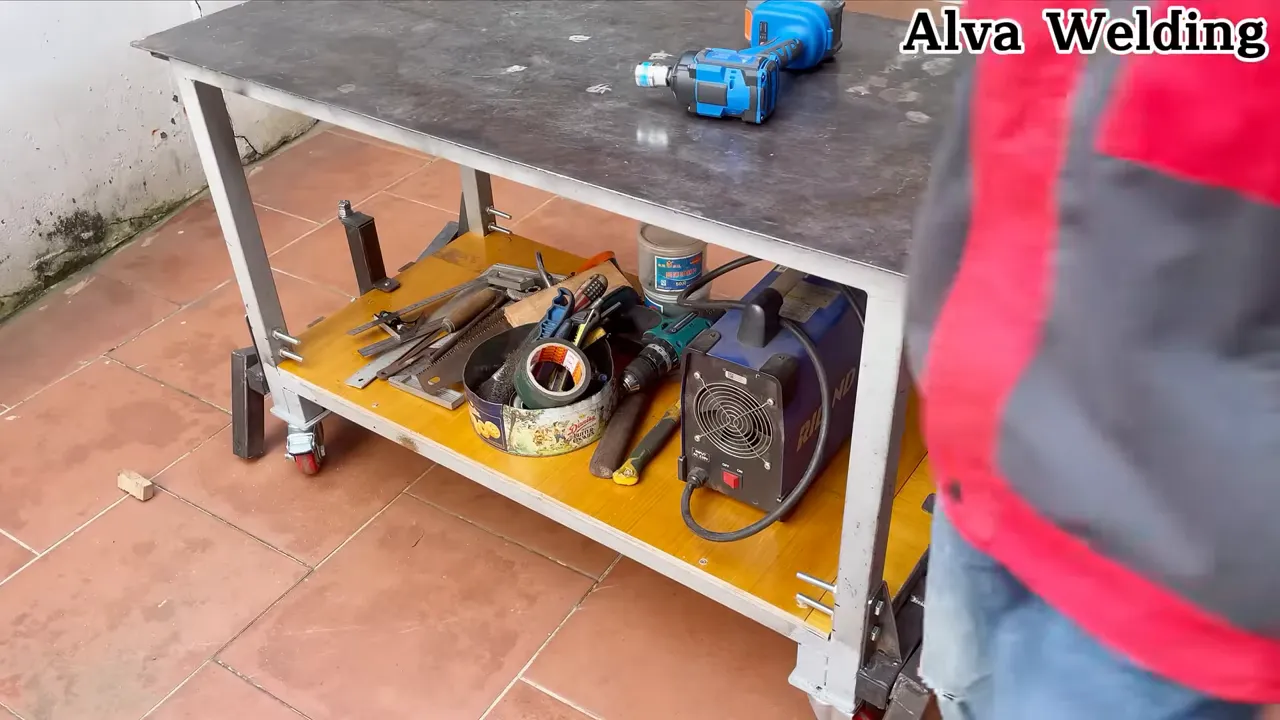
Every time I leaned on that old bench to hold a piece for tack welding or grinding, the table would shift. The issue was subtle at first — a small vibration, a tiny lateral movement — but it grew with each task. Precision welds suffered, clamps slipped, and I had to constantly reposition jigs to compensate. Beyond frustration, a shaky bench is a safety hazard. When you are working with grinders, cutting tools, or hot welds, unexpected movement can cause accidents.
My goal was simple: design a retrofit system that would convert an ordinary bench into a rigid, vibration-damped, and adjustable platform without replacing the entire table. I wanted something that could be fabricated in a single afternoon with basic welding tools, that would be compatible with square and round tube frames, and that would add minimal weight while delivering maximal stability.
🧰 Design Goals: What I Needed the Solution to Do
I started by listing clear objectives. This keeps the build focused and avoids over-engineering.
- Stability: Eliminate lateral and vertical movement under typical workshop loads.
- Compatibility: Fit existing benches built from common materials like 40×40 square tube and thicker legs without extensive modification.
- Adjustability: Allow for leveling on uneven floors with adjustable feet or shims.
- Vibration damping: Reduce high-frequency vibration from grinders and sanders.
- Ease of fabrication: Use standard materials and simple welding techniques so beginners can replicate the solution.
- Modularity: Permit future upgrades like casters, shelves, or vice mounting points.
With these goals in mind I sketched a retrofit plate system that ties the bench legs together, adds triangulation for stiffness, and uses high-strength anchor plates on the underside. The concept is straightforward: strengthen the weakest links and add a tunable interface to the floor.
🛠️ Materials and Tools I Used
Choosing the right materials makes the difference between a good and great solution. I kept the bill of materials practical and affordable.
- 40×40 mm square steel tube and 40×20 mm unequal angle for reinforcement
- 6 mm and 8 mm flat steel plates for anchor plates and gussets
- High-tensile bolts (ISO property class 8.8 or 10.9) with washers and jam nuts (or nylon-insert locknuts) for adjustable feet
- Adjustable leveling feet with M12 threads
- Welding wire and shielding gas suitable for your welder
- Basic tools: angle grinder, cutting disc, chop saw for metal, drill press, clamps, tape measure, square
- Safety gear: welding helmet, gloves, jacket, ear protection, respiratory protection for grinding
Keep in mind that material thicknesses may vary depending on the bench size and expected load. For a standard two-meter bench used for general fabrication, 6 mm plates and 40×40 tube provide a solid compromise between weight and stiffness.
🔥 Step-by-Step Fabrication and Assembly
I break fabrication into manageable stages: evaluation and measurement, cutting and prepping components, tack assembly, final welding, and attachment to the bench. Below is the detailed process I followed.
1. Evaluate the Bench and Plan the Retrofit
Start by assessing the current bench frame. Check for rust, previous poor welds, and uneven legs. Measure the distance between legs and the clearance to the floor. Decide whether the retrofit plates will be welded to the legs or clamped. For my bench I welded plates because the frame was steel and the welds would remain hidden underneath.
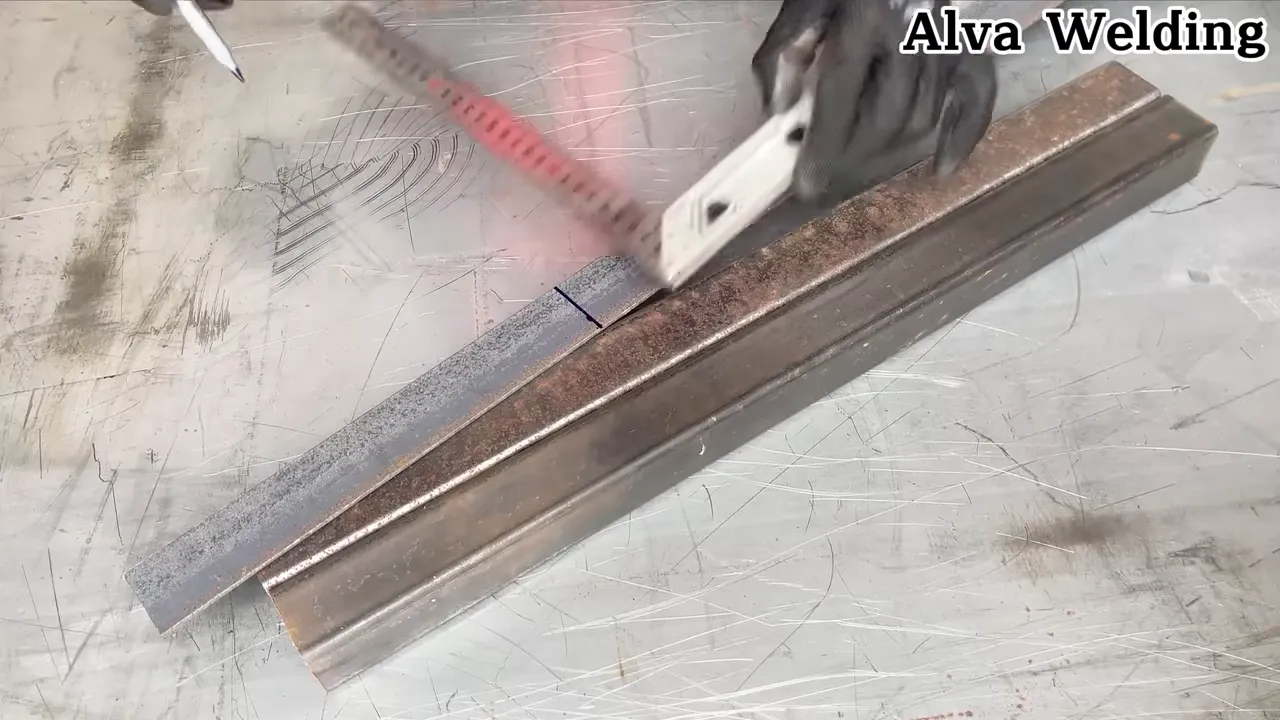
2. Cut Anchor Plates and Gussets
Cut 6 mm flat plates into rectangles sized to span the inside of the leg pairs. These plates serve two purposes: they create a rigid triangular connection between legs and provide a surface to mount leveling feet or bolts. I also cut triangular gussets from 6 mm plate to reinforce the corners where legs meet the tabletop supports.
When cutting, maintain square edges and deburr the plates to avoid stress risers. If you are using a chop saw for metal, take light passes and let parts air-cool between cuts to avoid warping thin plates.
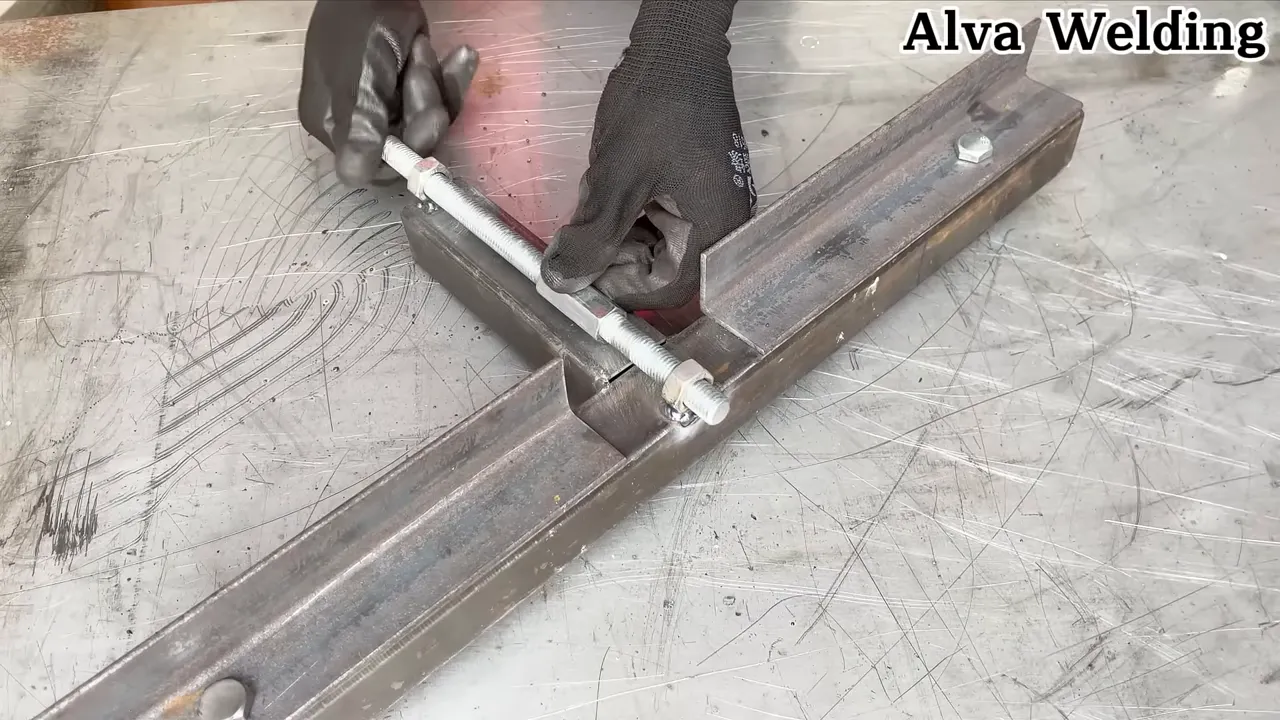
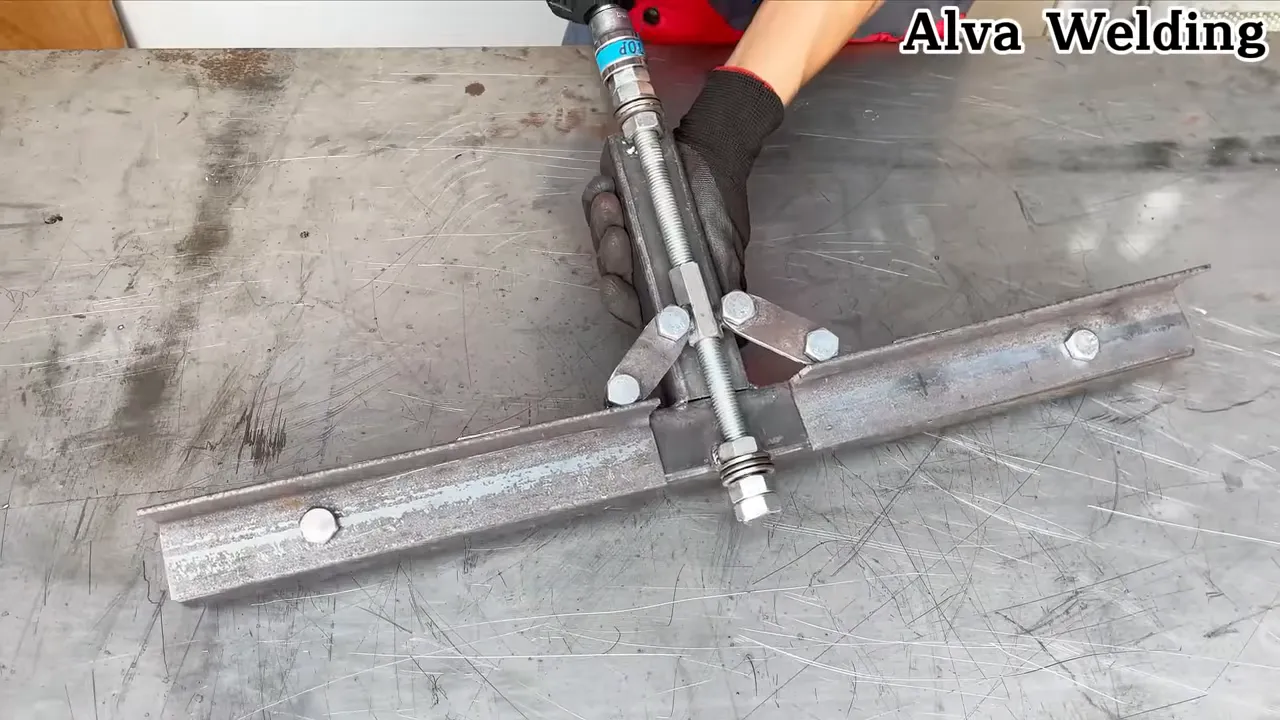
3. Fit and Tack the Retrofit Pieces
Dry-fit everything. I clamped the anchor plates to the frames and used a square to ensure everything is perpendicular. Tack weld the plates in multiple spots to maintain alignment during the final welding. Tack welding reduces distortion and keeps the structure square as you complete full welds.
Key tip: place tack welds on opposing sides alternately to keep heat input balanced.
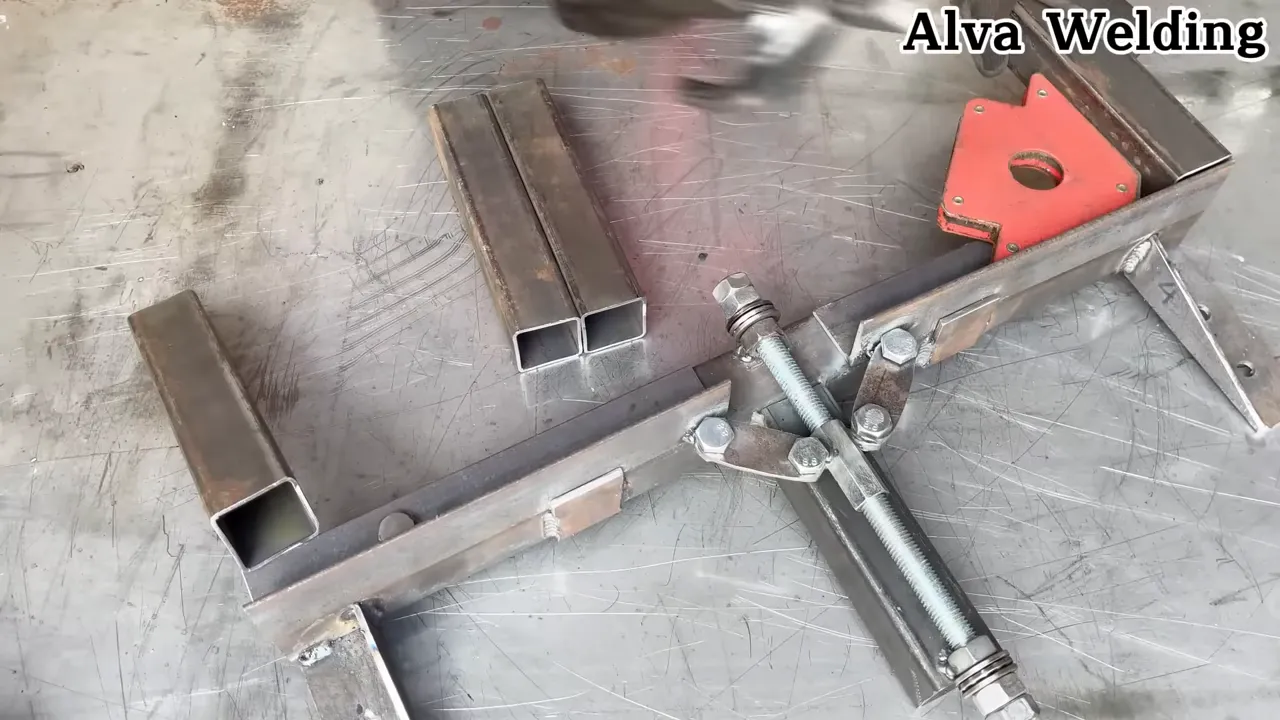
4. Add Triangulation and Cross Bracing
Triangulation is the single most effective way to stiffen a frame. I welded triangular braces from angle iron between the legs and the table frame, forming rigid triangles that resist lateral loads. For cross bracing between the front and back legs I used flat bars welded diagonally to prevent racking; for best stiffness use X-bracing (both diagonals) to resist loads in both directions.
5. Weld Anchor Plates and Install Leveling Feet
Once tacked, complete the welds around the anchor plates. Grind only what is necessary to achieve a clean finish; heavy grinding removes material and can weaken thin plates. Drill Ø13 mm clearance holes for M12 bolts (maintain edge distance ≥ 1.5× hole diameter) or weld an M12 nut/coupling nut under the plate and thread the leveling feet into that. Use washers and jam nuts (or nylon-insert locknuts) to keep the adjustment stable over time.
Install leveling feet and adjust them so the bench sits level. Tighten the jam nuts against the plates to prevent movement.
6. Final Check and Finish
With everything welded and bolted, do a full check. Verify the tabletop is level in both directions, and test the legs for any micro-movement by applying pressure at different points. If necessary, add small shim washers under plates or re-spot weld to close gaps. Finish with rust-protective paint or sealant to keep the new work robust for years.
⚡ Welding Tips and Tricks I Rely On
Welding the retrofit plates to an existing frame can be straightforward if you use the right approach. Here are the techniques and settings that produced consistent, strong welds for me.
- Tack first, weld later: Place 4–6 tacks per joint, alternating sides to balance heat. This minimizes warping and keeps critical dimensions accurate.
- Control heat: Use short weld passes and allow cooling between passes. For thin plates, stitch welding works well: make small welds spaced along the seam to avoid heat buildup.
- Welding process: For mild steel I use MIG with 0.8 mm wire and a moderately low voltage to reduce burn-through on thin plates. For thicker gussets I increase the wire feed and voltage as needed.
- Weld orientation: Flat and horizontal are the easiest orientations for clean beads. If you must weld vertical, maintain a steady travel speed and appropriate push or pull technique for your process.
- Grind judiciously: Grind only to clean up joints where needed. Excessive grinding removes metal and can reduce the strength of fillet welds.
- Clean metal: Remove paint, rust, and mill scale from weld areas. A clean, bright metal surface makes a better, more consistent weld.
Remember that welding is as much about heat management and fit-up as it is about torch time. If something looks misaligned after tack welding, grind out and re-tack rather than forcing a full weld that cures in the wrong place.
✅ Assembly, Testing, and Proofing the Result
Once the retrofit was complete I performed a series of tests to validate the design. Testing is where the “no one believed” part turned into visible proof.
First, I loaded the bench with heavy metal plates and applied lateral force at the far edge. The movement was negligible. Next, I placed a vise and struck the mounted piece with a hammer to mimic vibration from heavy grinding. The damping provided by the anchor plates and the triangulation minimized vibration transfer into the frame.
I also welded small tack pieces to verify the bench would hold alignment during delicate welding tasks. Previously I had to re-clamp constantly. With the retrofit, clamps remained tight, and tack welds held without shifting. The final step was the aesthetic finish: a protective coat of matte enamel to resist shop grime and rust.
🔩 Maintenance, Upgrades, and Uses
A retrofit like this is not a one-and-done project. Regular checks and simple upgrades keep the bench performing at its best.
- Periodic checks: Every few months, inspect welds for cracks, bolts for tightness, and feet for wear.
- Re-tighten lock nuts: Vibrations can slowly loosen fasteners. Check and re-torque bolts as needed.
- Add casters: If mobility is desired, use heavy-duty locking casters mounted to the anchor plates. Ensure the casters have a braking system to prevent movement while working.
- Vise and jig mounting: Use the strengthened anchor plates to mount heavy vises, rollers, or jigs without fear of ripping the tabletop out of square.
- Sound damping: For specialized tasks like TIG on thin sheet, add rubber or neoprene pads between the tabletop and any fixtures to reduce high-frequency vibrations even more.
With these maintenance steps the retrofit will last for many years and provide a flexible platform for additional tooling and fixtures.
🎯 Final Thoughts and Lessons Learned
What began as an annoyance turned into an opportunity to make my workspace safer, more efficient, and more enjoyable. The core lesson is straightforward: stiffness is cheap, but convenience and safety are priceless. A few plates, some gussets, and a handful of well-placed welds transformed the bench from a liability into a reliable, repeatable platform for quality work.
If you feel like your bench is the weak link in your shop, don’t replace the whole thing yet. A targeted retrofit can deliver dramatic improvement in a short amount of time and with modest cost. Take time to measure, fit, and tack before committing to full welds. Keep heat input in check to prevent warping. Finally, test thoroughly so you can show the results to those who doubted it could be fixed.
❓ Frequently Asked Questions
How thick should the anchor plates be for a standard two-meter bench?
For a typical two-meter bench used for general fabrication, 6 mm steel plates provide a good balance between stiffness and weight. If your bench will carry heavy machinery or large vises, consider 8 mm plates for added strength. Always consider the overall load and distribute anchor plates accordingly.
Can I attach the retrofit without welding if I do not have a welder?
Yes. You can use heavy-duty clamping plates and bolts to attach anchor plates to the bench legs. Use high-tensile metric fasteners such as ISO property class 10.9 (or 8.8 for lighter loads) with large washers and lock nuts. The trade-off is that bolted joints may permit micro-movement unless torqued properly and checked periodically.
Will adding plates and braces increase vibration from grinders?
No. Properly designed plates and triangulation reduce both low-frequency movement and high-frequency vibration transmission. For additional vibration damping, place neoprene or rubber pads between the tabletop and any mounted equipment.
What welding process and settings do you recommend for thin plates?
For mild steel thin plates MIG welding with 0.8 mm wire and moderate voltage works well. Use short stitch welds and let the metal cool between passes. TIG can give great results on thin material if you are experienced, but MIG is faster and more forgiving for beginners.
How do you prevent plate warping during welding?
Prevent warping by using multiple small tack welds in an alternating pattern, stitch welding instead of long continuous beads, and allowing cooling time between passes. Backstep welding (welding from the end back toward the previous weld) also helps control heat expansion. If warp appears, clamp and reheat carefully or add additional welds to pull the metal back into alignment.
Are adjustable leveling feet necessary?
They are highly recommended. Workshop floors are rarely perfectly level, and adjustable feet let you tune the bench so tools and jigs behave predictably. Leveling feet also reduce rocking and make the bench more comfortable to work at for long periods.
Can I paint over the welded areas immediately after welding?
Allow the welded areas to cool and then clean any welding residue and scale. Use a rust-inhibiting primer before painting. Painting too soon while the metal is hot can trap contaminants under the finish and reduce adhesion.
What are common mistakes to avoid when retrofitting a bench?
Common mistakes include poor measurement and fit-up, insufficient tack welding that allows pieces to move during full welds, excessive grinding that removes too much material, and ignoring leveling adjustments. Plan, measure twice, tack thoroughly, and weld with controlled heat input.
How long did the whole project take from start to finish?
For a single-person effort with a pre-planned design, cutting and tacking components can be done in a few hours. Final welding and finishing typically take an additional few hours. Allow extra time if you are new to welding or need to fabricate custom feet or brackets.
Is this retrofit suitable for outdoor benches?
Yes, but for outdoor use choose galvanized or weather-resistant steel and use weatherproof fasteners. Apply appropriate protective coatings, and consider stainless steel hardware to prevent corrosion. Regular maintenance is more important outdoors to prevent rust and deterioration.
🔁 Next Steps
If you want plans or a material list tailored to your bench dimensions, I can help you calculate plate sizes, brace locations, and bolt specifications. Share your bench measurements and expected loads, and I will walk you through a customized solution that builds on the same principles described here.
Finally, remember the satisfaction that comes from taking a problem and turning it into a reliable solution. The sound of a solid bench underfoot is one of the most rewarding things in the shop, and once you cross that threshold you will wonder why you waited so long to fix it.


