Disclosure: As an Amazon Associate, we earn from qualifying purchases. If you click a link on this page and make a purchase, we may receive a small commission at no extra cost to you.
Learning to solder can feel frustrating when your first project gives you nothing useful at the end. The Gikfun Electronic Hourglass LED DIY Kit EK1886 gives you a small electronics build with a visible payoff: an animated LED hourglass display. It is made for soldering practice, basic electronics learning, and decorative desk use once assembled. This review helps you decide whether the kit fits your skill level, tool setup, and expectations before you buy.
Quick Verdict
Rating: 8.5/10
Best For: Beginners and hobbyists who want a guided soldering project with a working LED display
Bottom Line: This Gikfun kit gives you a rewarding hands-on electronics project with a clear visual result. Its main tradeoff is that it requires soldering tools and offers limited customization after assembly.
Key Specifications
| Specification | Detail |
|---|---|
| Brand | Gikfun |
| Model | EK1886 |
| Product Type | Electronic hourglass LED DIY soldering practice kit |
| Design | Double-layer PCB with analog hourglass LED animation |
| LED Count | 30 white LED blue-ray lights |
| Control | MCU-programmed hourglass image |
| Power Supply Voltage | 3.3V to 5V DC |
| Switch Type | Push button |
| Listed Item Weight | 16 ounces |
| Cordless | No |
| Waterproof | No |
| Included Guidance | English user manual and online PDF guidance |
| Tools Needed | Soldering iron, solder wire, multimeter, tweezers, and wire cutters |
| Best Use | Soldering practice, school electronics projects, hobby builds, and small decorative display use |
| Safety Note | Requires soldering heat, polarity checks, and correct component placement |
What Is the Gikfun Electronic Hourglass LED DIY Kit?
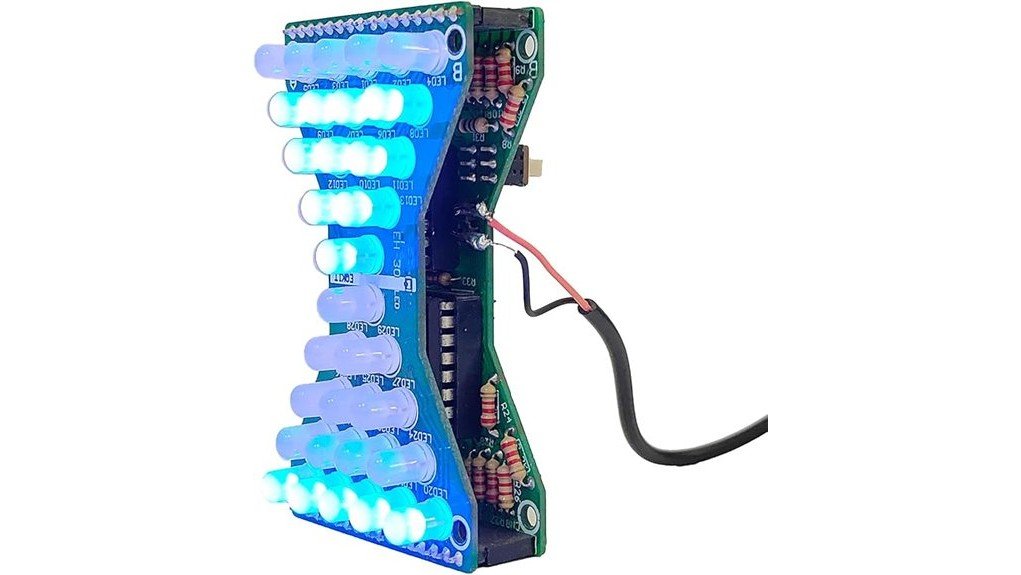
The Gikfun Electronic Hourglass LED DIY Kit EK1886 is a solder-it-yourself electronics project that creates an animated LED hourglass display. The kit uses a double-layer PCB, 30 white LED blue-ray lights, and an MCU program that controls the hourglass-style motion.
It is made for learners, students, and hobbyists who want more than a plain soldering practice board. After assembly, the circuit displays falling LED “sand” to mimic a real hourglass. You get a finished project that can sit on a desk as a small night-light-style decoration.
This is not a broad programming kit like an Arduino starter bundle. It focuses on assembly accuracy, soldering practice, component direction, and basic circuit understanding.
Who Should Buy It?
Best For
- Beginners who want a guided soldering project with a visible result
- Students learning PCB assembly, LED polarity, and basic electronics
- Hobbyists who enjoy small LED display projects and desk decorations
Skip If
- You want a plug-and-play product that works without soldering
- You need open programming, app control, or custom LED patterns
- You do not already have or plan to buy basic soldering tools
Design and Build Quality
The kit uses a double-layer PCB with clearly marked component locations. That layout helps beginners place parts with less guesswork, although you still need to check LED polarity and component direction before soldering.
The 30 LEDs create the main hourglass effect. When the circuit works correctly, the LEDs simulate falling particles from the top section to the bottom section. The result is more engaging than a basic practice board because you can see the circuit working after you finish.
Build quality depends partly on your assembly. Clean solder joints, correct LED alignment, and careful trimming make the finished board look better and work more reliably. Rough joints, reversed LEDs, or loose connections can cause dim lights, missing lights, or failed startup.
Pro Tip: Test the LEDs with a multimeter before soldering, then place all polarity-sensitive parts in one direction check before applying heat.
Assembly Experience
The Gikfun EK1886 includes an English manual and online PDF guidance. That makes the process easier for new builders, especially when you follow the order of assembly instead of soldering parts at random.
You should expect a hands-on build, not a snap-together kit. The listing notes that you need a soldering iron, solder wire, multimeter, tweezers, and wire cutters. A 30W soldering iron is a practical match for this type of through-hole electronics project.
The LED stage usually takes the most patience. Each LED must sit in the correct position and direction, and a small mistake can affect the final animation. Take your time here, because the visual result depends on even placement.
Setup Tips Before First Use
Start by laying out every component on a clean, bright work surface. Group LEDs, resistors, switches, and other parts before you begin. This reduces the chance of mixing parts or soldering the wrong component into a marked position.
Use the manual as your main guide, and check every part before soldering it permanently. For LEDs and other polarity-sensitive parts, confirm direction twice. It is easier to correct placement before soldering than to remove a part after the joint cools.
After soldering, inspect the board for poor joints, solder bridges, or floating connections. The product guidance specifically warns users to check for false or weak soldering, which matters because one bad joint can stop part of the display from working.
Before You Buy: This kit does not work out of the box. You need soldering tools, a stable 3.3V to 5V DC power source, and enough patience to check LED direction before assembly.
LED Display and Hourglass Animation
The main reason to choose this kit is the finished LED animation. The MCU program controls the 30 LEDs to show an analog hourglass image, with the lights moving in a pattern that resembles falling sand.
The animation is fixed, so you should not buy it expecting advanced programming control. That is also part of its appeal for beginners. You can focus on soldering and circuit assembly instead of coding, firmware changes, or troubleshooting software.
Once built correctly, the display can work as a small decorative light. It is best for indoor desk, shelf, classroom, or hobby bench use. It is not waterproof, and it is not designed for outdoor display.
Power, Controls, and Compatibility
The kit operates on 3.3V to 5V DC power. Use a stable low-voltage supply that matches the manual and listing guidance. Avoid guessing with higher-voltage adapters, since overvoltage can damage small electronic components.
The listing identifies a push-button switch type. The control setup is simple, which suits the beginner-friendly purpose of the kit. You do not get wireless control, an app, or smart-home features.
This kit is also listed as non-cordless. Treat it as a low-voltage electronics project that needs an appropriate power connection during use, not as a battery-powered decorative device.
Soldering Safety and Materials
This product involves heated tools, small parts, and low-voltage electronics. Use basic soldering safety every time you build it. Work in a ventilated area, keep the hot iron in a stable stand, and avoid touching the metal tip or fresh joints.
Because the kit uses small components, it is better for teens and adults than young children. Younger learners should only use it with direct adult supervision and proper soldering instruction.
The board is not waterproof, so keep it away from water, damp benches, sinks, and outdoor moisture. After assembly, store the finished unit where the LEDs and solder joints will not get crushed or bent.
How It Performs in Real Use
For Learning Electronics
The kit gives you practical exposure to through-hole soldering, LED polarity, PCB markings, and basic circuit behavior. You can see how correct assembly turns individual components into a working display.
For Soldering Practice
It works well as a first or second soldering project because the repeated LED placements build consistency. The project rewards careful technique, but it can frustrate users who rush through polarity checks.
For Hobby Desk Display
After assembly, the hourglass animation makes the kit more useful than a throwaway practice board. It can sit on a hobby bench, shelf, or desk as a small LED display piece.
For Classroom or STEM Use
The kit suits supervised school electronics experiments where students learn assembly steps and tool handling. It is most useful when paired with instruction on soldering safety, component direction, and circuit inspection.
Common Mistakes to Avoid
The biggest mistake is installing LEDs without checking polarity. If several LEDs face the wrong way, the display may look broken even when the rest of the board is assembled correctly.
Another common issue is using too much solder. Large solder blobs can bridge nearby pads and cause short circuits. Use enough solder to form a clean joint, then inspect the board under good lighting.
Do not power the board with an unverified adapter. The kit is rated for 3.3V to 5V DC, so a higher-voltage supply can create failure risk. Follow the manual and use a regulated low-voltage source.
Pros and Cons
Pros
- 30 LED hourglass animation gives you a clear finished result
- Double-layer PCB with marked components supports beginner assembly
- MCU-controlled display adds more interest than a plain practice board
- English manual and online PDF guidance help structure the build
- Works as both a soldering project and a small decorative LED display
Cons
- Requires separate soldering tools and careful LED placement
- Fixed animation means limited customization after assembly
- Not waterproof, cordless, or suitable for rough handling
Interested in This DIY Kit?
Check current product details before you choose it for learning, gifting, or hobby use.
Is It Worth the Price?
The Gikfun Electronic Hourglass LED DIY Kit fits the budget-friendly DIY electronics category. Its value comes from the build experience, the repeated soldering practice, and the finished LED animation.
It is worth considering if you want a structured beginner project that does more than train solder joints. The finished display gives you something to keep, show, or gift after the work is done.
It is not the best fit if you want advanced programming, multiple display modes, waterproof construction, or a ready-made decorative light. Buyers who only want a finished product should choose a plug-and-play LED display instead.
How It Compares to Alternatives
Compared with an Arduino starter kit, the Gikfun EK1886 is simpler and more focused. Arduino kits usually offer more programming flexibility, but they also require broader setup and more learning time.
Compared with a basic soldering practice board, this kit gives you a more satisfying final result. Compared with Gikfun LED chaser or flashing-light kits, the hourglass design feels more decorative and display-focused. Choose this one if you want soldering practice with a finished LED piece rather than a general electronics platform.
Frequently Asked Questions
Do you need soldering experience for this kit?
You do not need advanced experience, but basic soldering knowledge helps. Beginners should follow the manual closely, check polarity, and inspect every joint before powering the board.
What tools do you need to assemble it?
You need a soldering iron, solder wire, multimeter, tweezers, and wire cutters. A stable workspace and good lighting also make LED placement easier.
What power supply does the Gikfun EK1886 use?
The kit operates on 3.3V to 5V DC power. Use a regulated low-voltage source and avoid higher-voltage adapters that could damage the circuit.
Can you change the LED colors or animation?
No, the kit uses a fixed 30 LED blue-ray style display and MCU-controlled hourglass animation. It is better for assembly practice than custom programming.
How long does assembly take?
Assembly time depends on your soldering speed and experience. Many beginners should plan for a careful, unrushed session rather than trying to finish quickly.
Is this kit suitable for kids?
It is better suited for teens and adults because it requires a hot soldering iron and small electronic parts. Younger learners should only use it with direct adult supervision.
Is the finished hourglass waterproof?
No, the product is not waterproof. Keep the assembled board indoors and away from moisture, spills, and damp work areas.
Who should skip this Gikfun kit?
Skip it if you want a ready-made decorative light, battery-powered display, or fully programmable LED project. It makes the most sense when you want soldering practice with a finished visual effect.
The Bottom Line
The Gikfun Electronic Hourglass LED DIY Kit EK1886 is a strong pick for beginners, students, and hobbyists who want a soldering project with a finished LED display. Its biggest strength is the clear hourglass animation, while its main limitation is the fixed design and required soldering setup.
Buy it if you want hands-on electronics practice with a decorative result. Skip it if you need plug-and-play operation, waterproof construction, or advanced customization.