Disclosure: As an Amazon Associate, we earn from qualifying purchases. If you click a link on this page and make a purchase, we may receive a small commission at no extra cost to you.
Cracked plastic is hard to repair when glue peels away, a zip tie looks unfinished, or a replacement part costs too much. The GNI Upgraded 150W LED Digital Adjustable Temperature Plastic Welder, model W150, gives you controlled heat, filler rods, repair mesh, and finishing tools in one kit. Its main strengths are a 200℃ to 600℃ range, a digital display with temperature locking, and 106 welding rods for several compatible plastics. This review explains where the kit works well, what takes practice, and when a professional repair is the safer choice.
Quick Verdict
Rating: 8.3/10, Recommended with caveats
Best For: DIY users repairing compatible bumper trim, kayak surfaces, storage bins, plastic covers, toys, and workshop items.
Bottom Line: The GNI W150 combines 150W heating, a broad adjustable range, temperature locking, and a well-stocked accessory kit. You still need to identify the plastic, choose a matching rod, and control the heat, so it is not a universal or certified structural repair solution.
| Specification | Detail |
|---|---|
| Brand | GNI |
| Model number | W150 |
| Product type | Corded plastic welding and soldering repair kit |
| Kit format | 13-in-1 accessory set |
| Power | 150W |
| Temperature range | 200℃ to 600℃ (392℉ to 1112℉) |
| Heat-up claim | About 15 seconds to the selected working temperature |
| Heating element | Ceramic heating core |
| Controls | Digital display, adjustable temperature, and temperature-lock function |
| Body and heat management | Upgraded steel tube with 6 ventilation holes |
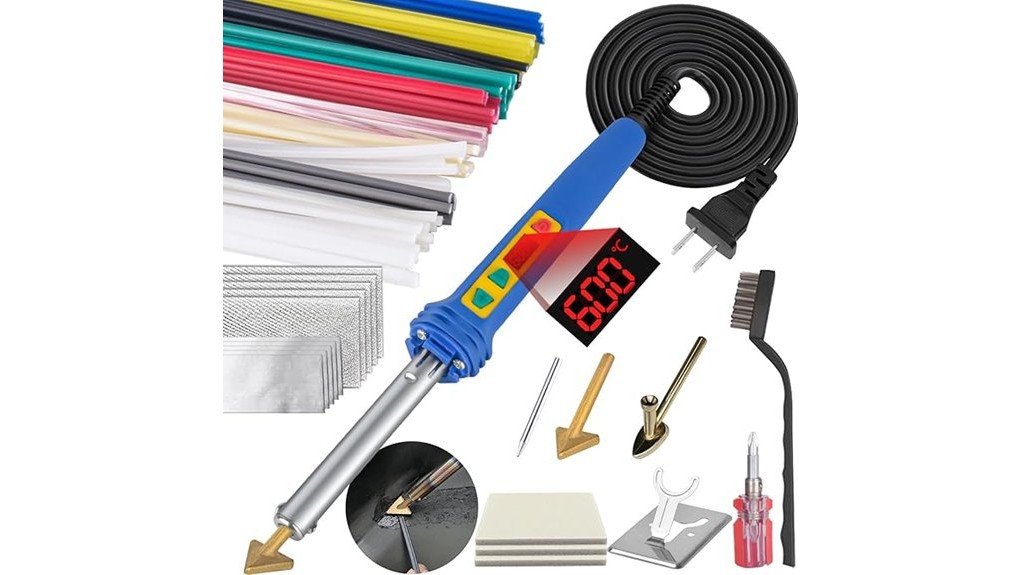
| Welding rods | 106 total: 56 rods labeled for ABS, PP, PE, TPE, PC, PUR, and PA, plus 50 colorful rods |
| Tips | 4 soldering tips in 3 types |
| Other accessories | 5 wire mesh pieces, 3 sandpaper pieces, 5 foil-tape pieces, screwdriver, stand, and metal brush |
| Listed weight | About 0.6 kg (1.3 lb) |
| Listed colors | Blue and red |
| Best use | Non-critical repairs on compatible automotive, outdoor, household, toy, and electronic housings |
What Is the GNI Plastic Welder?
The GNI W150 is a pen-shaped electric tool that softens compatible plastic and filler rod so you can join cracks, rebuild edges, or reinforce damaged areas. Unlike a surface adhesive, plastic welding works by heating the base material and adding compatible filler where needed.
The kit is designed for DIY repair rather than certified body-shop work. It includes the welder, four tips, 106 rods, mesh, abrasives, foil tape, a stand, a screwdriver, and a brush. That gives you tools for preparation, filling, reinforcement, smoothing, and cleanup without buying each item separately.
The listing also describes the tool as suitable for limited soldering tasks. Treat that as a secondary function. The tip style, temperature, workpiece, and nearby components still determine whether a specific electronics or jewelry task is appropriate.
Before You Buy: Check the material marking on the damaged part before ordering. A rod that does not match the base plastic may appear bonded but separate later, and no heat repair should be your only fix for a safety-critical, load-bearing, or occupant-protection component.
Who Should Buy It?
Best For
- DIY users who regularly repair marked ABS, PP, PE, or other listed thermoplastic parts.
- Car owners working on non-structural bumper tabs, dashboard trim, splash guards, and plastic covers.
- Kayak, storage-bin, toy, and workshop owners who want rods, mesh, tips, and finishing tools in one kit.
Skip If
- You need a certified repair for a structural, load-bearing, or safety-related component.
- You cannot identify the plastic or confirm that a compatible filler rod is included.
- You want a finished cosmetic result without practice, sanding, or possible refinishing.
Heating Performance and Temperature Control
The 150W ceramic heating system is the kit’s main performance feature. GNI claims the W150 can reach the selected temperature in about 15 seconds, which is useful for short repair passes and repeated work on several small cracks.
You can set the tool from 200℃ to 600℃ (392℉ to 1112℉). The digital readout is easier to repeat than an unmarked dial, while the temperature-lock function helps prevent an accidental setting change as you move your hand around the repair.
A wide range does not mean the highest setting is best. Thin trim can warp quickly, and excessive heat can char the surface, enlarge the crack, or push material away from the joint. Start conservatively on scrap from the same material when possible, then increase heat only when the base plastic and rod are not softening together.
Kit Components and Accessories
The W150 package includes 106 rods. The listing separates them into 56 rods labeled for ABS, PP, PE, TPE, PC, PUR, and PA, plus 50 colorful rods. The larger count gives you practice material, but color alone does not identify compatibility. Match the material first, then choose the closest color if appearance matters.
The four tips cover three shapes for filling, smoothing, and more focused work. Five mesh pieces can reinforce the back of a crack, while three sandpaper pieces, five foil-tape pieces, and the metal brush support preparation and finishing. The stand gives the hot tool a safer resting point between passes.
The upgraded steel tube and six ventilation holes are intended to reduce heat transfer toward the handle. They do not make the front of the tool safe to touch, and the metal tip remains hot well after power is disconnected.
Pro Tip: Practice on the back of a damaged part or on matching scrap. Use the same rod, temperature, tip angle, and travel speed you plan to use on the visible repair, then bend the cooled test bead to check whether it separates.
Fit, Compatibility, and Repair Uses
Compatibility is more important than wattage. The included material-labeled rods cover ABS, PP, PE, TPE, PC, PUR, and PA, but the damaged part must also be weldable and correctly identified. Look for a molded material code on the back, inside, or underside of the item.
For vehicles, the kit is most appropriate for non-critical plastic parts such as tabs, trim, splash shields, dashboard pieces, and small bumper-cover cracks. Do not use a successful-looking surface bead as proof that a structural mounting point or occupant-protection part is safe.
For kayaks, tanks, bins, and outdoor equipment, consider flex, water exposure, and the direction of stress. A back-side mesh reinforcement may help spread force across a crack, but you should inspect the cooled repair before returning the item to service.
How It Performs in Real Use
For Car Bumper Tabs and Trim
The 150W output and narrow tips give you enough control for many small bumper-cover cracks and broken tabs. Mesh can reinforce the back side where appearance matters less. Remove the part when practical so heat does not reach paint, wiring, sensors, foam, or nearby trim.
For Kayaks and Outdoor Plastic Gear
The kit can fill a crack or worn area when the hull or gear material matches an included rod. Clean away dirt, wax, oil, and loose plastic first. Allow the weld to cool fully, then test it gradually on land before exposing it to water or a heavy load.
For Household Plastic Repairs
Storage bins, toy shells, tool cases, covers, and trash cans are lower-risk practice projects. The included rods and sandpaper make the W150 more useful than a bare iron for rebuilding an edge or smoothing a raised bead after it cools.
For Electronics Housings
The tool can repair an empty plastic cover or housing, but heat can damage wires, batteries, boards, adhesives, and insulation. Disconnect power, remove heat-sensitive parts when possible, and stop if the surrounding material smokes, blisters, or changes shape.
How to Use It Correctly
Clean the damaged area and remove loose, burned, painted, or contaminated plastic. Identify the base material, select a matching rod, and secure the part so the crack stays aligned without placing your hands near the tip.
Begin with a test setting on scrap or a hidden area. Tack the ends of the crack first, then move along the joint in short, steady passes. The rod and base material should soften together. Piling melted rod onto a cold surface can create a weak cap rather than a true weld.
For a wider break, reinforce the hidden side with mesh where the part design allows it. Let the repair cool without flexing it. Sand only after the plastic reaches room temperature, and avoid removing so much material that the repaired area becomes thin.
Common Mistakes to Avoid
- Using rod color instead of the material code to choose filler.
- Starting at maximum temperature on thin plastic.
- Welding over oil, paint, oxidation, or loose edges.
- Moving or testing the part before the joint has cooled.
- Repairing a safety-critical component without professional inspection.
Safety and Material Notes
The tool reaches up to 600℃, so wear eye protection and heat-resistant gloves. Set the stand on a stable, nonflammable surface, keep the cord away from the hot tip, and unplug the unit before changing tips or leaving the work area.
Heat plastic only in a well-ventilated area. Stop if you see heavy smoke, burning, or unknown coatings reacting to heat. Keep children and pets away until the welder, tips, rods, and repaired part are cool.
Do not heat a fuel container, pressurized vessel, battery case, live electrical assembly, or a part contaminated by flammable liquid. For vehicle safety parts, load-bearing outdoor gear, or repairs where failure could cause injury or water intrusion, have the part inspected or replaced by a qualified professional.
Pros and Cons
Pros
- 150W ceramic heater with a claimed 15-second warm-up.
- Digital 200℃ to 600℃ adjustment with temperature locking.
- 106 rods include several labeled plastic types plus color choices.
- Mesh, abrasives, tape, stand, brush, and four tips support a complete repair process.
- Pen-shaped handle and ventilated steel tube suit detailed DIY work.
Cons
- Repair strength depends on correct material matching, preparation, and technique.
- High heat can warp thin parts or damage nearby paint, wiring, and insulation.
- No clear manufacturer warranty term was confirmed, so current seller support should be checked before purchase.
User Experience and Customer Support
The pen-shaped body and non-slip handle are designed for controlled movement along cracks, corners, and edges. At about 0.6 kg, the kit is portable, although the cord and hot-tool stand still require a clear, stable workspace.
Beginners should expect a learning curve. A consistent result depends on tip angle, travel speed, temperature, pressure, and material identification. The digital controls make settings repeatable, but they cannot tell you which rod is correct or prevent overheating by themselves.
The accessible product information does not confirm a specific manufacturer warranty period. Review the current Amazon seller, return terms, included instructions, voltage requirements, and support details before ordering, especially if you are buying outside the product’s intended market.
Is It Worth the Price?
The GNI W150 is a value-focused kit rather than a professional plastic fabrication station. Its appeal comes from combining an adjustable 150W tool with rods, tips, reinforcement mesh, surface-prep items, and a stand.
It offers the best value when you expect to repair several compatible items and can practice before working on visible parts. A single minor cosmetic repair may be cheaper with an adhesive or replacement part, but repeated bumper-trim, bin, kayak, or workshop repairs make a reusable welder easier to justify.
It is not the best fit when the part has an unknown material, carries a critical load, protects a vehicle occupant, or must meet a certified repair standard. In those cases, replacement or professional service has more value than a low-cost DIY attempt.
How It Compares to Alternatives
A basic soldering iron may cost less, but it often lacks the W150’s temperature range, locking control, rod assortment, mesh, and repair accessories. A hot-staple gun is better at mechanically bridging some cracks, while the GNI focuses on melting, filling, and smoothing compatible plastic.
Two-part plastic epoxy can be easier for a one-time surface repair, especially when heat would damage nearby parts. The GNI makes more sense when you want a reusable kit, need to rebuild missing material, and are willing to learn rod selection and heat control.
Frequently Asked Questions
Can the GNI plastic welder repair car bumpers?
It can repair many non-structural bumper-cover cracks, tabs, and trim areas when the plastic matches an included rod. Do not rely on it alone for impact structures, sensor mounts, or other safety-related parts without professional approval.
Which plastics are included in the rod assortment?
The listing identifies ABS, PP, PE, TPE, PC, PUR, and PA among the 56 material-labeled rods, plus 50 colorful rods. Confirm the marking on your part and do not assume that a similar color means a compatible material.
Does the temperature lock matter?
Yes. It helps keep the selected setting from changing if your hand brushes the controls during a repair. You still need to watch the plastic closely because a locked setting can be too hot for a thin or unfamiliar part.
Is 150W enough for DIY plastic repair?
It is suitable for many small and medium household, kayak, toy, trim, and bumper-cover repairs. Large fabrication jobs, very thick material, and structural automotive work may require specialized equipment and professional technique.
Should you use mesh on every crack?
No. Mesh is most useful when the hidden side has room for reinforcement and the part needs support across a break. On thin, visible, or tightly fitted areas, added thickness can interfere with reassembly.
Can you use the W150 on electronics?
The listing describes soldering and electronics uses, but the tool’s heat can damage boards, batteries, insulation, and small components. Disconnect power and use a purpose-built electronics iron when the job requires fine temperature control or delicate tips.
Can you use it outdoors?
Use it outdoors only in dry conditions with safe power, ventilation, and a stable nonflammable surface. Wind can cool the joint unevenly or blow debris into softened plastic, so a sheltered work area is better.
Who should skip this plastic welder?
Skip it if you need a certified structural repair, cannot identify the plastic, or expect a factory-smooth finish without practice. It is better for controlled DIY repairs than safety-critical or professional restoration work.
The Bottom Line
The GNI W150 is recommended with caveats for DIY users who want adjustable heat, temperature locking, 106 rods, and a broad accessory kit for compatible non-critical plastic repairs. Its main limitation is the technique required: you must identify the material, prepare the joint, control the heat, and know when replacement or professional repair is safer.
Ready to Buy?
Check the latest price, seller details, voltage information, and package contents before you decide.