Disclosure: As an Amazon Associate, we earn from qualifying purchases. If you click a link on this page and make a purchase, we may receive a small commission at no extra cost to you.
Damaged railing posts can make an outdoor railing feel loose, unsafe, and expensive to repair. The No Welding Boot Repair gives you a way to restore certain 1-inch railing posts without hiring a welder or replacing the full railing section. It uses a slip-fit boot design that goes over the existing post after the damaged lower section is cut away. This review helps you decide if its sizing, installation process, and limitations match your railing repair project.
Quick Verdict
Rating: 8.2/10, Recommended with caveats
Best For: Homeowners repairing removable 1-inch railing posts that are damaged near the base.
Bottom Line: The No Welding Boot Repair is a practical repair option when your post size matches and the railing can be removed from concrete. Its main limitation is narrow compatibility, so you need to measure carefully before buying.
Key Takeaways
- The No Welding Boot Repair is made for railing post repair without welding.
- It is designed for 1” x 1” outer dimension posts and has 1 1/8” x 1 1/8” inner dimensions.
- It does not fit 1 ¼” or 1 ½” posts, so measuring is the most important step before buying.
- The rail must be removable and out of the concrete before installation.
- The base plate measures 3” x 3” and includes four 3/8” mounting holes.
- The included bolts and set screw setup help secure the repair boot once installed.
| Specification | Detail |
|---|---|
| Product Name | No Welding Boot Repair |
| Manufacturer | Anvil Welding & Fabrication LLC |
| Product Type | Railing post repair boot |
| Installation Style | Slip-fit over the existing railing post |
| Compatible Post Size | 1” x 1” outer dimension posts |
| Inner Dimensions | 1 1/8” x 1 1/8” |
| Not Compatible With | 1 ¼” or 1 ½” posts |
| Base Plate Size | 3” x 3” |
| Mounting Holes | Four 3/8” holes |
| Finish | Black paint finish |
| Included Hardware | Bolts for secure mounting |
| Best Use | Repairing damaged removable railing posts where the lower post section can be cut and reset |
What Is the No Welding Boot Repair?
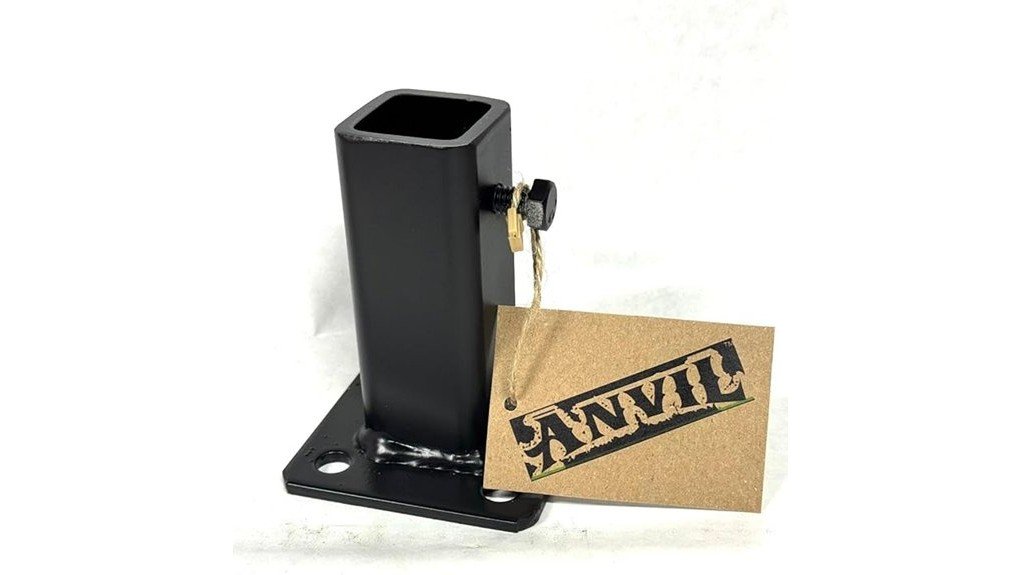
The No Welding Boot Repair is a railing post repair boot made for 1” hollow or solid posts. Instead of welding a new lower section onto the post, you cut away the damaged portion and slide the repair boot over the existing post. This makes it useful for homeowners who want a cleaner repair path than replacing a full railing run.
The product is manufactured by Anvil Welding & Fabrication LLC. The article-supported details describe a black painted finish, included bolts, set screws, and a 3” x 3” base plate with four 3/8” holes. Those details matter because the repair depends on fit, alignment, and secure mounting, not just the boot itself.
This is not a universal railing repair part. It works best when your post size, railing layout, and concrete setup match the stated requirements. If your post is larger, permanently embedded, badly bent above the repair area, or part of a code-critical railing system, you should inspect the full setup before relying on this product.
Before You Buy: Measure the outside of your post before ordering. This repair boot is made for 1” x 1” posts and is not listed as compatible with 1 ¼” or 1 ½” posts.
Who Should Buy It?
Best For
- Homeowners fixing a damaged 1” x 1” railing post near the base.
- DIY users who want a no-weld repair method for a removable railing section.
- Outdoor railing repairs where replacing the full railing would cost more than a targeted boot repair.
Skip If
- Your post measures 1 ¼”, 1 ½”, or another non-supported size.
- The rail cannot be removed from concrete for proper repair work.
- The railing has major structural damage beyond the lower post area.
Compatibility and Sizing Details
Compatibility is the biggest buying factor for this repair boot. The stated fit is for 1” x 1” outer dimension posts, with inner boot dimensions of 1 1/8” x 1 1/8”. That extra internal clearance lets the boot slide over the post, but it does not make it a flexible fit for larger railing posts.
The article states that this product does not fit 1 ¼” or 1 ½” posts. That limitation is important because many railings look similar from a distance but use different tubing sizes. You should measure the post itself, not the decorative cap, paint buildup, or a swollen damaged area.
The rail also needs to be removable and out of the concrete. The recommended measurement is 3” to 8” from the bottom horizontal bar to the cement. This gives you enough room to cut the damaged area, slide the boot into place, and secure the base plate correctly.
| Post Type | Outer Dimension | Inner Dimension |
|---|---|---|
| Compatible | 1” x 1” | 1 1/8” x 1 1/8” |
| Not Compatible | 1 ¼” or 1 ½” | N/A |
Materials, Build, and Finish
The original article describes the repair boot as a durable product made by Anvil Welding & Fabrication LLC and crafted by certified welders and blacksmiths. It also notes a black paint finish, which gives the repair a cleaner look on many outdoor railings. The finish matters because a visible base repair can stand out if it looks unfinished or mismatched.
The base plate measures 3” x 3” and includes four 3/8” holes for mounting. That plate gives the repair a defined mounting surface, while the set screws and included bolts help keep the boot secured in place. The product is also described as patent pending, which suggests the manufacturer designed it as a specific railing repair solution rather than a generic bracket.
Step-by-Step Installation Process
The installation process is straightforward, but it still requires careful prep. You first cut off the damaged section of the post, making the edge as clean and even as possible. A rough cut can affect how the boot seats and how the repaired post lines up with the rest of the railing.
Next, apply a suitable bonding agent to help improve the connection. The original article mentions epoxy and polyurethane as adhesive options, but you should follow the product instructions and choose a bonding agent that matches the railing material and outdoor exposure. Do not rely on adhesive alone if the boot also requires mechanical mounting.
After prep, slide the repair boot over the existing post and align it with the railing. Tighten the set screws for stability, then secure the boot with the provided bolts through the base plate. Check that the post is plumb and that the railing does not shift before you consider the repair complete.
Pro Tip: Measure the post at an undamaged section and confirm the bottom rail clearance before cutting. A correct first measurement can prevent a poor fit and wasted repair time.
Installation Safety Notes
Railing repairs affect safety, especially on porches, steps, balconies, and raised walkways. This product can help restore a damaged post only when the rest of the railing remains solid. If the railing is loose at multiple points, rusted through, or attached to weak concrete, repair the underlying issue before installing a boot.
You should also treat cutting and drilling as safety-sensitive work. Wear proper eye protection, gloves, and follow the instructions for your tools and bonding agent. If the railing protects a drop, supports frequent traffic, or must meet local code requirements, consider having the finished repair checked by a qualified professional.
How It Performs in Real Use
For Damaged Base Sections
This repair boot makes the most sense when the lower part of a 1” post is the main problem. In that case, you can remove the damaged section and restore the post with a fitted boot. It helps you avoid replacing the entire railing when the damage is localized.
For Outdoor Railing Repairs
The black painted finish helps the repair look cleaner in outdoor spaces. It should blend better with many dark railings than a bare metal patch. Still, outdoor exposure can be demanding, so you should inspect the repaired area over time for movement, finish wear, or fastener loosening.
For DIY Home Maintenance
The no-welding design is the main benefit for DIY users. You do not need welding equipment to install the boot, but you do need accurate measurements, safe cutting, and secure fastening. The repair is simple in concept, yet it still rewards careful work.
For Long-Term Use
Long-term performance depends on fit, surface prep, mounting quality, and the condition of the surrounding railing. A properly fitted boot can help preserve structural integrity when the rest of the railing is sound. It may not solve problems caused by widespread corrosion, cracked concrete, or poor original installation.
Common Mistakes to Avoid
- Buying before measuring: Confirm the post is 1” x 1” before ordering.
- Ignoring rail clearance: Check the 3” to 8” bottom rail clearance before cutting.
- Skipping surface prep: Clean cuts and proper bonding improve fit and stability.
- Using it on the wrong damage: This is best for lower post damage, not full railing failure.
- Assuming it replaces code review: Safety railings may need professional inspection after repair.
Pros and Cons
Pros
- No-welding installation makes the repair more accessible for DIY users.
- Designed specifically for 1” x 1” railing posts.
- 3” x 3” base plate with four 3/8” holes supports secure mounting.
- Black paint finish gives the repaired area a cleaner appearance.
- Can cost less than replacing a full railing section when the damage is localized.
Cons
- Limited to 1” x 1” posts and not listed for 1 ¼” or 1 ½” posts.
- The rail must be removable and out of the concrete.
- May not be suitable for severe railing damage or code-critical repairs without professional review.
Cost-Effectiveness and Benefits
The No Welding Boot Repair offers its best value when it helps you avoid replacing a full railing section. A targeted repair can make sense when the railing is otherwise sound and the damaged area is near the base of a compatible post. It is also useful when you want a repair method that does not require welding equipment.
The value depends on your exact setup. If your post size matches, your rail can be removed, and the damage is localized, this product can be a strong value for the price. If you need a universal bracket or a repair for larger posts, it is not the best fit.
How It Compares to Alternatives
Compared with welding a new post section, the No Welding Boot Repair is easier for many homeowners because it avoids welding equipment and on-site fabrication. Compared with replacing a full railing run, it can be more focused and less disruptive when the rest of the railing remains in good shape.
Standard post base plates or generic brackets may work for some projects, but they may not fit around a damaged railing post in the same way. This product makes the most sense if you want a purpose-built boot for a supported 1” x 1” post and you can follow the required installation steps.
Manufacturer Insights and Quality Assurance
The No Welding Boot Repair system is manufactured by Anvil Welding & Fabrication LLC. The original article describes the company as focused on quality craftsmanship and notes that the product is made by certified welders and blacksmiths. That background supports the product’s purpose as a practical railing repair part.
The design is also described as patent pending. While that does not replace correct sizing or installation, it does suggest the boot was designed for a specific repair problem. You should still confirm warranty terms, included hardware, and product details on the listing before purchase.
Frequently Asked Questions
What size post does the No Welding Boot Repair fit?
It is designed for 1” x 1” outer dimension railing posts. The listed inner dimensions are 1 1/8” x 1 1/8”, which allows the boot to slide over the compatible post size.
Will it fit 1 ¼” or 1 ½” railing posts?
No. The article-supported sizing states that it does not fit 1 ¼” or 1 ½” posts. Measure your post before ordering because railing tubing can look similar across sizes.
Does installation require welding?
No welding is required based on the product concept. The repair uses a slip-fit boot, set screws, bonding agent, and bolts to secure the repaired post area.
How long does installation usually take?
The original article estimates about 30 minutes to 1 hour. Your time may be longer if the damaged post is hard to cut, the railing is difficult to remove, or the mounting surface needs extra prep.
What bonding agent should you use?
The article mentions epoxy and polyurethane as possible adhesive types. You should choose a bonding agent that matches the railing material, outdoor exposure, and the product instructions.
Can it be used outdoors?
Yes, the article presents it as a repair solution for outdoor railing posts and notes a black paint finish. For outdoor use, inspect the repair over time for movement, loosened fasteners, or finish wear.
Is this a replacement for a full railing repair?
It can replace a full railing replacement only when the damage is limited and the rest of the railing is structurally sound. If the railing is loose, heavily rusted, or safety-critical, get professional guidance before relying on a boot repair.
Does the product include a warranty?
The original article states that warranty details are included, but it does not provide a specific duration. Check the current product listing or seller information before purchase for exact warranty terms.
The Bottom Line
The No Welding Boot Repair is worth considering if you need to repair a removable 1” x 1” railing post without welding. Its slip-fit design, 3” x 3” base plate, set screws, and included bolts make it a practical option for localized lower-post damage.
Skip it if your post size is larger, the rail cannot be removed from concrete, or the railing has broader structural damage. For the right setup, it offers a focused repair path that can save time and reduce replacement costs.