
Disclosure: As an Amazon Associate, we earn from qualifying purchases. If you click a link on this page and make a purchase, we may receive a small commission at no extra cost to you.
Cracked bumper tabs, split plastic trim, and broken headlight mounts can be expensive to replace when the damage is small. The 200W Plastic Welder is made for reinforcing damaged plastic with heated staples, so you can repair many common cracks instead of replacing the whole part. This review helps you decide if the kit has enough power, accessories, and safety practicality for your garage or repair bench. Its biggest strength is the complete staple-and-accessory package, while the main limitation is that you still need to confirm the plastic type and use the tool with care.
Quick Verdict
Rating: 8.2/10, Recommended with caveats
Best For: DIY car owners, body-shop users, and repair-focused buyers who need a hot-staple kit for plastic cracks.
Bottom Line: The 200W Plastic Welder gives you fast heating, multiple staple shapes, and a large 2,000-piece staple supply for common plastic repairs. It is not a universal fix for every plastic part, so you should check material compatibility and practice on scrap plastic before working on a visible piece.
| Specification | Detail |
|---|---|
| Product name | 200W Plastic Welder |
| Product type | Hot-staple plastic repair welder kit |
| Power | 200W |
| Stated heating temperature | Up to 450°C, according to the provided article |
| Included staple quantity | 2,000 staples |
| Staple shapes mentioned | Outside corner, inside corner, flat, and wave staples |
| Staple size range mentioned | 0.02 to 0.03 inches |
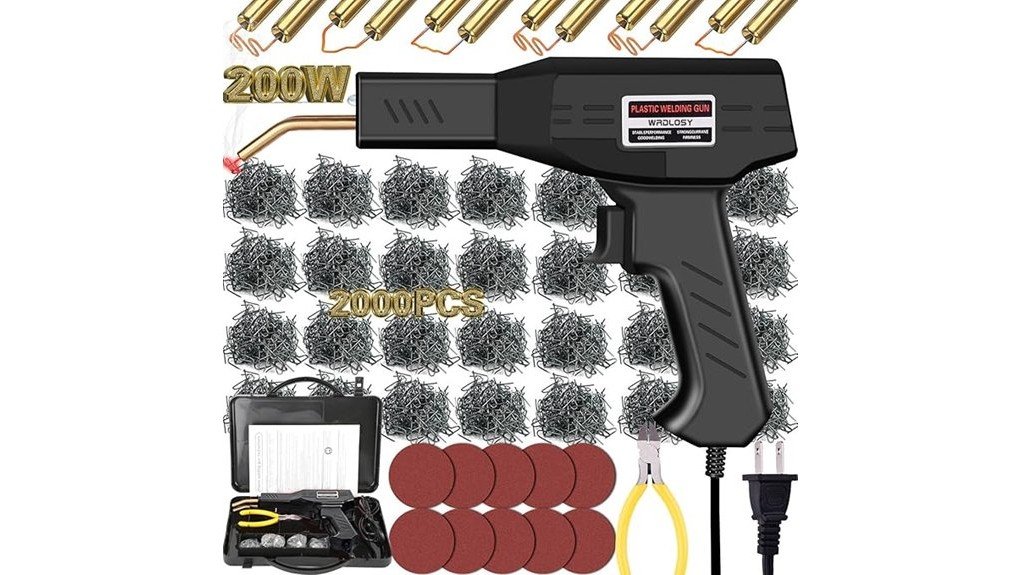
| Included accessories | 10 pieces of sandpaper, plier, staples, and custom carry case |
| Best use | Automotive interior plastic, bumper restorations, headlight repairs, and general plastic crack reinforcement |
| Safety note | Use gloves and eye protection, keep flammable materials away, and work in a ventilated area. |
What Is the 200W Plastic Welder?
The 200W Plastic Welder is a plastic repair kit that uses heated staples to reinforce cracked or damaged plastic. Instead of relying only on glue or surface filler, the tool heats a staple so it can sink into the damaged area and bridge the crack from inside the plastic.
The kit is aimed at buyers who repair automotive plastics, including interior trim pieces, bumper tabs, bumper covers, and headlight mounting areas. The included staple shapes give you options for straight cracks, corners, curves, and wider repair lines.
The package also includes 10 pieces of sandpaper, a plier, and a custom carry case. That matters because plastic repair usually needs more than the welder alone: you often need to prepare the surface, embed the staple, trim the excess metal, and smooth the area before any cosmetic finishing.
Before You Buy: The provided article does not confirm a brand, model number, warranty, dimensions, or certification details. Check the current Amazon listing carefully before you buy, and do not assume it works on every plastic type.
Who Should Buy It?
Best For
- DIY car owners repairing cracked plastic trim, bumper tabs, or light housings.
- Garage users who want a kit with multiple staple shapes and a large staple supply.
- Repair-focused buyers who already understand basic sanding, trimming, and surface prep.
Skip If
- You need a verified brand name, warranty term, or certification before buying.
- You want a cosmetic finishing tool that removes all sanding, filling, or painting work.
- You are repairing load-bearing or safety-critical parts that should be handled by a professional.
Key Features and Specifications
The main selling point is the 200W output. For a hot-staple repair tool, power affects how quickly the staple heats and how efficiently you can work through several cracks or tabs during one repair session. The article states that the welder heats almost instantly and can reach up to 450°C, which supports faster staple placement when the tool is used correctly.
The 2,000-piece staple count gives the kit strong practical value. Plastic cracks vary by shape, so having outside corner, inside corner, flat, and wave staples helps you match the staple to the repair instead of forcing one staple style into every job.
The included sandpaper and plier also make the kit more useful out of the box. Sandpaper helps prepare or clean the repair area, while the plier helps with staple handling and trimming after the staple has cooled.
Performance and Heating
In use, the 200W power rating is the detail that makes this kit feel more repair-focused than basic low-power tools. Quick heating helps you place staples without long pauses between cracks, which is useful on bumper covers or larger plastic panels with several damaged points.
Good performance still depends on your technique. Too little heat may leave the staple sitting too shallow, while too much pressure can push the staple too far or deform thin plastic. The goal is to embed the staple enough to reinforce the crack, then let the area cool before trimming and finishing.
Staple Types and Repair Compatibility
The included staple shapes are useful because cracks do not all run in straight lines. Flat staples are often the easiest choice for straight cracks, while wave staples can help across longer uneven splits. Corner staples are better suited to broken tabs, angled joints, and plastic edges where a straight staple may not sit well.
The article mentions staple sizes from 0.02 to 0.03 inches. That range gives you options for different repair needs, but it does not remove the need to test fit. Thin, brittle, painted, or highly visible plastics may need extra care because heat and pressure can leave marks if you rush the repair.
Ease of Use and Control
The kit is designed to make plastic repair approachable, especially for common automotive repairs. A hot-staple tool does not require complex setup, but it does require steady hands and careful placement. Marking the crack line before you start can help you keep the repair neat.
Control matters most when you are working near edges, curves, or mounting tabs. The best results come from applying the staple across the crack, waiting for the plastic to soften enough to accept it, then releasing pressure before the surface overheats.
Pro Tip: Practice on scrap plastic before repairing a visible bumper or trim piece. It helps you learn how quickly the staple heats and how much pressure the plastic can handle.
Accessories, Storage, and Package Value
The included 2,000 staples are the biggest package advantage. If you plan to repair more than one plastic part, a large staple supply reduces the chance that you run out in the middle of a project.
The 10 pieces of sandpaper add value because surface preparation affects the final repair. A reinforced crack may still need sanding before paint, filler, or trim reinstallation. The plier also supports the finishing stage because staple ends usually need to be clipped or bent after cooling.
The custom carry case is useful if you keep tools in a garage, service vehicle, or shared workspace. It helps keep the staples separated from other small parts and makes the kit easier to store between repairs.
How It Performs in Real Use
For Bumper Restorations
For bumper cracks and broken tabs, the 200W Plastic Welder makes the most sense as a reinforcement tool. It can help hold damaged plastic together before you sand, fill, or refinish the surface. It will not make the exterior look new by itself, so expect extra finishing work if appearance matters.
For Automotive Interior Fixes
Interior plastic trim often has small tabs, clips, and thin edges. The corner staple options can be helpful here, but you need lighter pressure and careful heat control. Test a hidden area first when the surface is visible or textured.
For Headlight and Mounting Repairs
Headlight housings and mounting points can crack from age, vibration, or impact. A hot-staple repair can add strength across the crack, but fit still matters. If the part controls aiming, sealing, or safety, inspect the repair carefully or ask a professional to check it.
For Home and Workshop Plastic Repairs
The kit can also be useful for general plastic items around a workshop, as long as the plastic can handle heat and the repair is not safety critical. It is better for structural reinforcement than for a perfect cosmetic surface.
How to Use It Correctly
Start by cleaning the damaged area and choosing a staple shape that matches the crack. Hold the plastic in its correct position before heating the staple, because alignment becomes harder once the staple is embedded.
Place the staple across the crack, apply steady pressure, and stop once the staple sits securely in the plastic. Let the area cool fully before trimming the staple ends with the plier. After that, use sandpaper as needed to smooth the repair area.
Do not rush visible repairs. For bumpers, trim, and headlight areas, a stronger repair often comes from several carefully spaced staples rather than one deep staple forced into the plastic.
Safety and Material Notes
This tool uses heat, so basic safety steps matter. Wear gloves and eye protection, keep flammable materials away from the work area, and use the welder in a ventilated space. Heated plastic can create unpleasant fumes, especially if the plastic type is unknown or dirty.
You should also confirm that the plastic part is suitable for hot-staple repair. Some plastics may melt poorly, deform quickly, or need another repair method. For expensive automotive parts, painted surfaces, or safety-related components, professional guidance is the safer choice.
Let the tool and repaired area cool before storing the kit in the carry case. Keep staples and hot parts away from children, pets, upholstery, and loose shop materials.
Pros and Cons
Pros
- 200W output supports quick staple heating for common plastic repairs.
- 2,000 included staples give you a large supply for multiple projects.
- Outside corner, inside corner, flat, and wave staples cover different crack shapes.
- Sandpaper, plier, and carry case make the package more complete.
- Useful for automotive interiors, bumper restorations, and headlight repair areas.
Cons
- Brand, model number, dimensions, and warranty were not confirmed in the provided article.
- Requires practice and careful heat control to avoid plastic deformation.
- Not ideal for every plastic type or for safety-critical repairs.
Is It Worth the Price?
The 200W Plastic Welder looks like a strong value for the price if you need a full starter kit instead of only the heating tool. The 2,000 staples, sandpaper, plier, and carry case make it more useful for buyers who want to begin repairs without buying every small accessory separately.
It is worth considering if your main goal is reinforcing cracked plastic on bumpers, trim, headlight areas, or similar repair projects. The best value comes from repeated use, especially if you have several automotive plastic repairs planned.
It is not the best fit if you need verified brand documentation, a known warranty term, or a professional cosmetic finish with no extra sanding or refinishing. The tool can reinforce cracks, but it does not replace careful prep work.
How It Compares to Alternatives
Compared with plastic repair epoxy, a hot-staple welder can add internal reinforcement across a crack instead of relying only on surface bonding. Epoxy may still be useful for cosmetic filling, but it does not give you the same embedded staple support.
Compared with a hot-air plastic welding kit, this style of tool is simpler for many crack repairs because you work with staples rather than filler rod and airflow control. A hot-air kit may be better for larger surface welding jobs, while the 200W Plastic Welder makes more sense for tabs, cracks, corners, and quick reinforcement work.
Frequently Asked Questions
Can the 200W Plastic Welder be used on all types of plastics?
No. The article says it works with various plastics, but you should still confirm the material before using heat. Some plastics can deform, melt unevenly, or need a different repair method.
What comes in the package?
The article lists the welder, 2,000 staples, 10 pieces of sandpaper, a plier, and a custom carry case. Check the current seller listing before ordering because package contents can vary by seller or listing update.
How hot does it get?
The provided article states that the tool heats up to 450°C. That level of heat can help embed staples quickly, but it also means you need gloves, eye protection, and careful pressure control.
Which staple type should you use?
Use flat staples for simple straight cracks, wave staples for uneven cracks, and corner staples for tabs, edges, and angled damage. The best choice depends on the crack shape and the thickness of the plastic.
Is it good for bumper repair?
Yes, it can be useful for bumper cracks, tabs, and plastic reinforcement. For a clean exterior finish, you may still need sanding, filler, primer, or paint after the staple repair.
Are replacement staples available separately?
The original article says replacement staples are available separately. Before buying replacements, match the staple shape and size to your welder and your repair type.
What safety precautions should you take?
Wear gloves and goggles, clear flammable materials from the area, and work with ventilation. Let the staple and plastic cool before trimming or touching the repair.
Who should skip this plastic welder?
Skip it if you need a confirmed brand, verified warranty, or a repair method for structural safety parts. You should also skip it if you are not comfortable using a high-heat tool near painted or visible plastic.
The Bottom Line
The 200W Plastic Welder is a good fit if you want a hot-staple kit for reinforcing cracked automotive plastic, bumper tabs, trim, and headlight repair areas. Its strongest advantages are the 200W output, 2,000 included staples, and multiple staple shapes, but the lack of verified brand and warranty details means you should check the current listing before buying. Skip it for safety-critical repairs or plastics you cannot identify.


