Scrap metal can become one of the most useful tools on your bench. With basic welding skills, careful layout, and a few common workshop tools, you can turn known, clean mild-steel leftovers into a compact right-angle fixture for holding parts during tack welding.
This guide shows you how to inspect the scrap, cut and fit the pieces, weld the frame, drill mounting holes, test the finished tool, and adapt the same method for simple clamps, stops, and light forming aids.
Quick Answer
Turn usable mild-steel scrap into a right-angle welding fixture by inspecting and cleaning the metal, cutting a flat base and two fence pieces, clamping them at 90 degrees, tack welding, checking square, finishing the welds in short alternating runs, drilling mounting holes, and testing the fixture with light clamping force.

Key Takeaways
- Use known, weldable mild steel that is free of deep rust, cracks, oil, unknown coatings, and hidden contamination.
- Never weld a sealed tube, tank, drum, cylinder, or container that has held a flammable or toxic material.
- Tack first, check the 90-degree layout, and alternate short welds to limit distortion.
- Use ventilation or local fume extraction; a generic dust mask is not a substitute for controlling welding fumes.
- Treat a homemade fixture as an unrated, light-duty tool and stop using it if any weld, plate, bolt, or mounting point bends, cracks, or loosens.
At a Glance
| Time Required | About 2 to 4 hours, including layout, cutting, welding, drilling, cleanup, and a cautious test |
| Difficulty | Beginner to intermediate; practice on matching scrap before welding the fixture |
| Tools Needed | Welder, angle grinder, drill or drill press, square, clamps, marker or scribe, wire brush, and PPE |
| Cost | Low when suitable scrap is already available; expect to use abrasives, welding consumables, fasteners, and a rust-resistant finish |
Choose a Safe, Simple Scrap-Metal Project
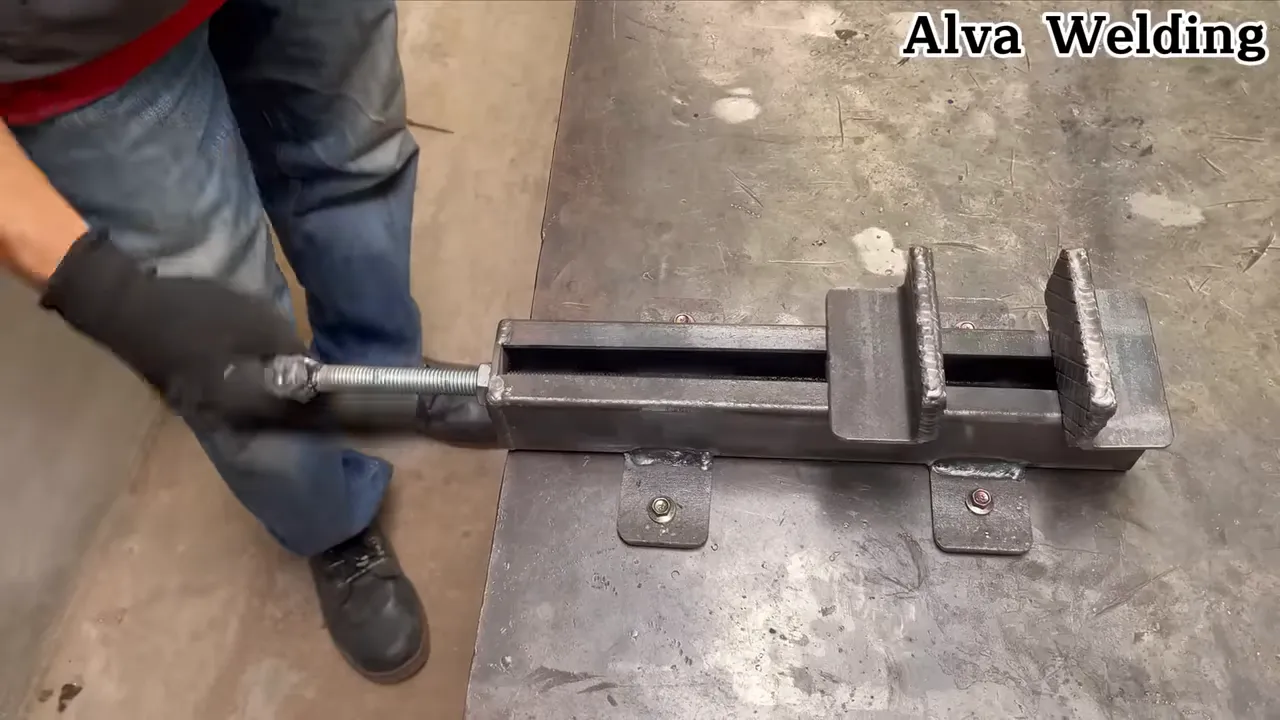
Build around one clear job. The example in this guide is a bench-mounted right-angle welding fixture: a flat base with two short steel fences set at 90 degrees. You secure workpieces against the fences with separate C-clamps or locking pliers while you tack them together.
This design is easier to inspect than a homemade vise or press because it has no high-force screw, spring, or hidden moving joint. You can later adapt the same workflow to make a bench stop, light-duty clamp, bending aid, or welding jig, but each added function needs its own material, joint, and load review.
Note: This project is an unrated positioning fixture, not a lifting device, vehicle-support tool, pressure tool, structural connection, or substitute for an engineered vise.
🧰 Materials and Tools You Will Need
You need strong scrap, basic welding gear, and tools that help you measure, cut, clamp, and finish the metal. Pick pieces that already sit close to the final shape so you can reduce cutting and welding time.
Example Cut List
The dimensions below make a compact fixture. They are a practical example, not a rated engineering design, so adjust them only after checking the condition and thickness of your material.
- Base: one flat mild-steel plate, about 8 × 8 × 1/4 inch.
- Fences: two pieces of mild-steel angle, about 1-1/2 × 1-1/2 × 1/8 inch and 6 inches long.
- Mounting hardware: four bolts, flat washers, and locknuts sized for your bench and the holes you drill.
- Optional clamp tabs: two small pieces of 1/4-inch plate if you want extra C-clamp contact points.
Tools and Consumables
- Scrap metal: known mild-steel plate, angle iron, square tubing, or other solid steel pieces in sound condition.
- Welder: a properly set up gas metal arc welder (GMAW/MIG), flux-cored welder, or stick welder suited to the metal thickness.
- Angle grinder: use the correct guarded cutting, grinding, or flap disc, and never exceed the wheel’s marked maximum speed.
- Drill: use a hand drill or drill press with a suitable metal-cutting bit for mounting holes and optional pivot holes.
- Clamps, vise, and magnets: hold parts securely while you measure and tack. Do not rely on a magnet alone when a clamp can prevent movement.
- Measuring and marking tools: use a square, tape measure, center punch, and scribe or permanent marker.
- Welding consumables: filler wire or electrodes that match your process and the known base metal.
- Safety gear: wear safety glasses under a welding helmet, welding gloves, hearing protection, flame-resistant clothing, and appropriate footwear. Use ventilation or local exhaust; use respiratory protection only when it is selected for the hazard and worn correctly.
Warning: Do not heat unknown coated, painted, galvanized, plated, oily, or contaminated scrap. Zinc-bearing coatings can produce zinc oxide fume, and old coatings may contain other hazardous metals. Do not weld or cut any sealed tube, drum, tank, cylinder, or container that has held a flammable or toxic substance. Use known clean material instead. See OSHA’s welding requirements and the NIOSH zinc oxide guide.

How to Inspect Scrap Metal Before Welding
Known mild steel is the safest starting point for this project. A magnet can help you screen for ferrous metal, but it cannot prove the alloy, coating, heat treatment, or weldability. Use material whose source and prior use you understand.
- Reject cracked or deeply pitted pieces: surface rust can often be cleaned, but deep corrosion and thinning reduce the usable section.
- Avoid cast, hardened, or spring steel of unknown grade: these materials may crack or require special preheat, filler, and cooling procedures.
- Check for coatings: look for zinc spangle, chrome plating, paint layers, powder coating, undercoating, or chemical residue.
- Inspect tubing and containers: verify that hollow stock is open and clean. Never assume an old container is safe because it appears empty.
- Check straightness: a twisted base or bent fence makes it difficult to build an accurate fixture.
Before You Begin
Set up a clean, stable work area before you cut or weld. Keep flammable items away from sparks, and make sure your scrap has no oil, paint, plastic, solvent, or heavy coating near the weld zone.
Plan the tool around one main job. A simple clamp, small bending aid, or welding fixture works better than a tool that tries to do too many things at once.
Pre-Work Safety Check
- Move combustible material away from the hot-work area or shield anything that cannot be moved.
- Keep suitable fire-extinguishing equipment ready and inspect both sides of nearby walls, floors, or partitions for hidden fire paths.
- Provide enough ventilation to keep fumes out of your breathing zone. Put local exhaust close enough to capture fume without disturbing shielding gas.
- Inspect the grinder, guard, side handle, cord, disc, and speed rating before use.
- Clamp the work securely before cutting, grinding, or drilling.
- Keep bystanders behind a welding screen and away from sparks, arc radiation, and flying particles.
OSHA’s hot-work fire-prevention requirements call for moving or protecting fire hazards and keeping suitable extinguishing equipment ready. OSHA’s portable-tool rules also require appropriate guards on portable abrasive-wheel tools.
🔧 Step-by-Step Build for a Simple Scrap Metal Tool
Use this workflow to turn leftover steel into a strong, practical right-angle fixture. Keep the design simple so you can adjust it to the known material you already have.
Estimated time: About 2 to 4 hours for layout, cutting, drilling, welding, cleanup, and a cautious test. Your time will vary with material condition, tool setup, and experience.
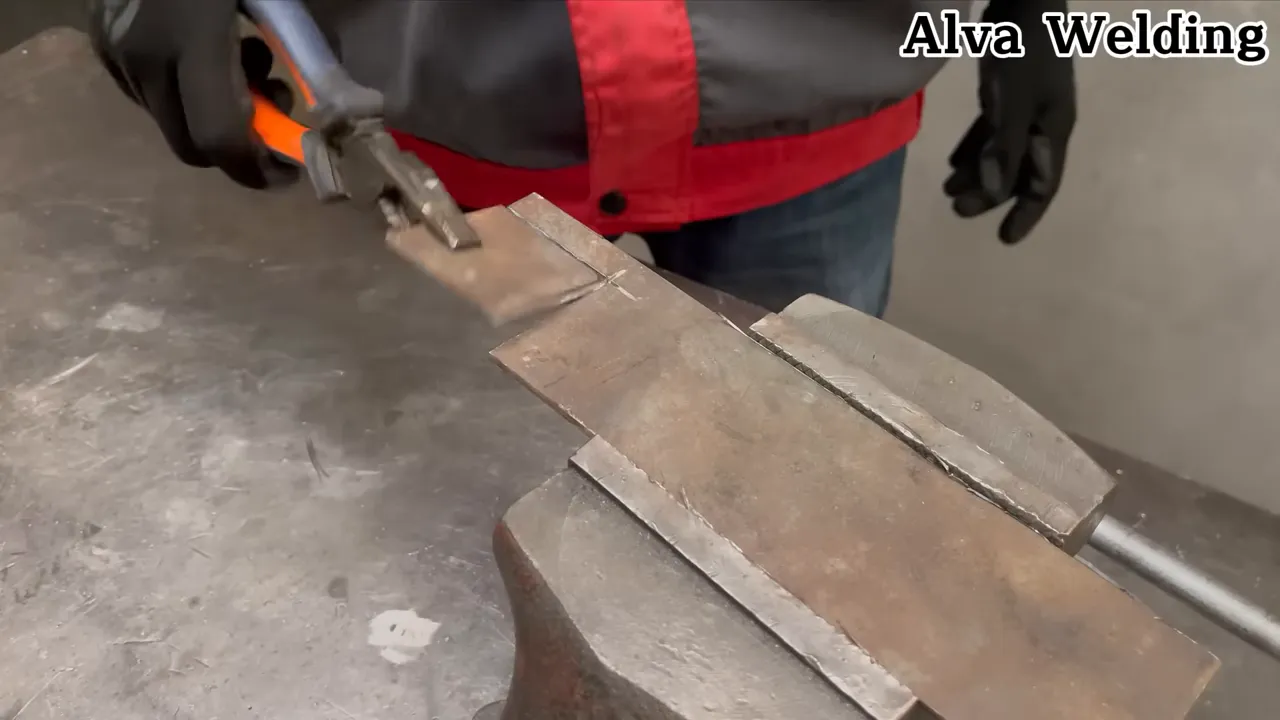
- Design and measure: Mark an 8-inch-square base and two 6-inch fence pieces, or scale the design to fit your projects. Draw the fence locations before cutting and leave room for C-clamps and mounting bolts.
- Cut and prep: Cut the scrap to rough size with the grinder or another suitable metal-cutting tool. Grind burrs and clean excessive mill scale, rust, moisture, paint, and grease from the weld zones. Clean base metal helps reduce defects such as porosity; see Miller’s electrode-selection guidance.
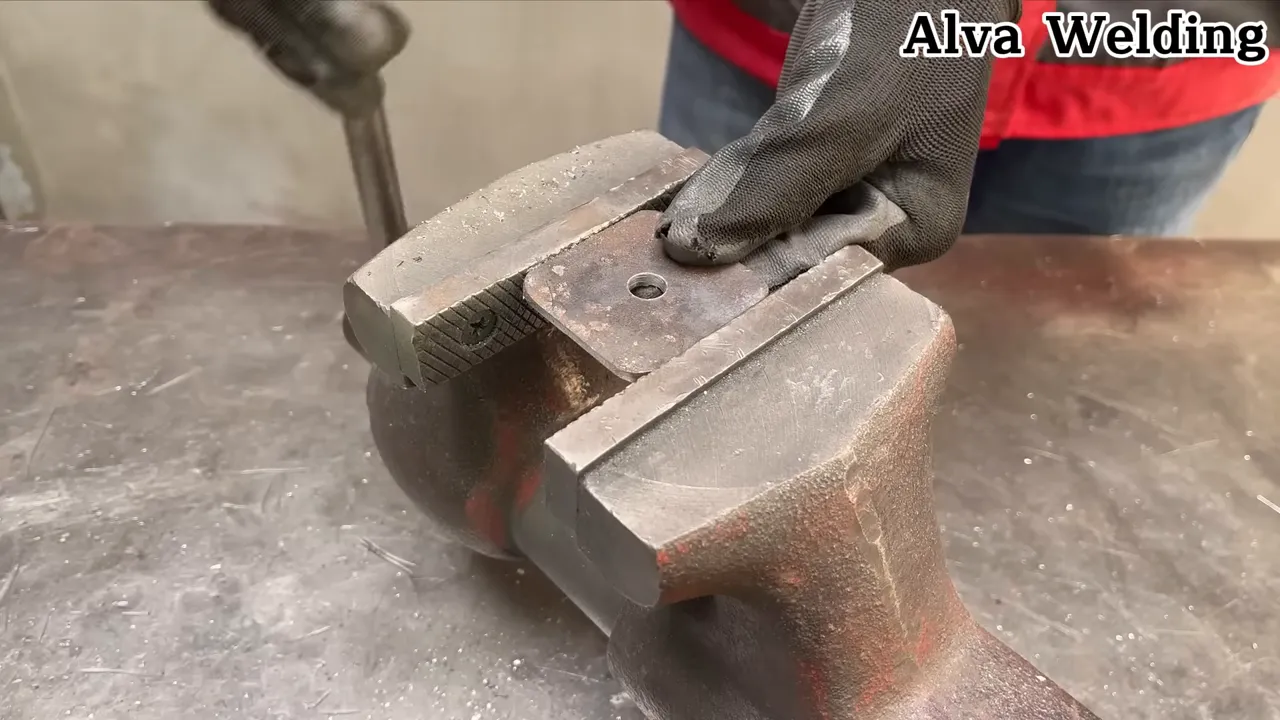
- Lay out the mounting holes: Mark four holes near the base corners while leaving enough metal around each hole for the bolt washer. Center-punch the marks so the drill bit starts accurately.
- Fit and clamp: Place the two angle-iron fences on the base so their working faces meet at 90 degrees. Leave a small corner relief if needed so workpieces do not sit on a weld bead. Clamp both fences and check the inside angle with a reliable square.
- Tack weld the frame: Add small tacks at separated points rather than welding one fence fully at once. Recheck the angle after each tack and correct any movement before adding more weld.
- Finish the welds: Use settings and filler recommended for your welder, process, joint, and material thickness. Weld in short, alternating runs to limit heat buildup. Do not add extra passes merely to make the weld look larger; sound joint preparation and correct settings matter more than bead size.
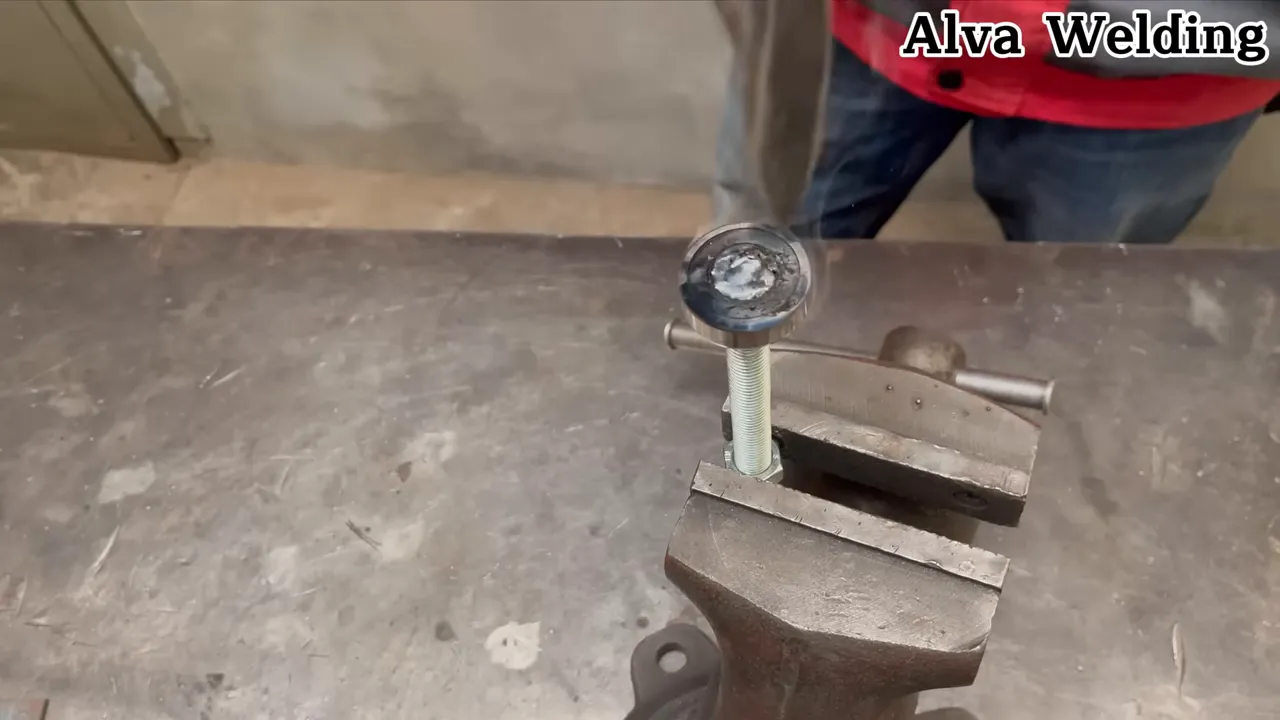
- Drill and assemble: Let the work cool, then drill the mounting holes with the plate clamped securely. Deburr both sides. Add bolts, flat washers, and locknuts when mounting the fixture. For later projects, bolts, pins, threaded rods, or welded nuts can provide adjustment, but moving parts require extra alignment and load checks.
- Deburr and finish: Smooth sharp edges, remove loose spatter, and inspect the weld toes and heat-affected area. After the fixture is cool and clean, apply a suitable metal primer and finish or a light protective oil to exposed steel. Keep paint off grounding and clamping faces.
- Check accuracy: Place two straight test pieces against the fences and verify the inside angle. If the fixture pulled out of square, cut or grind only the problem weld, realign the fence, tack it again, and recheck before rewelding.
- Test the tool: Mount the fixture to a sturdy bench and apply only light clamp pressure at first. Increase pressure slowly while watching for cracking, bending, rocking, loose hardware, or movement at the welds.
When you build from scrap, close fit-up and accurate alignment are essential, but they do not replace sound welds. Tight, square parts plus correct settings, adequate fusion, and careful inspection help the finished tool stay reliable.
Practical Build Notes
- If you need a heavy jaw or fence surface, weld on sound flat stock of known grade instead of relying on thin or deeply rusted scrap.
- Alternate tack and weld locations to reduce warping on long seams. A heavy backing plate can absorb some heat, but it does not correct poor sequencing.
- Use threaded inserts or welded nuts when you want more adjustment than rivets allow, but keep threads protected from weld spatter and verify that the screw runs freely before final welding.
- Make practice welds on offcuts of the same material and thickness before welding the actual fixture.
Pro Tip: Tack the tool together, test the fit with real workpieces, and measure the angle again. Finish weld only after every contact face and clamp location works as planned.
🛠️ Tips, Tricks, and Safety Reminders
Small details can make the tool safer, stronger, and easier to use. Focus on known clean metal, stable clamps, guarded tools, fume control, and careful heat management.
- Clean weld surfaces: grind or brush down to sound bare metal where you plan to weld, while controlling the dust created during cleaning.
- Tack strategically: keep parts aligned, measure after each group of tacks, and re-tack if something shifts.
- Control heat: weld in short sections and alternate sides to reduce distortion.
- Use the grinder correctly: keep the guard and side handle installed, match the disc to the task, and keep your body out of the wheel’s plane.
- Wear protection: protect your eyes, lungs, ears, hands, feet, and skin from sparks, dust, fumes, ultraviolet radiation, and noise.
- Control fumes at the source: position ventilation so fumes move away from your face. Do not place your head directly over the plume.
- Test incrementally: load-test the tool lightly before increasing clamp force, and never use an unrated homemade fixture for safety-critical work.
Scrap can hide coatings, grease, or old repairs. Clean each piece well, but remember that grinding a hazardous coating can create contaminated dust. If you cannot identify the coating or previous service, reject the piece rather than trying to make it safe by guesswork. OSHA notes that welding can produce hazardous fumes and gases and requires adequate ventilation in applicable workplaces; see 29 CFR 1910.252.
⚙️ How to Test and Use the Finished Tool
After assembly, test the new tool on the same type of light positioning task you plan to do later. Start by holding two small practice pieces at 90 degrees before you trust the fixture with larger work.
The best design depends on your usual projects. Shape the contact faces, holes, and mounting points around the jobs you repeat most often, but do not assume a thicker-looking weld gives the tool a known capacity.
- Set the fixture on a flat bench and check that the base does not rock.
- Install all mounting bolts with washers and tighten them evenly.
- Inspect for visible cracks, undercut, incomplete attachment, bent plates, or loose hardware.
- Clamp two light test pieces against the fences and confirm that the fixture stays square.
- Increase clamp pressure gradually. Stop immediately if the base lifts, the fences spread, a weld cracks, or the hardware shifts.
- Reinspect after the first few uses and after any impact, overload, or repair.
Ways to Adapt the Basic Design
- Bench clamp: add a properly aligned commercial clamp screw or threaded mechanism and bolt the assembly to a workbench. Treat it as light-duty unless a qualified designer establishes a safe capacity.
- Weld fixture: use the two fences to hold odd shapes square while you tack or weld them.
- Forming aid: use a sound, ductile steel edge for light bending or flattening only. Do not hammer unknown cast, hardened, cracked, or plated scrap.
Don’t throw away your scrap metal—but do reject any piece whose alloy, coating, condition, or previous use makes it unsafe to heat or load.
Warning: Never use this homemade tool for overhead lifting, supporting a vehicle or person, compressing springs, restraining pressurized parts, or any task where sudden failure could cause serious injury.
Troubleshooting a Scrap-Metal Welding Fixture
- The corner is no longer square: heat distortion likely moved a fence. Stop, identify the pulling weld, cut or grind only that weld as needed, realign, tack, and recheck before finishing.
- The base rocks: the plate may have been warped before the build or pulled during welding. Check it on a known flat surface and correct the layout before mounting.
- The weld has pinholes or porosity: stop and check for contamination, moisture, poor shielding gas coverage, wind, or incorrect settings. Remove the defective weld to sound metal before repairing it.
- The mounting bolt loosens: verify the bench is sound, use flat washers and suitable locking hardware, and replace stretched or damaged fasteners.
- A fence bends under clamp pressure: the section is too weak, the clamp is too far from support, or the force is excessive. Stop using the tool; do not simply add more weld to a bent member.
- The drill bit wanders: center-punch the mark, clamp the plate firmly, start at an appropriate speed, and use a pilot hole when suitable for the final hole size.
Common Mistakes to Avoid
A weak scrap-built tool often fails because the material selection, layout, fit, or testing stage gets rushed. Slow down before final welding, and fix small problems while they still take only a few minutes.
- Using thin scrap for high-pressure areas: add thicker known steel where the tool will clamp or press, or reduce the intended force.
- Welding over dirty metal: clean the weld zone before you strike an arc, and reject unknown coatings instead of spreading hazardous dust.
- Skipping alignment checks: check square after tacking and before final welds.
- Guessing welder settings: start with the machine chart or manufacturer guidance, then verify on matching scrap.
- Removing the grinder guard: use the correct guarded tool and wheel for the cut rather than modifying the guard to fit an unsafe setup.
- Welding sealed or previously used containers: an apparently empty vessel can retain hazardous vapor or pressure.
- Testing too hard too soon: start with a light load and increase pressure slowly while standing out of the likely failure path.
- Treating the fixture as rated equipment: a successful light test does not establish a safe working load.
Sources
- OSHA 29 CFR 1910.252: General Welding Requirements — ventilation, fume warnings, PPE, and precautions for hollow spaces and containers.
- OSHA 29 CFR 1926.352: Fire Prevention — removing or protecting fire hazards, keeping extinguishing equipment ready, and cleaning or testing used containers.
- OSHA 29 CFR 1926.353: Ventilation and Protection — controls for welding metals or coatings containing zinc, lead, cadmium, or chromium.
- OSHA 29 CFR 1910.243: Guarding Portable Powered Tools — abrasive-wheel guards, inspection, and maximum wheel-speed checks.
- NIOSH Pocket Guide: Zinc Oxide — inhalation hazards and symptoms associated with zinc oxide fume.
- Miller: Factors for Selecting the Right Stick Electrode — base-metal cleaning and filler selection considerations.
❓Frequently Asked Questions
What kinds of scrap metal are best for making a shop tool?
Known mild-steel plate, angle iron, and tubing in sound condition are good choices because they are widely weldable with common shop processes. Avoid deeply rusted, cracked, cast, hardened, plated, coated, or contaminated pieces unless the material and required procedure are positively identified.
How long does it typically take to build a simple tool from scrap?
A basic right-angle fixture may take about 2 to 4 hours when the material is already suitable. Heavy rust removal, difficult cuts, inaccurate scrap, unfamiliar equipment, or added moving parts can extend the project across several work sessions.
Do I need advanced welding skills to do this?
No, but you should be able to set up your welder, make sound tack welds, recognize obvious defects, and control heat on material of the same type and thickness. Practice on matching offcuts first. Gas metal arc welding (GMAW/MIG), flux-cored welding, or stick welding can work when the process and filler suit the steel.
Can I make similar tools without welding?
Yes. Bolts, clamps, brackets, threaded connectors, and slotted plates can assemble many light-duty fixtures. Mechanical fasteners also make parts replaceable and adjustable, but the holes, fasteners, and base still need enough strength for the intended use.
How do I maintain a tool made from scrap metal?
Keep the tool dry, clean moving parts, and apply light oil where appropriate. Remove weld spatter from contact faces, tighten mounting hardware, and inspect for cracks, bending, and corrosion before use. Touch up the finish after cleaning the surface, but keep paint away from grounding and clamping faces.
How do I know if my homemade tool is strong enough?
Visual inspection and a light test can reveal obvious problems, but they do not establish a rated capacity. Start with low force and stop if you see cracks, bending, loose hardware, rocking, or movement in the frame. Use engineered, rated equipment for lifting, vehicle support, spring compression, pressure work, or other safety-critical jobs.
Can I weld galvanized scrap after grinding off the coating?
For a small home-shop fixture, the safer choice is uncoated mild steel. Grinding zinc creates dust, and heating remaining zinc can create zinc oxide fume. Work involving galvanized or otherwise coated metal requires material identification, effective exposure controls, suitable PPE, and proper cleanup; do not rely on a generic mask or an open door.
What should I do if a weld cracks during testing?
Stop using the tool and release the load safely. Do not weld over the crack. Determine whether the cause is poor fusion, contamination, a brittle or unknown base metal, bad joint design, or excessive force. Remove the defect to sound material and repair only when the material and procedure are understood; otherwise replace the part.
Safety Disclaimer: This article is for informational purposes only and does not replace professional welding, fabrication, industrial-hygiene, engineering, or workplace-safety advice. Use proper protective gear, follow your tool and consumable manuals, comply with applicable rules, and ask a qualified professional for help if you are unsure about a material, coating, weld, ventilation method, or load-bearing design.
📌 Final Thoughts
Scrap metal can become useful shop gear when you design around known material, sound fit-up, controlled heat, accurate alignment, and cautious testing. Start with a simple right-angle fixture, then improve the design only after you understand how each piece of steel and each weld behaves.
Your next step is to sort your scrap pile and choose one strong, clean, identifiable mild-steel piece for the base. Once you finish your first tool, you can build custom fixtures and jigs that match the way you work—without treating homemade equipment as stronger or safer than you can verify.