Grind the weld flush with 80- then 180-grit, keeping the panel flat and cool. Clean off grease, rust, and residue, then seal the bare steel with epoxy primer. Apply body filler only to low spots, block sand it smooth, and spray high-build primer. Guide-coat and sand again until the surface is level. Clean the panel, then paint in light overlapping coats to blend the repair cleanly and protect it long term.
Grind the Weld Flush
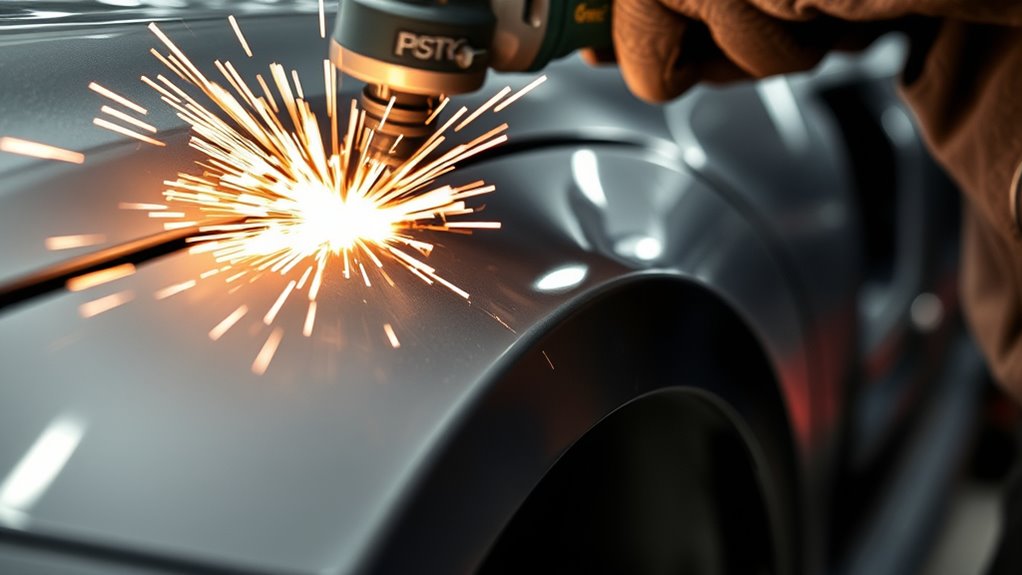
Start by grinding the weld flush with a flap disc or grinding wheel so it sits even with the surrounding metal and doesn’t leave high spots that can telegraph through the paint.
You should grind the weld flush in controlled passes, letting the disc do the work instead of forcing it.
Begin around 80 grit to knock down excess bead, then step to 180 grit to refine the surface.
Start with 80 grit to level the bead, then finish with 180 grit for a smoother surface.
Keep your hand steady and move evenly across the repair so you don’t dish the panel.
Heat is the enemy here; work in short bursts and pause often so the metal can cool and keep its shape.
After each pass, inspect the area for ridges, pits, or crown left behind.
If you spot a flaw, re-grind it until the surface reads flat.
This careful prep gives you a clean foundation for the next stage and helps you reclaim a smooth, disciplined finish. Additionally, ensuring the metal is clean and free of contaminants, as highlighted in flux core welding, is crucial for achieving the best results.
Strip Grease, Rust, and Primer
Before you paint, remove all grease with a proper degreaser so the coating can bond correctly. Strip any rust and existing primer from the weld zone and replacement panel using sanding, paint stripper, pressure washing, or a rust treatment if needed. Once the surface is clean, you can key it with a flap disc and prep it for primer. Additionally, ensure that all contaminants are removed to prevent porosity in welds, which can compromise the quality of your finish.
Remove Grease Thoroughly
Strip all grease, rust, and old primer from the weld area before any coating goes on.
You need to remove grease thoroughly with a quality degreaser, then wipe the surface with Prepsol or a similar solvent. Make sure you get into seams, edges, and heat-affected zones where factory oils hide.
Don’t leave any residue; even a thin film can break adhesion and let moisture creep in. Use clean, lint-free towels and change them often so you’re not dragging contamination back onto the panel.
If the weld sits under old coating, strip it now and leave only sound metal.
Once the surface is clean and dry, you’re free to move to the next prep step with confidence.
Strip Rust And Primer
Take off every trace of rust and old primer with a mix of paint stripper, sanding, and pressure washing so you’re working from clean, sound metal.
To strip rust and primer properly, attack the weld zone until no loose coating remains. Use a degreaser first if factory grease is still present, then rinse and dry the panel completely.
A flap disc can key the surrounding area, leaving a uniform scratch that helps the new primer lock in. Don’t leave islands of old primer under the repair; they’ll weaken adhesion and trap corrosion.
Once the surface is bare and textured, apply zinc-rich weld-through primer right away. That thin barrier keeps moisture off exposed steel and gives you a disciplined, durable base for the next bodywork stages.
Protect Bare Steel With Epoxy Primer
After you’ve cleaned and prepped the weld, seal the bare steel with a 2K epoxy primer to lock out moisture and improve corrosion resistance. Apply it within the product’s recommended recoat window so you get strong adhesion and reliable protection. If you brush it on, expect visible brush marks, and sand it before filler or topcoat if you need a smoother bond. Additionally, ensuring proper cleaning of galvanized metal helps to enhance the effectiveness of the primer.
Products Worth Considering
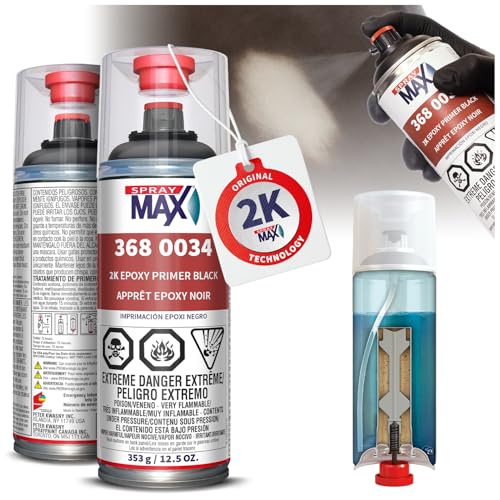
SUPERIOR CORROSION PROTECTION: This epoxy primer automotive coating provides excellent adhesion and rust protection on steel, aluminum, and galvanized metal surfaces – ideal for cars, motorcycles, and restorations.

SUPERIOR CORROSION PROTECTION: This epoxy primer automotive coating provides excellent adhesion and rust protection on steel, aluminum, and galvanized metal surfaces – ideal for cars, motorcycles, and restorations.

DURABLE EPOXY PRIMER: Apply this automotive aerosol gray primer on car body panels, aluminium, steel, or fiberglass to create a durable finish, and to effectively prevent rust. Setting the stage the professional way for your new paint job, and extending the lifetime of your new paint. Spray like a pro without the expensive HVLP setup.
Epoxy Primer Protection
Once you’ve cleaned and sanded the weld area to a rough profile, apply an epoxy primer to seal the bare steel and block moisture. This 2K coating gives you superior corrosion resistance, but you must mix it with hardener exactly as directed.
- Stir and strain the epoxy primer before use.
- Spray it for the smoothest, most uniform film.
- Brush only if access demands it, knowing marks may show.
- Recoat within the specified window so adhesion stays strong.
You’re building a tough foundation here, not a cosmetic layer. The epoxy primer bonds best to properly abraded metal and protects the repair from flash rust while you move toward the next coating stage.
Apply it cleanly, keep your timing tight, and let the system work for you.
Sealing Bare Steel
Bare steel needs immediate sealing, and epoxy primer is the best choice for the job because it offers far better moisture resistance than standard primers and helps prevent rust.
When you’re sealing bare steel, mix the 2K epoxy with its hardener exactly as specified, then apply it within 24 hours of welding for the strongest bond. You can brush it on, but spray application usually leaves a cleaner, more even film without visible marks.
Cover every exposed edge and weld zone completely, because any missed metal can corrode fast. After it cures, lightly sand the surface with 400-500 grit paper before you add filler, primer, or topcoat.
That prep builds adhesion and keeps your repair smooth, durable, and ready for the next stage.
Fill Low Spots Over the Weld
Start by sanding the weld area with 180-grit sandpaper to give the metal enough tooth for the filler to bond properly. Then you can fill low spots over the weld with a metal-compatible body filler, pressing it into depressions while keeping the surface slightly proud.
Sand the weld with 180-grit, then apply metal-compatible filler, keeping it slightly proud for proper bonding.
- Mix the filler accurately and apply it before it starts to set.
- Use a flat block to shape the repair and keep the profile controlled.
- Leave material in low spots so you don’t chase thin areas.
- Brush on a guide coat or black paint to reveal missed depressions.
After curing, refine the repair with P80, then move to P180 for a smoother shift. Work steadily and only remove material where the surface needs it.
When the panel feels level, clean off dust and residue completely. That prep gives you a solid foundation for primer and keeps the repaired area ready for paint without trapping defects underneath. Additionally, ensure to take proper safety precautions, as welding galvanized steel can release toxic zinc fumes.
Products Worth Considering

Reinforced with aluminum – extra strength in an easy-spreading filler

Maximized Adhesion & Strength: Evercoat Body Shop Metal Reinforced Filler delivers superior adhesion to aluminum, galvanized steel, and steel, ensuring lasting repairs that won’t weaken over time, even under tough conditions.

Durable Filler: Use it instead of conventional filler for its longevity and corrosion resistance
Block Sand the Repair Smooth
Block sand the repair area with 180-grit paper to knock down high spots and reveal any remaining imperfections in the weld.
With block sanding, you control the surface instead of chasing it. Use a flat sanding block on the first passes so you keep the repair’s contour honest and leave filler in the low spots.
Dust on a guide coat or black paint, then sand again; the dark trace will mark lows and show where metal still needs attention. Keep your pressure even and work in long, crossing strokes so you don’t dig grooves.
When the panel starts to level out, switch to a DA sander with finer P180 grit to erase coarse scratches and blend the repair.
Make multiple passes, checking your progress each time, until the surface feels uniformly smooth and ready for the next stage. This disciplined process gives you a flat, liberated finish that won’t fight you later, especially when considering the effects of maximum fillet weld size on the overall repair integrity.
Apply High-Build Primer
With the weld sanded level, spray on two wet coats of high-build primer to fill minor imperfections and give the repair a uniform base for paint. You’ll use high-build primer to build film thickness over the welded area and lock in a consistent surface. Follow the can’s mix, tip size, and flash-time instructions so the coating lays down correctly and cures fully.
- Clean the panel before spraying.
- Apply the first wet coat evenly.
- Add the second wet coat for coverage.
- Let it cure at least 48 hours.
After curing, mist on a spray-on guide coat, then lightly block with 180 grit sandpaper. The guide coat shows low spots so you can correct them before moving on.
Keep your strokes straight and controlled, and don’t cut through the primer. When you work this way, you free the repair from texture and unevenness, and you set up a solid, level foundation for the next finish layer. Additionally, applying a zinc-rich primer can help prevent future rust in the repaired area.
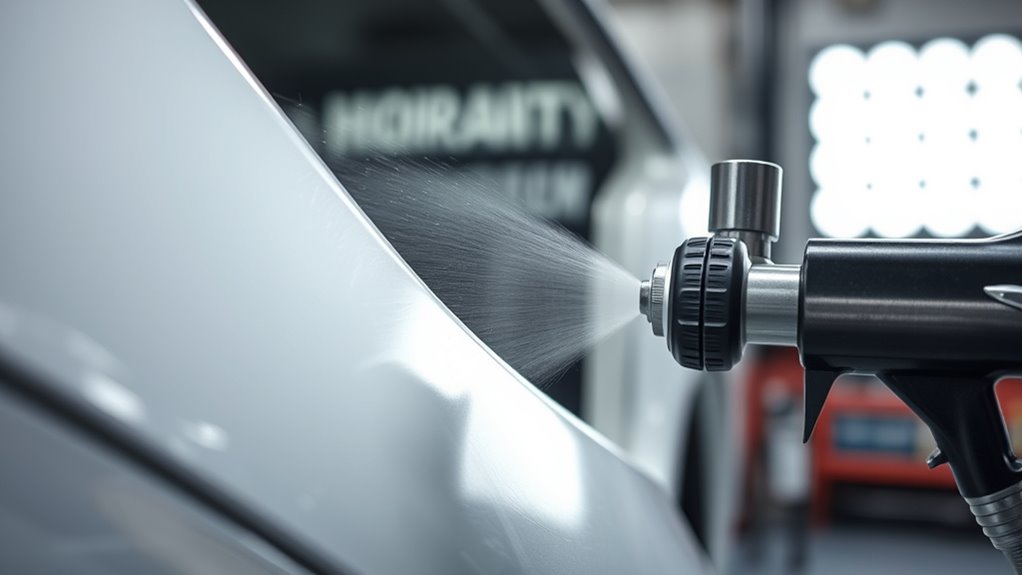
Paint and Blend the Panel
Once the primer has cured and been lightly blocked smooth, you’re ready to paint the repair and blend it into the surrounding panel. Clean the area, confirm the weld-through primer still seals bare metal, then spray your color. Use an acrylic paint matched to the vehicle and apply light coats; don’t flood the surface. Proper welding processes ensure that the base layer remains intact for a better finish.
| Step | Action |
|---|---|
| Prep | Dust off and degrease the panel |
| Edge blend | Feather primer with 180-grit on a block |
| Seal | Verify weld-through primer coverage |
| Color | Spray multiple thin coats |
| Finish | Lightly sand between coats if needed |
Keep the gun or aerosol moving so you avoid runs and dry spots. Overlap each pass slightly to feather the repair into the adjacent finish. Let each coat flash, then cure fully before handling. If the tone needs refinement, add another mist coat rather than forcing coverage. That method keeps the repair clean, durable, and free from visible lines.
Frequently Asked Questions
Can You Paint Over a Weld?
Yes, you can paint over a weld if you do proper Weld Preparation: cool it, clean off oil and grease, sand smooth, apply zinc-rich or epoxy primer, then topcoat. You’ll stop corrosion and get durable adhesion.
What Body Filler Is Best for Over Welds?
3M finishing glaze is best over welds because it spreads smoothly, fills pinholes, and resists cracking. You’ll get better Filler Durability if you rough-sand first, mix hardener well, and build thin layers into low spots.
What Paint to Use After Welding?
After welding, you should use zinc-rich weld-through primer, then epoxy primer, because it’s your shield against rust. Scuff with 180 grit, apply in one session, and finish with high-build primer before color coat.
Can I Paint Over Weld Through Primer?
No, you shouldn’t use weld-through primer as your final coat. You’ll need weld preparation, then epoxy or etch primer, followed by filler primer and topcoat, to guarantee adhesion, corrosion resistance, and a durable finish.
Conclusion
By grinding the weld flush, cleaning the metal, sealing it with epoxy primer, and filling any low spots, you set up a durable repair. Then you block sand, spray high-build primer, and paint and blend the panel so the finish disappears into the surrounding bodywork. Take your time and check each step before moving on; that’s the name of the game if you want a smooth, long-lasting auto body repair that holds up and looks factory-clean.


