Angle Grinder Armature Failure: Signs, Testing, and Safety Checks
What’s in This Article
- Common Symptoms of Angle Grinder Armature Failure
- How to Identify Electrical Issues in Your Grinder
- Importance of Grounding Your Angle Grinder
- How to Test Armature Resistance
- Essential Maintenance Tips for Prolonging Your Angle Grinder’s Life
- Use Your Angle Grinder Safely
- Troubleshooting Common Grinder Issues
- Frequently Asked Questions
Angle grinder armature failure can make a strong tool act weak, noisy, or unsafe. You may notice uneven motor speed, unusual noises, heat, sparks, or sudden power loss. Resistance readings can also help you spot trouble, but you should treat any test result as a clue, not a final diagnosis. This guide shows you the main signs, safe testing steps, and maintenance habits that help protect your grinder.
Quick Answer
Angle grinder armature failure often shows up as weak power, burning smells, heavy sparking, overheating, or rough motor noise. You can test the armature with a meter, inspect the commutator and brushes, and check for shorts or open windings. Stop using the grinder if it sparks hard, gets too hot, or trips power, because the fault can become a shock or fire risk.
Key Takeaways
- Uneven speed, heat, harsh noise, and heavy sparking can point to armature damage.
- Resistance readings help you compare commutator segments and find short or open circuits.
- Good grounding and clean connections make electrical testing safer and more reliable.
- Dust, worn brushes, blocked vents, and poor storage can shorten your grinder’s life.
- You should stop using the tool when signs suggest a serious electrical fault.
Common Symptoms of Angle Grinder Armature Failure

When you diagnose angle grinder armature failure, watch for several clear symptoms. Inconsistent motor performance often gives the first warning. The grinder may slow down under light pressure, surge during use, or struggle to reach full speed.
You may also notice a burning smell, heavy sparking near the brush area, or overheating during normal work. A rough grinding sound, rattling, or high-pitched whine can also point to armature or bearing problems. These symptoms do not prove one single fault, but they tell you the tool needs inspection.
Resistance checks can help you compare the armature windings. Some grinders may show low resistance values, such as readings in the 1.6 to 6.3 ohm range, but exact readings depend on the tool design and meter. A zero reading can suggest a short circuit, while an open or infinite reading can suggest a broken winding or poor connection.
Warning: Unplug the grinder before you inspect brushes, open the housing, or test internal parts.
Products Worth Considering

100% Quality Assurance: Well-designed, well-crafted. Not an OEM part, but meets OEM manufacturing requirements. This is the manufacturer's replacement and is functionally equivalent to the previous part.

100% Quality Assurance: Well-designed, well-crafted. Not an OEM part, but meets OEM manufacturing requirements. This is the manufacturer's replacement and is functionally equivalent to the previous part.
Armature Rotor Fits 9556, 9557, 9558, 9556NB, 9556HN, 9557NB, 9557HN, 9557PB, 9558NB, 9558HN, 9558PB Angle Grinder Replacement Part New
How to Identify Electrical Issues in Your Grinder
Start by checking the simple problems first. Look for a damaged cord, loose plug, worn brushes, clogged vents, and signs of heat around the housing. These faults can act like armature failure, so you should not jump to one cause too early.
Next, check resistance values across the commutator segments with a suitable meter. You want readings that stay close to each other as you move around the commutator. A sudden high, low, zero, or unstable value can point to electrical issues, poor contact, or damaged windings.
Common Electrical Symptoms
You can spot many electrical faults before the tool fails completely. Watch for these signs during testing and normal use:
- Inconsistent power delivery: The motor speeds up and slows down without a change in load.
- Heavy brush sparking: Bright, harsh sparks around the commutator can signal worn brushes or armature trouble.
- Zero resistance readings: A zero value can suggest a short circuit between tested points.
- Open resistance readings: An infinite reading can suggest a broken winding, poor contact, or a damaged lead.
- Heat, odor, or noise: Heat, burning smells, and harsh sounds need prompt inspection.
Testing Resistance Values
Testing resistance values helps you find uneven electrical paths in the armature. Use a meter that can read low resistance, and make clean contact with each commutator segment. Dirt, oil, or weak probe contact can make the reading jump.
During armature testing, compare each reading rather than relying on one fixed number. Some readings may sit around 1.6 to 6.3 ohms, but your grinder model may differ. Large changes between nearby segments need more inspection.
A zero resistance reading can point to a short circuit. An infinite resistance reading can point to an open winding or a poor connection. Repeat the test before you decide, because a loose probe can create a false result.
Grounding Importance Explained
Grounding helps protect you from shock and helps your tool work as designed. It also helps you get more stable test results when you check the motor circuit. Poor grounding can cause erratic behavior, nuisance tripping, or unsafe tool operation.
Use these checks to find grounding problems:
- Check the cord and plug: Look for cuts, crushed spots, bent pins, or loose strain relief.
- Inspect grounding connections: Confirm that ground wires and terminals sit tight and clean.
- Test for continuity: Use a suitable meter to check the ground path where the tool design allows it.
- Stop if readings jump: Clean your contact points and repeat the test before you continue.
Importance of Grounding Your Angle Grinder
Grounding your angle grinder supports safe and efficient operation. It helps reduce the risk of electrical shocks and short circuits when a fault occurs. Good grounding also helps the grinder run more consistently.
Check the plug, cord, switch area, and internal ground connections if the tool design gives safe access. Loose, corroded, or dirty contacts can create unstable readings and poor motor behavior. If you find damaged insulation or melted parts, stop using the grinder.
Do not bypass a ground pin or use a damaged extension cord. You also should avoid using the grinder in damp areas unless you use proper protection and a safe power source. If you feel tingling, see sparks from the housing, or trip breakers often, let a qualified repair person inspect the tool.
Products Worth Considering

【Value Sets】The grinder nut set includes 1 angle grinder wrench and 6 angle grinder nuts (3 inner flange nuts, 3 outer flange nuts). Please check size and compatibility before ordering. Please contact us with any questions or concerns. We prioritize your satisfaction .

WHAT YOU GET: Includes 1 extended angle grinder wrench and 6 thickened-design flange nuts (3 inner nuts + 3 outer nuts), always have spare nuts to avoid downtime.

Complete Angle Grinder Nut & Wrench Kit : Includes 1 angle grinder wrench and 6 flange nuts (3 inner flange nuts + 3 outer flange nuts) for easy disc replacement and nut removal
How to Test Armature Resistance
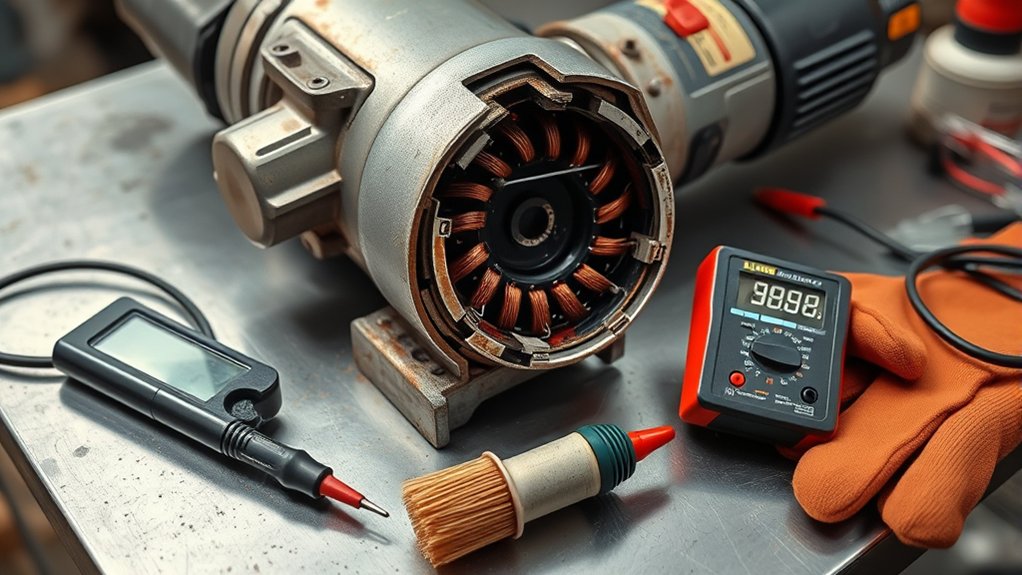
You can test armature resistance with a low-ohm meter or a non-digital tester. Exact values vary by grinder, so use the test to compare segments and find clear outliers. If you do not feel safe opening the tool, take it to a repair shop.
Follow these steps for safer armature testing:
- Unplug the grinder and remove the wheel before you open the housing.
- Remove the brushes if the tool design requires it for a clear test.
- Clean the commutator lightly so your probes touch clean metal.
- Place the meter probes on two adjacent commutator bars.
- Record the reading and move around the commutator one segment at a time.
- Compare all readings and look for one value that differs sharply from the rest.
- Check for shorts to the shaft or core if your meter and skill level allow it.
Keep your test method consistent. Press the probes with the same pressure and use clean contact points. If one reading looks strange, repeat it before you decide that the armature has failed.
Pro tip: Take a photo before you remove wires or brushes so you can put each part back correctly.
Essential Maintenance Tips for Prolonging Your Angle Grinder’s Life
You can reduce armature stress with simple maintenance. Keep dust out of the vents, check the brushes, and store the grinder in a dry place. Small habits help prevent heat, poor contact, and early motor wear.
Do not force the grinder through the work. Heavy pressure increases motor load and heat. Let the wheel cut or grind at its own pace, and use the correct wheel for the material.
Regular Cleaning Procedures
Regular cleaning keeps the motor cooler and helps the brushes make better contact. Add these steps to your maintenance routine:
- Clean air vents: Remove dust buildup so air can cool the motor.
- Inspect the brushes: Replace worn or cracked brushes before they damage the commutator.
- Clean the commutator area: Remove loose dust without scraping or gouging the copper surface.
- Check all connections: Look for corrosion, loose terminals, and damaged insulation.
- Test suspicious tools: Check resistance if the grinder runs hot, weak, or noisy.
Avoid blowing dust deeper into the tool with high pressure air. Use gentle cleaning methods and follow the tool maker’s service guidance. If metal dust has packed inside the housing, a repair shop can clean it more safely.
Proper Storage Practices
Proper storage practices protect the armature, commutator, bearings, cord, and switch. Store your grinder in a dry, dust-free place. Moisture and grit can cause corrosion, poor contact, and rough operation.
Use a protective case or padded bag to protect the tool from impact. Store the grinder with the power switch off, and keep the cord loosely coiled. Sharp bends in the cord can damage wires inside the insulation.
Keep the grinder away from extreme temperatures and humidity. Heat can age plastic and rubber parts, while damp storage can damage electrical parts. Check the tool before use if it sat unused for a long time.
Use Your Angle Grinder Safely
Safe grinder use protects you from sparks, wheel breakage, dust, and electrical faults. Good personal protective equipment (PPE) and correct setup matter every time you use the tool. Use these safety steps before and during work:
- Wear PPE: Use eye protection, hearing protection, gloves, and a dust mask or respirator when the job needs it.
- Check the guard: Keep the guard installed and set it between you and the wheel.
- Use correct attachments: Match the wheel or disc to the grinder speed, material, and task.
- Inspect the wheel: Do not use cracked, chipped, wet, or wrong-sized wheels.
- Hold the grinder firmly: Use both hands and keep a balanced stance.
- Control sparks: Aim sparks away from people, cords, fuel, paper, and other flammable items.
Stop the grinder if it vibrates hard, smokes, smells burnt, or makes a new grinding noise from the motor. These signs can point to mechanical or electrical failure. Fix the problem before you keep working.
Troubleshooting Common Grinder Issues
Even with careful use, angle grinders can develop problems that affect power and safety. Start with the easiest checks before you open the tool. Many faults come from worn brushes, blocked vents, bad cords, or wrong accessories.
Use this quick troubleshooting guide:
- Grinder will not start: Check the outlet, plug, cord, switch, brushes, and internal connections.
- Grinder loses power: Check for worn brushes, heavy load, low voltage, or armature wear.
- Grinder overheats: Clean the vents, reduce pressure, and inspect the armature and bearings.
- Grinder sparks heavily: Inspect the brushes, brush holders, commutator, and armature windings.
- Grinder vibrates: Check the wheel, flange, spindle, bearings, and armature balance.
If you see resistance readings that change sharply between commutator segments, inspect the armature more closely. A zero reading can suggest a short circuit, while an open reading can suggest a broken winding. Secure meter leads and clean contact points help you avoid misleading results.
If the grinder still acts unsafe after basic checks, stop using it. A damaged armature can lead to more heat, weak torque, and sudden failure. A repair shop can test the motor with better tools and confirm if replacement makes sense.
Frequently Asked Questions
How to Tell if an Armature Is Bad?
You can suspect a bad armature when the grinder loses power, overheats, sparks heavily, or makes rough motor noise. Resistance readings that differ sharply between commutator segments can also point to shorted or open windings.
What Causes an Angle Grinder to Stop Working?
An angle grinder can stop working because of a bad cord, worn brushes, a faulty switch, a failed armature, or a burned motor winding. Start with the simple parts first, because they cost less and fail often.
What Is an Armature in a Grinder?
The armature is the rotating part of the grinder’s electric motor. It uses windings and a commutator to help turn electrical energy into mechanical rotation.
What Are Signs My Grinder Needs Repair?
Your grinder needs repair if it sparks hard, smells burnt, loses power, overheats, or vibrates more than normal. You should also inspect it if resistance checks show a clear short, open circuit, or unstable readings.
Can You Repair an Angle Grinder Armature?
Some shops can repair or rewind certain armatures, but many small angle grinders cost less to replace than to rebuild. Compare the repair cost, part availability, and tool condition before you decide.
Should You Keep Using a Grinder That Smells Burnt?
No, you should stop using it and unplug it. A burnt smell can point to overheating brushes, damaged windings, blocked vents, or a failing armature.
Safety Disclaimer: This article is for informational purposes only and does not replace professional tool repair or electrical advice. Always unplug the grinder before inspection, follow the maker’s manual, and ask a qualified repair person if you find damaged wiring, shock risk, smoke, or severe sparking.
Conclusion
Armature failure can turn a useful angle grinder into a weak, hot, and unsafe tool. Watch for power loss, heavy sparking, odd noise, heat, and unstable resistance readings. Clean the grinder, inspect the brushes, check grounding, and test the armature when symptoms appear.
Your next step is simple: stop using the grinder when it shows serious electrical warning signs. Repair the fault before it damages more parts or puts you at risk. With careful testing and steady maintenance, your grinder can stay safer, stronger, and ready for the next job.


