Angle grinder safety guards are not optional accessories for normal grinding and cutting work. The correct guard helps shield you from sparks, chips, accidental wheel contact, and fragments if an abrasive wheel breaks. This guide explains how to choose, position, inspect, and use the right guard without relying on guesswork.
Quick Answer
Keep the manufacturer-approved guard installed, locked, and positioned between you and the exposed wheel. Match the guard to the exact grinder, wheel diameter, wheel type, and task. Before use, disconnect power, inspect the guard and wheel, confirm the wheel speed rating, and direct sparks away from people and combustibles.
Key Takeaways
- Use only a guard approved by the grinder manufacturer for that model, wheel, and application.
- A cut-off wheel usually needs a more enclosed cutting guard; a grinding wheel uses the guard specified for face or edge grinding.
- The wheel’s maximum speed rating must be at least as high as the grinder’s maximum speed.
- Keep the solid part of the guard between your body and the wheel, and aim sparks away from people, cords, fuel, dust, and other combustibles.
- A dust shroud controls airborne dust but does not automatically replace the required wheel guard unless the manufacturer approves it as a combined guard.
At a Glance
| Time Required | About 3–5 minutes for a pre-use guard and wheel check; longer for a first-time setup |
| Difficulty | Easy, but the correct procedure is model-specific |
| Tools Needed | Grinder manual, approved guard, compatible wheel and flanges, supplied wrench or hex key if required, and task-appropriate PPE |
| Cost | Usually no added cost when the correct guard is supplied; replacement cost varies by grinder model and guard type |
What’s in This Article
- Understanding the Importance of Angle Grinder Safety Guards
- Essential Features of Effective Angle Grinder Safety Guards
- Proper Setup of Angle Grinder Safety Guards
- How to Use Safety Guards to Protect Operators
- The Role of Safety Guards in Spark Control
- Dust Shrouds and Silica Control
- How to Avoid Common Mistakes With Safety Guards
- How to Inspect and Maintain Safety Guards
- Cutting vs. Grinding Guards: What You Need to Know
- Angle Grinder Safety Guards and OSHA Compliance
- Best Practices for Safe Angle Grinder Operations
- Troubleshooting Angle Grinder Guard Problems
- Frequently Asked Questions
- Conclusion
Understanding the Importance of Angle Grinder Safety Guards

An angle grinder wheel can rotate fast enough to throw abrasive grit, workpiece chips, wire strands, and broken accessory fragments with considerable force. The guard creates a physical barrier around part of the wheel and helps direct material away from the operator.
The guard does not make the tool risk-free. It cannot stop every spark or fragment, and it cannot prevent kickback caused by a pinched cut-off wheel. It works as one layer in a safety system that also includes the correct wheel, secure flanges, a side handle, two-handed control, a stable workpiece, proper body position, and personal protective equipment.
For general-industry workplaces, OSHA 29 CFR 1910.243 states that a right-angle or vertical portable grinder guard must limit wheel exposure to no more than 180 degrees and be located between the operator and the wheel. The adjustment must help deflect pieces of a broken wheel away from the operator.
For right-angle portable grinders, OSHA limits wheel exposure to 180 degrees and requires the guard to remain between the operator and the wheel.
That OSHA rule is a workplace requirement, not a universal setup diagram for every consumer grinder. Your model’s manual remains essential because guard styles, locking systems, approved wheels, flanges, and permitted applications vary.
Essential Features of Effective Angle Grinder Safety Guards
An effective guard must do more than fit around the spindle. It needs the correct diameter, mounting interface, depth, side coverage, and locking method for the grinder and accessory.
Guard Design and Coverage
- Manufacturer-approved fit: The guard must be listed for the exact grinder model or product family.
- Correct wheel capacity: The guard must match the wheel’s diameter and thickness. An oversized wheel may not be adequately covered or controlled.
- Secure lock: The latch, clamp, screw, or detent must hold the guard firmly throughout the job.
- Clearance: The wheel, flange, and locknut must rotate without touching the guard.
- Required side coverage: Thin cut-off wheels commonly require a closed or two-sided guard because side loading or wheel failure can send fragments from the wheel plane.
- Useful adjustment range: The guard should rotate to protect the operator in the intended working position without being forced or modified.
Guard Terminology Varies by Brand
Do not choose a guard by appearance or a generic online label alone. Manufacturers use different names. Many manuals describe an open Type 27 guard for approved grinding wheels and a more enclosed Type 1/41 guard for cut-off wheels. Other product lines use terms such as Type A, Type B, clip-on cutting cover, protective guard, extraction guard, or cutting hood.
For example, an official DeWalt angle grinder manual requires a closed, two-sided cutting-wheel guard for abrasive or diamond cutting wheels and directs users to an accessory chart for the correct guard-and-wheel combination. Treat that as an example, not a substitute for the manual supplied with your grinder.
Note: A guard that physically attaches is not automatically compatible. The mounting system, wheel dimensions, speed, flanges, and approved application must all match.
Spark Direction and Control
The solid section of the guard should sit between your body and the exposed wheel area. Rotate it so the main stream of sparks and debris travels away from your face, hands, legs, clothing, power cord, battery, nearby workers, vehicles, glass, and combustible materials.
Sparks can bounce from walls, floors, fixtures, and the workpiece. Check the full travel path rather than looking only at the first few feet. A portable spark screen or fire-resistant curtain can protect nearby areas, but it does not replace housekeeping or a required hot-work procedure.
Compatibility With Disc Types
Match the guard to the accessory and task listed in the tool manual:
- Depressed-center grinding wheels: Use the approved grinding guard and only grind on the surface allowed by the wheel label.
- Thin abrasive cut-off wheels: Use the approved enclosed cutting guard. Never grind on the side of a wheel marked for cutting only.
- Diamond cutting wheels: Use the guard, flanges, direction of rotation, and dust-control system specified by the grinder and wheel manufacturers.
- Flap discs: Many grinders require a guard. Confirm the disc diameter, backing construction, and approved guard in the manual.
- Wire cup brushes and wire wheels: Use only listed accessories and the guard specified by the manufacturer. Wires can loosen and be thrown during use.
- Cup wheels: These may require a dedicated cup-wheel guard or dust-extraction shroud. A standard grinding guard may not provide the required coverage.
- Sanding pads: Some manuals permit specific sanding operations without a wheel guard, but that exception does not apply to ordinary grinding or cut-off wheels.
Proper Setup of Angle Grinder Safety Guards
Use this sequence as a general pre-use guide, then follow the instructions for your grinder and accessory. Stop if any part is missing, damaged, unlisted, or does not fit without force.
1. Disconnect the Power Source
Switch the grinder off and wait for the accessory to stop. Unplug a corded grinder or remove the battery from a cordless grinder before installing or adjusting the guard, wheel, flange, side handle, or accessory.
Warning: Never adjust the guard while the grinder is connected to power. An accidental start can pull fingers, clothing, or tools into the wheel.
2. Identify the Wheel and Task
Read the markings on the wheel and the grinder nameplate. Confirm all of the following:
- The wheel is approved for grinding, cutting, sanding, brushing, or the exact task you plan to perform.
- The wheel diameter and thickness are within the grinder’s rated capacity.
- The arbor hole, hub, thread, and required flanges match the spindle system.
- The wheel’s rated speed is at least equal to the grinder’s maximum rated or no-load speed specified by the manufacturer.
- The wheel is intended for the material, such as carbon steel, stainless steel, aluminum, masonry, or concrete.
- The wheel is not cracked, chipped, warped, wet, contaminated, expired under the manufacturer’s marking system, or damaged in storage.
3. Install and Lock the Correct Guard
Fit the guard to the mounting collar exactly as shown in the manual. Engage the tabs, grooves, clamp, latch, screw, or detent fully. Do not file, bend, drill, shim, tape, weld, or otherwise modify the guard to make it fit.
Try to move the locked guard by hand. It should remain secure under normal adjustment pressure. If it slips, remove the tool from service until the locking mechanism or approved guard is repaired or replaced.
4. Mount the Wheel and Flanges
Use the backing flange, locknut, hub, and orientation specified for that wheel. Reversing a flange or using a generic nut can leave the wheel off-center, poorly clamped, or exposed beyond the guard.
Tighten the wheel only as directed. Excessive force can damage a thin wheel or make removal difficult. Never press the spindle-lock button while the wheel is moving.
5. Position the Guard and Your Body
- Place the solid guard section between your body and the wheel.
- Aim the expected spark stream away from people, flammables, hoses, cords, batteries, windows, and finished surfaces.
- Keep your head and torso out of the wheel’s plane, especially during startup.
- Install and tighten the side handle in the position that gives two-handed control.
- Support and clamp the workpiece so the cut will not close and pinch the wheel.
6. Check Clearance and Test-Run Safely
With power disconnected, rotate the wheel by hand when the design allows it. It should move freely without rubbing the guard or binding against the flange.
After mounting a new or replacement accessory, follow the test-run procedure in the tool manual. Some manufacturers instruct the operator to stand and keep bystanders out of the wheel plane while running the grinder at maximum no-load speed for one minute. Stop immediately if the tool vibrates, wobbles, rubs, clicks, or makes an unusual sound.
Pro Tip: Photograph the grinder’s model number and save the official manual on your phone. It makes guard, flange, and wheel checks much faster when accessories become mixed in a shared shop.
How to Use Safety Guards to Protect Operators
Keep the guard installed for the entire operation. Do not rotate it away after the wheel starts, and do not remove it to reach a tight corner. Use a smaller approved grinder, a different accessory, or another tool designed for the restricted space.
Hold the grinder with both hands and maintain a balanced stance. Let the wheel reach operating speed before it touches the workpiece. Apply controlled pressure; forcing the wheel can slow the grinder, overheat the accessory, increase kickback risk, and reduce control.
Keep the power cord behind the tool and away from the wheel. When hidden wiring may be present, use the insulated gripping surfaces described in the manual and confirm the work area before cutting.
Protect bystanders as well as the operator. Establish a controlled work area, keep people out of the wheel plane and spark path, and require suitable PPE for anyone who must enter.
The Role of Safety Guards in Spark Control

A guard helps redirect sparks and grit, but it does not capture all hot particles. Grinding and cutting can create ignition sources, so inspect the area before starting.
- Remove paper, cardboard, sawdust, oily rags, fuel, solvents, aerosols, dry vegetation, and other combustibles from the spark path.
- Check the opposite side of walls, floors, partitions, and openings where sparks can travel unseen.
- Do not grind where flammable gas, vapor, or combustible dust may be present.
- Use shields or fire-resistant curtains when sparks could reach nearby people or property.
- Follow the employer’s hot-work permit and fire-watch procedure when the hazard assessment requires it.
- Keep suitable fire protection available and inspect the area after the work ends.
OSHA identifies grinding as a spark-producing activity in its hot-work guidance. Workplace requirements vary with the site, material, industry, and presence of combustibles, so the guard is only one part of fire prevention.
Dust Shrouds and Silica Control
When grinding or cutting concrete, brick, mortar, stone, tile, or engineered stone, the larger health hazard may be airborne dust. Materials containing crystalline silica can release respirable particles that reach deep into the lungs.
A dust shroud surrounds more of the wheel and connects to a suitable vacuum, while some systems deliver water at the grinding surface. These controls serve a different purpose from a standard spark and fragment guard. Use only a manufacturer-approved shroud or combined guard system that is compatible with the grinder and accessory.
For covered construction tasks, OSHA’s respirable crystalline silica standard specifies engineering controls and, in some situations, respiratory protection. Handheld grinder requirements differ for mortar removal and other uses, and they also differ between indoor and outdoor work.
Warning: Do not improvise wet grinding with an ordinary electric grinder. Use only a tool and control system designed for wet operation, with the electrical protection required by the manufacturer and worksite rules.
Products Worth Considering

Angle grinder dust extraction suitable for the front cover of most 48-51mm angle grinders. Can be installed on most 5"/4.5" angle grinders.The thickness of Diamond Grinding Disc should not more than 25mm or less than 15mm.
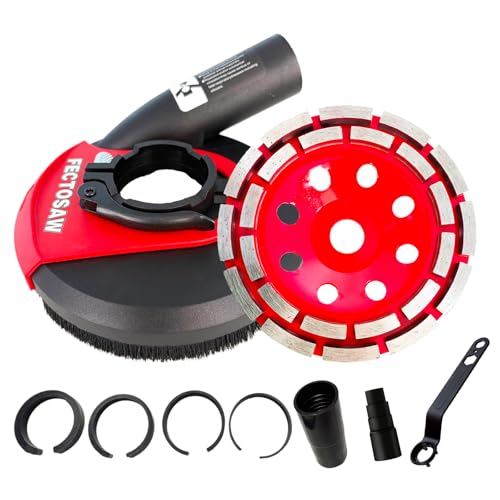
Complete Grinding & Dust Control Kit Includes a dust shroud and diamond grinding cup wheel, providing efficient surface grinding and dust collection in one ready-to-use set.

High Compatibility:Suitable for Angle Grinder under main brand 4-1/2''/5",adapt to 48-51mm Angle grinder front cap and easy to install.Allows collection of harmful dust suface grinding application.
How to Avoid Common Mistakes With Safety Guards
- Removing the guard for visibility: Reposition the guard, workpiece, light, or body instead. Do not trade wheel coverage for a better view.
- Using a grinding guard for a thin cut-off wheel: Use the enclosed cutting guard or clip-on cover approved for that tool and wheel.
- Assuming every Type 27 wheel can grind: Some thin Type 27 or Type 42 wheels are marked for cutting or edge work only. Read the wheel label.
- Installing an oversized wheel: A larger wheel may exceed the grinder’s capacity, contact the guard, or have a lower speed rating than the tool.
- Using the wrong flange orientation: Follow the accessory chart or manual; the same locknut may be oriented differently for different wheels.
- Pointing sparks toward the operator: Rotate the guard and change stance before starting.
- Working near combustibles: Clear and inspect the full spark path, including concealed spaces.
- Using a cracked or bent guard: Replace it. A damaged guard may not remain aligned or contain fragments as designed.
- Treating a dust shroud as universal: Confirm that the shroud is approved as the required guard for the wheel and application.
- Using one hand: Install the side handle and keep two-handed control unless the manufacturer explicitly provides another approved gripping method.
How to Inspect and Maintain Safety Guards
Inspect the guard before every use and after a drop, impact, wheel failure, or unusual vibration. A quick inspection should cover the guard, mounting system, wheel, flanges, spindle, switch, side handle, cord or battery, and work area.
Regular Guard Inspections
- Look for cracks, bends, heavy scoring, corrosion, missing sections, or heat damage.
- Check the collar, latch, clamp, screw, spring, and adjustment detents.
- Confirm that the guard locks and cannot rotate unexpectedly.
- Make sure the guard has not been modified or forced onto the wrong model.
- Check that the wheel does not contact the guard at any point.
- Verify that labels and model markings remain readable enough to identify the part.
- Remove packed dust and grit that could hide damage or prevent the latch from seating.
Proper Guard Adjustments
Disconnect power and wait for the wheel to stop before every adjustment. Use the release lever or fastener as designed. Do not strike the guard with a hammer or pry it into position.
If the guard loosens repeatedly, stop using the grinder. Cleaning may restore a dirty latch, but worn or damaged locking parts need approved replacement or service. Do not rely on tape, wire, a hose clamp, or a stronger hand-tightening force to keep a defective guard in place.
Cleaning and Storage
Brush or wipe debris from the guard after use. Follow the manual before using compressed air because airborne dust can create eye and breathing hazards and may be driven into the tool. Store guards where they will not be bent, stepped on, or mixed with incompatible grinders.
Store abrasive wheels in a dry, protected location and handle them carefully. Do not place heavy tools on thin cut-off wheels or leave wheels where temperature, moisture, impact, or contamination may damage them.
Cutting vs. Grinding Guards: What You Need to Know
Cutting and grinding guards protect against different exposure patterns. The correct choice depends on the accessory—not simply whether the operator plans to move the tool sideways or along an edge.
| Feature | Grinding Guard | Cutting Guard |
| Typical coverage | Open at the working face to permit approved surface or edge grinding | More enclosed, often with side coverage around a thin cut-off wheel |
| Common wheel example | Approved Type 27 depressed-center grinding wheel | Type 1/41 abrasive cut-off wheel or approved diamond cutting wheel |
| Primary misuse to avoid | Using a wheel not rated for face grinding or exposing the operator by rotating the guard away | Side-loading, twisting, or grinding with a wheel marked for cutting only |
| Selection rule | Use the exact guard and wheel combination listed by the manufacturer | Use the exact enclosed guard, cover, flanges, and wheel combination listed by the manufacturer |
Names and type numbers are not perfectly consistent across every brand or country. The safest rule is to match the grinder model, guard part number, wheel markings, flanges, and application through the official accessory chart.
Products Worth Considering
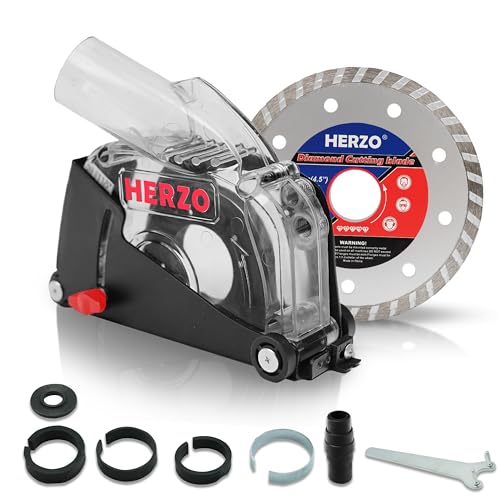
Widely Adapt:Suitable for 80% Main Brand 4-1/2 and 5 inch Angle Grinder
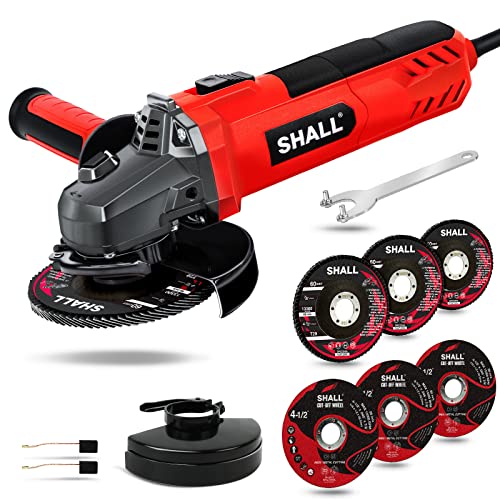
Note: There are 3 cutting discs wrapped in the clear plastic film, pls tear off the film to take them out.

Included: (1) DeWalt N441218 Angle Grinder Guard Replacement for Angle Grinder DCG414B
Angle Grinder Safety Guards and OSHA Compliance
OSHA requirements depend on the industry and task. The following rules are central to many U.S. workplaces:
- General industry: 29 CFR 1910.243 addresses guarding of portable powered tools. For right-angle or vertical portable grinders, the guard must limit exposure to 180 degrees and be positioned between the operator and wheel.
- Construction: 29 CFR 1926.303 covers abrasive wheels and tools, including guard design, portable wheel guarding, inspection, and mounting requirements.
- Eye and face protection: 29 CFR 1910.133 requires appropriate protection where workers face hazards from flying particles and requires side protection where flying objects are a hazard.
- Silica in construction: 29 CFR 1926.1153 covers respirable crystalline silica and includes specified controls for handheld grinders used on silica-containing materials.
OSHA’s bench- and pedestal-grinder work-rest and tongue-guard gap rules should not be copied onto a handheld angle grinder. Portable grinders use a different guard arrangement and are covered by different provisions.
ANSI/UAMA B7.1-2017 is the current abrasive-wheel safety publication listed by the Unified Abrasives Manufacturers’ Association. OSHA regulations may incorporate older ANSI editions by reference, while employers may adopt newer consensus guidance in their safety programs. Compliance decisions should be based on the applicable OSHA rule, state-plan requirement, manufacturer instructions, and site policy.
Note: This guide explains common U.S. safety requirements but is not a substitute for your employer’s hazard assessment, training, tool manual, or the rules that apply in your jurisdiction.
Best Practices for Safe Angle Grinder Operations
- Read the grinder and accessory instructions before first use.
- Use the manufacturer-approved guard, wheel, flanges, and side handle.
- Confirm the wheel’s rated speed equals or exceeds the grinder’s maximum speed.
- Inspect the accessory and guard before every use and after any drop or impact.
- Wear safety glasses with side protection; add a face shield and other PPE based on the hazard assessment.
- Use hearing protection when noise exposure requires it.
- Control dust with approved engineering controls and respiratory protection where required.
- Clamp and support the workpiece so the wheel will not bind or become pinched.
- Hold the tool with both hands and keep your body out of the wheel plane.
- Let the grinder reach speed before contact and do not force the wheel.
- Keep sparks away from combustibles, bystanders, cords, hoses, batteries, and finished surfaces.
- Stop immediately for vibration, wobble, rubbing, smoke, unusual noise, a shifting guard, or a damaged wheel.
- Wait for the wheel to stop completely before setting the grinder down.
Troubleshooting Angle Grinder Guard Problems
The Guard Will Not Fit
Check the grinder model, wheel capacity, guard part number, collar design, and installation orientation. Do not enlarge slots or force the guard. A guard from another grinder—even one with the same wheel diameter—may use a different mounting system.
The Guard Rubs the Wheel
Disconnect power. Confirm that the wheel diameter and thickness are approved, the flanges are installed in the correct orientation, the wheel is seated flat, and the guard is fully mounted on its collar. Replace a bent guard or damaged flange. Do not operate the grinder until the wheel turns freely.
The Guard Moves During Use
Stop using the tool. Clean the locking surfaces and inspect the clamp, latch, detents, spring, and fastener. If the guard still slips, install the correct replacement parts or have the grinder serviced. Do not secure it with improvised clamps or wire.
The Cutting Guard Blocks the Cut Line
Reposition the workpiece, guard, side handle, lighting, or your stance while keeping the guard between you and the wheel. Use a smaller approved grinder or another cutting tool if the correct guard cannot provide safe access.
Sparks Still Reach the Operator
Change the guard angle and body position, then check the wheel’s rotation and the path created by the workpiece. Add a suitable spark screen when needed. Remember that sparks can bounce, so clear nearby surfaces and concealed spaces as well.
Frequently Asked Questions
Why is a safety guard important on a grinding machine?
A guard covers part of the rotating wheel and helps direct sparks, chips, and fragments away from the operator. On a portable angle grinder, it also helps reduce accidental contact with the wheel. It is one safety layer and must be used with the correct accessory, secure workholding, two-handed control, and PPE.
What is the purpose of a guard on a grinder?
The guard limits how much of the wheel is exposed, creates a barrier between the wheel and operator, and redirects much of the spark and debris stream. A properly designed guard can also help deflect fragments if an abrasive wheel breaks.
What safety precautions help prevent injury from sparks and kickback?
Use the correct guard and wheel, clamp the workpiece, support cuts so they cannot close on the wheel, keep two hands on the grinder, and stand out of the wheel plane. Clear combustibles, wear suitable eye and face protection, and stop if the wheel binds, slows sharply, or begins to vibrate.
What are the OSHA requirements for angle grinder guards?
For right-angle or vertical portable grinders in general industry, OSHA 29 CFR 1910.243 limits wheel exposure to 180 degrees and requires the guard to be between the operator and wheel. Construction work is also subject to 29 CFR 1926.303. Other standards may apply to PPE, silica, hot work, and the specific workplace.
Can you use an angle grinder without a guard?
Do not use an angle grinder without the required guard for grinding or cutting wheels. A few manufacturer manuals permit guardless use for narrowly defined sanding or surface-finishing accessories, but that exception does not apply to ordinary abrasive grinding or cut-off wheels. Follow the exact manual for the tool and accessory.
Should the guard face you or the workpiece?
The solid portion of the guard should be between you and the exposed wheel. Position it so sparks and debris travel away from your body while the approved working area of the wheel can contact the workpiece. The exact angle changes with the task and stance.
Do you need a different guard for cutting and grinding?
Often, yes. Thin cut-off wheels commonly require a closed or two-sided cutting guard, while approved grinding wheels use a grinding guard. Some grinders use a clip-on cutting cover over the grinding guard. Use the combination listed in the official manual rather than choosing by appearance.
Is a dust shroud the same as a safety guard?
Not always. A dust shroud is designed to capture dust at the wheel and connect to a vacuum or water-control system. It replaces or supplements the standard guard only when the grinder manufacturer approves that setup for the wheel and task.
Can a bent or cracked grinder guard be repaired?
Replace a bent, cracked, heavily worn, or modified guard with the correct approved part. Straightening, welding, drilling, or patching can change its strength, alignment, and ability to remain locked during a wheel failure.
Can you put a larger wheel on an angle grinder if the guard is removed?
No. A larger wheel may exceed the grinder’s rated capacity, have an incompatible speed rating, contact the tool, and remain inadequately guarded. Use only wheel sizes and guards listed for the grinder.
Conclusion
Your angle grinder guard is a primary defense against wheel contact, sparks, debris, and fragments. Keep the correct manufacturer-approved guard installed, locked, and positioned between your body and the wheel for every normal grinding or cutting operation.
Before starting, match the wheel, guard, flanges, size, speed, and task; inspect the setup; control sparks and dust; and use two-handed control with appropriate PPE. When a guard does not fit, rubs, slips, or blocks safe access, stop and correct the setup instead of modifying or removing it.
Sources
- OSHA 29 CFR 1910.243 — Guarding of Portable Powered Tools — portable grinder guard location and maximum wheel exposure
- OSHA 29 CFR 1926.303 — Abrasive Wheels and Tools — construction guarding, mounting, and portable abrasive-wheel requirements
- OSHA 29 CFR 1910.133 — Eye and Face Protection — protection from flying particles and side-protection requirements
- OSHA 29 CFR 1926.1153 — Respirable Crystalline Silica — dust controls for handheld grinders used on silica-containing materials
- DeWalt DWE43231VS/DWE43240VS Instruction Manual — manufacturer example for guard selection, wheel compatibility, inspection, and no-load testing
- Unified Abrasives Manufacturers’ Association Publications — ANSI/UAMA B7.1-2017 abrasive-wheel safety standard listing