How to Convert an Angle Grinder Into a Circular Saw Safely
What’s in This Article
- What it means to “convert” an angle grinder into a circular saw
- Is it actually feasible? When this DIY approach makes sense
- Safety first: the non-negotiables
- Parts and materials checklist
- Design principles that make the build work
- Before you begin
- Step-by-step: a practical conversion workflow
- Setup for best results when cutting wood
- Common mistakes to avoid
- Maintenance and inspection routine
- When you should not build or use this conversion
- Frequently asked questions about converting an angle grinder into a circular saw
- Key takeaways
You can turn an angle grinder into a saw-like cutting tool, but the build can become dangerous fast if the guard, base, or blade setup fails. A grinder gives you the motor and spindle, not the safety design of a real circular saw.
This guide shows you what the conversion means, what parts you need, how to build a safer setup, and when you should stop and use a purpose-built saw instead.
Quick Answer
You can convert an angle grinder into a circular-saw-style cutter only if you build a rigid base, secure bracket, strong blade guard, and controlled depth system. The blade must match the material and meet or exceed the grinder’s maximum speed rating. If you cannot verify alignment, guarding, and blade security, use a purpose-built circular saw.
🧰 What it means to “convert” an angle grinder into a circular saw
A typical circular saw uses a motor, spindle, blade, guard, and shoe or base plate. The shoe keeps the cut stable and helps control depth. An angle grinder already gives you the motor and spindle, but it does not give you the full cutting geometry or safety features needed for straight wood cuts.
A safer DIY “circular saw” conversion focuses on:
- Rigid mounting so the grinder cannot shift under load
- Blade alignment so the kerf stays straight and predictable
- A blade guard to reduce exposure and contain debris
- A base or shoe that maintains depth and limits grabbing
- Workpiece support to help prevent pinching and kickback
🧱 Is it actually feasible? When this DIY approach makes sense
Yes, you can create a grinder-based cutting tool for wood and similar materials. But this is not a “bolt on a blade and cut” project. The build only makes sense when you can control the main risks.
- Secure fabrication: Use strong welds, bolts, and brackets with correct alignment.
- Correct blade type: Match the blade to the material and grinder speed.
- Mechanical protection: Add a strong guard and plan for kickback control.
- Controlled cutting technique: Support the work and avoid binding.
If you cannot build rigid parts and verify alignment, buy a purpose-built circular saw or track saw.
⚠️ Safety first: the non-negotiables
Turning an angle grinder into a saw-like cutter changes the risk level. Follow these rules before you power on the tool.
Warning: Do not use this conversion if the blade, guard, bracket, or base can move during a cut.
✅ Blade and revolutions per minute compliance
- Use blades designed for the material, such as proper woodworking blades for wood.
- Confirm the blade meets or exceeds the grinder’s maximum revolutions per minute (RPM).
- Check that the mounting flange and guard system fit the blade and grinder.
- Never use a damaged blade, loose blade, or blade rated below operating speed.
✅ Guarding and debris control
- Use a blade guard that covers the danger zone from your side of the tool.
- Direct chips and dust away from your hands, face, and ignition sources.
- Plan for dust extraction and clear chip flow when your setup allows it.
✅ Workholding and anti-kickback planning
- Support the work so the cut line does not pinch the blade.
- Clamp thin stock and small pieces before cutting.
- Avoid forcing the cut. If the blade binds, stop and clear the kerf.
✅ Personal protective equipment
- Wear eye protection and add a face shield when debris is heavy.
- Use hearing protection.
- Wear respiratory protection when cutting dusty wood or coated material.
- Use cut-resistant gloves only while handling stock, not near the blade.
- Secure loose clothing and tie back long hair.
Important: Treat this conversion as an advanced fabrication project. Do not use it if blade security, guard fit, or alignment feels uncertain.
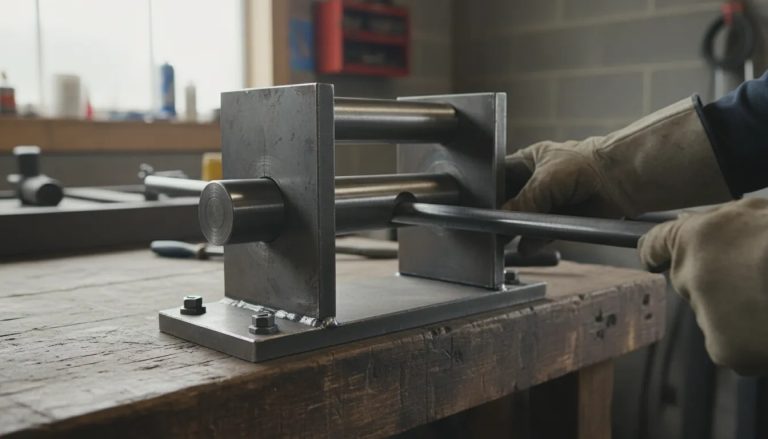
🧩 Parts and materials checklist
Your exact design depends on your grinder model. The parts below give you the basic building blocks for a grinder-to-saw conversion.
Products Worth Considering

【Compatibility Notice】Ensure your angle grinder's spindle/bore diameter matches the stand's clamping range of 1.65 inches (42 mm). Always measure your tool’s specifications before purchasing to confirm fitment

【Wrenches Combo Kit Good Coaxiality】Our angle grinder attachments offers excellent coaxiality, ensuring smooth rotation and grinding. You can expect a seamless grinding experience with a stable clamping mechanism that prevents slipping, making it incredibly convenient to use.
Core components
- Angle grinder with known spindle thread and flange system
- Blade that fits the spindle and matches the intended material
- Rigid base plate that stays flat and resists flex
- Blade guard that you fabricate or adapt with strong mounting
- Mounting bracket that locks the grinder to the base
Fabrication hardware
- Steel plate or angle iron for the frame
- Bolts, washers, and lock nuts, or welded structural members
- Pivot or guide parts for an adjustable depth system
- Springs or stops for steady cutting depth, if your design needs them
- Fasteners rated for vibration and load, with thread locking where suitable
Alignment and measurement tools
- Square and straightedge
- Dial calipers or measuring tape
- Protractor or angle finder for blade-to-base alignment
- Marker for test passes on scrap wood
- Speed or RPM information from the grinder and blade spec sheet
🛠️ Design principles that make the build work
A good conversion starts with stiffness and predictable cutting geometry. Weak parts let the blade drift, bind, or kick back.
1) Build a stiff shoe that resists flex
Flex between the blade and base plate can make the cut wander. It can also bind the blade and raise kickback risk. Use thicker steel and keep frame spans short.
2) Keep the blade perpendicular to the base
A tilted blade cuts unevenly and creates more friction. Check the blade with a square before you tighten the bracket. Recheck it after the first test cuts.
3) Use a consistent cutting depth reference
You need a repeatable depth limit for straight cuts. Depth control helps reduce binding and helps you avoid cutting into the bench.
4) Provide clearance for the blade path
Keep frame parts, guard edges, and fasteners away from the blade path. Test the setup with the grinder powered off first. Check all clearances before every live test.
Before you begin
Estimated time: Plan for several hours if you already have fabrication tools and experience. Take more time if you need to test, adjust, and rebuild brackets.
Before you start, confirm that your grinder, blade, flange, guard design, and base design work together. You also need a safe test area, scrap wood, clamps, and personal protective equipment.
Pro tip: Build a cardboard or thin plywood mockup first so you can test blade position and handle clearance.
📐 Step-by-step: a practical conversion workflow
The steps below give you a safer development process. Adjust the details to your grinder model and fabrication method.
-
Measure your grinder and blade mounting.
Record the spindle dimensions, blade mounting method, and grinder housing size. Confirm the blade diameter, blade thickness, and kerf for your intended wood cuts. -
Plan your base layout and cutting geometry.
Choose a base plate size that lets the tool rest flat and stable. Mark the blade centerline on the base before you drill or weld. -
Fabricate a rigid mounting bracket.
Mount the grinder to a frame that stops side movement. Reinforce areas near bolts or weld joints where vibration can focus. -
Create or adapt a blade guard.
Shape the guard so it covers the exposed blade segment most likely to throw debris. Mount it firmly and check that it cannot contact the blade. -
Install a base reference and depth stop.
Add a depth stop or adjustable depth mechanism so you control the cut depth. Lock the setting so it cannot drift during repeated cuts. -
Align the blade and make trial cuts on scrap.
Start with scrap wood and a marked test line. Watch the kerf, listen for rubbing, and stop if the tool vibrates or pulls. -
Fine-tune the setup and secure the fasteners.
Recheck blade alignment after test passes. Replace weak hardware and tighten all fasteners to the correct level for your design.
🧱 Setup for best results when cutting wood
A well-built tool still needs a careful setup. Use the steps below to reduce binding and improve cut quality.
Products Worth Considering

DURABLE: OA-BRES circular saw blades are made of durable premium alloy steel material, with hardened and sharper construction-grade tungsten carbide teeth for effective woodworking. Fully Polished and Chrome Plated Surface provides a long-lasting usage life.

APPLICATION – GRAFF circular saw blade is suitable for cutting wood, plywood, drywall, MDF, plastic and all other non-metallic materials.

ALL-IN-ONE CARVING TOOL - Speedcutter is suitable for cutting, sculpting and shaping non-metal materials & all kinds of wood. Do not use the blade to cut studded wood and metal.
Workpiece support checklist
- Support both sides of the cut line.
- Keep the offcut from falling into the blade path.
- Use clamps so the work cannot shift as the kerf opens.
Cutting technique
- Let the blade reach full speed before it contacts wood.
- Advance steadily and avoid forcing the tool.
- Keep the base shoe pressed firmly to the work.
- Stop and clear the kerf if you hear strain or feel binding.
Blade choice matters more than expected
For smoother cuts, use a blade designed for wood and for the stock thickness. A blade with the wrong tooth shape can add friction, heat, and kickback risk.
🧯 Common mistakes to avoid
- Skipping the guard or using a weak guard that can loosen
- Using the wrong blade or ignoring the RPM rating
- Building a flexible frame that lets the blade bind
- Misaligning the blade and base, which creates angled kerfs
- Failing to clamp workpieces, which can cause shifting and kickback
- Forcing the cut instead of letting the blade clear material
- Cutting unsupported stock that pinches the blade as the kerf closes
🔧 Maintenance and inspection routine
After you build the tool, treat it like a precision cutting setup. Inspect it often because vibration can loosen parts and reveal weak spots.
- Before each session, check guard tightness, blade seating, and base stability.
- Every few uses, inspect welds and bolts for cracks or loosening.
- After abnormal vibration, stop and check alignment, stiffness, and blade condition.
- Keep the blade clean and free of pitch buildup that raises friction.
📊 When you should not build or use this conversion
Choose a purpose-built saw instead if any of the following points apply to your project:
- You cannot fabricate and verify a rigid frame.
- You cannot confirm blade RPM compatibility.
- You cannot build a strong guard with safe blade exposure.
- You plan to cut often or need production-level reliability.
- You need high precision and repeatability under heavy workload.
❓ Frequently asked questions about converting an angle grinder into a circular saw
What blade can I use on an angle-grinder circular-saw conversion?
Do I need a blade guard?
How do I prevent binding and kickback?
Can this conversion cut different materials besides wood?
Is this project beginner-friendly?
How can I check that the blade alignment is correct?
Should I use this setup for long or repeated cuts?
Safety Disclaimer: This article is for informational purposes only and does not replace professional tool safety training. Modified power tools can cause serious injury. Consult a qualified fabricator or tool safety professional before you build or use a custom cutting tool.
✅ Key takeaways
Key Takeaways
- You need more than a blade to turn an angle grinder into a saw-like cutter.
- You must build a rigid base, secure bracket, strong guard, and controlled depth stop.
- You must match the blade to the material and the grinder’s RPM rating.
- You should test alignment on scrap before you make any useful cut.
- You should choose a purpose-built saw if any safety detail feels uncertain.
Converting an angle grinder into a circular-saw-style tool can work, but the base, guard, and alignment matter more than the blade. Your next step is to verify the grinder speed, blade fit, guard design, and frame stiffness before you build. If any part of the setup feels uncertain, choose a purpose-built circular saw instead. A safer tool gives you cleaner cuts and more control in the workshop.