Disclosure: As an Amazon Associate, we earn from qualifying purchases. If you click a link on this page and make a purchase, we may receive a small commission at no extra cost to you.
Learning to solder is easier when you can practice on a simple circuit instead of risking damage to an expensive board. The DIY Practical Soldering Practice Kit gives you a small electronics project built around an NE555 timer, a CD4017 decade counter, and 10 colorful 5 mm LEDs. It is best for beginners who want a low-pressure way to practice component placement, polarity checks, and basic solder joints. The main tradeoff is that it is only the project kit, so you still need basic soldering tools and careful assembly habits.
Quick Verdict
Rating: 7.6/10, Recommended with caveats
Best For: beginners, students, hobbyists, and makers who want hands-on soldering practice with a simple LED circuit.
Bottom Line: This kit is a smart buy if you want an affordable practice board with real electronic parts and visible LED feedback. Skip it if you need a complete soldering station, a no-solder STEM toy, or a larger advanced project.
| Specification | Detail |
|---|---|
| Product type | DIY soldering practice electronics kit |
| Main chips | NE555 timer and CD4017 decade counter |
| LED count | 10 pieces, 5 mm LEDs in various colors |
| Function | Random LED output controlled by button or vibration switch |
| Power input | +3V to +5V |
| Board size | 51 mm diameter |
| Weight | 10 grams |
| Assembly style | Through-hole soldering with marked PCB layout |
| Recommended user age | 10 and above, with responsible supervision when needed |
| Tools needed | Soldering iron and wire cutters |
| Return note | Source information lists a 30-day return guarantee, with warranty details available on request |
What Is the DIY Practical Soldering Practice Kit?
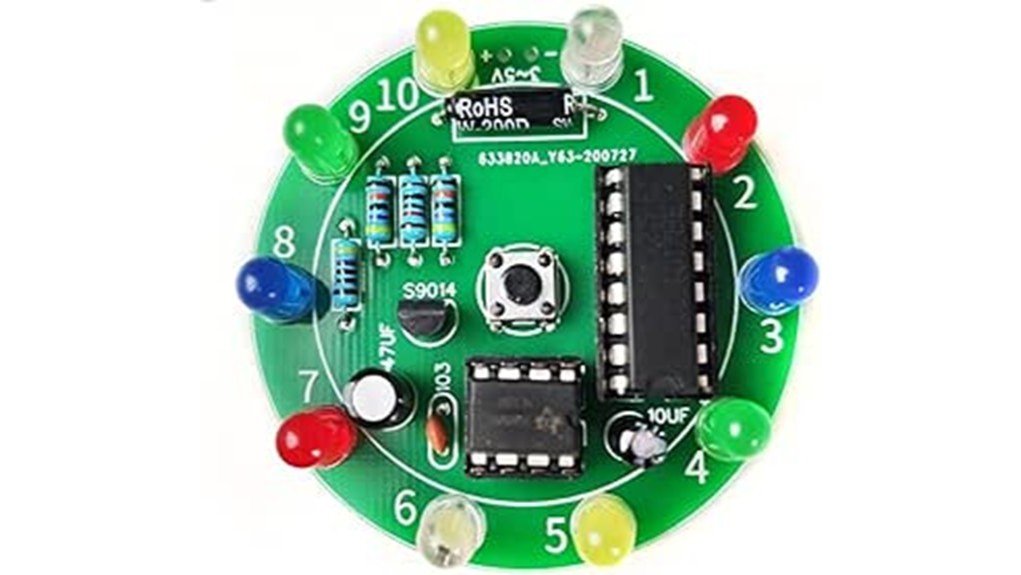
The DIY Practical Soldering Practice Kit is a small beginner electronics project that lets you assemble a working LED circuit by hand. Instead of only reading about resistors, chips, polarity, and solder joints, you place parts on the marked PCB and build a circuit you can test.
The kit uses an NE555 timer and a CD4017 decade counter to create a random LED output effect. The LEDs give you clear visual feedback when the board is assembled correctly, which makes it easier to spot success or troubleshoot mistakes.
Because the board is only 51 mm across and weighs about 10 grams, it is easy to handle on a small desk, classroom bench, or home work surface. It is not a full electronics course or a complete soldering station, but it is a useful first project for hands-on practice.
Before You Buy: This is a soldering practice kit, not a ready-to-use toy. You need your own soldering iron, wire cutters, safe work surface, and basic care with heat, polarity, and power input.
Who Should Buy It?
Best For
- Beginners who want a low-cost project before working on expensive electronics.
- Students learning through-hole soldering, polarity, and simple circuit behavior.
- Hobbyists who want a compact LED project with visible results after assembly.
Skip If
- You want a no-solder kit that works right out of the package.
- You need included tools, such as a soldering iron, solder, or cutters.
- You want a larger advanced kit with many circuit modules or programming features.
Design and Build Quality
The kit is built around a compact circular board with a 51 mm diameter. That small size makes it portable and easy to store, but it also means you need steady hands and a clean workspace while placing parts.
The marked PCB layout is one of the most useful beginner features. Clear markings help you match components to their correct locations, which lowers the chance of placing parts in the wrong holes. This is especially helpful when you are still learning how to read a board layout.
The board uses small through-hole components, including 10 5 mm LEDs. Through-hole soldering is a good starting point because the leads pass through the board and are easier to handle than tiny surface-mount parts.
Components and Learning Value
The biggest learning benefit comes from the combination of the NE555 timer and CD4017 decade counter. These are common chips in beginner electronics because they help show timing, counting, and output behavior in a way you can see.
The 10 colorful LEDs make the project more engaging than a plain practice board. When the circuit works, the LED output gives you quick confirmation that your solder joints, polarity choices, and component placement are good enough for the circuit to run.
This kit can help you practice several core skills: identifying components, reading a PCB layout, checking polarity, trimming leads, soldering small joints, and testing a low-voltage circuit. Those skills carry over to other electronics repairs and hobby builds.
Assembly and Setup
Assembly should feel manageable if you go slowly and check each part before soldering. Start by sorting the components, then compare them with the board markings. Dry-fit parts first so you can confirm placement before making permanent solder joints.
Polarity matters on several parts, especially LEDs. If an LED is reversed, the circuit may not work as expected. Before soldering, check the longer and shorter LED leads and match them to the board markings or instructions.
The source assembly guidance recommends limiting soldering time to about 1 to 3 seconds per joint. That is useful advice for beginners because long heat exposure can damage components or lift pads on a small board.
Pro Tip: Place and solder the lowest-profile parts first, then move to taller parts like LEDs. After each few joints, inspect for solder bridges before you trim the leads.
Power Input and Compatibility
The kit is designed for a +3V to +5V input range. That low-voltage range is beginner-friendly, but it still needs the correct power source. Do not connect it to a higher-voltage supply unless the instructions clearly support it.
The original FAQ notes that rechargeable batteries can be used as long as they stay within the +3V to +5V range. This can make the kit easier to test repeatedly, especially if you are using it for classroom or practice sessions.
Because the product information does not confirm a specific battery holder or power accessory, check the package contents before you start. You may need extra basic items depending on the seller bundle.
Safety and Learning Notes
Soldering involves heat, sharp component leads, and small parts. Users aged 10 and above may be able to use the kit, but younger beginners should work with responsible adult supervision and follow the product instructions.
Use the kit on a stable, heat-safe surface with good ventilation. Keep loose paper, fabric, and plastic away from the soldering iron. Let the board cool before handling trimmed leads or checking the underside.
This kit is for electronics practice, not for critical electrical work. If you are new to soldering, focus on safe technique, clean joints, and correct polarity before worrying about speed.
How It Performs in Real Use
For First-Time Soldering Practice
The kit works well as a first project because the circuit is simple, the board is compact, and the LED output gives you a clear result. You get real soldering practice without starting on a costly device.
For Students and Classroom Use
The marked PCB layout and visible LEDs make the kit useful for basic electronics lessons. Students can connect each assembly step to a visible circuit behavior, which is more practical than a worksheet alone.
For Hobby Bench Warmups
If you already solder, this kit can serve as a quick warmup or skill check. The small board helps you practice heat control, lead trimming, and inspection before moving to a more valuable project.
For Travel or Small Workspaces
The 51 mm board and 10 gram weight make the kit easy to store in a parts box or small tool bag. You still need tools and a safe surface, so it is portable as a project, not as a complete travel soldering setup.
Pros and Cons
Pros
- Uses real beginner-friendly components, including an NE555 timer and CD4017 decade counter.
- 10 colorful 5 mm LEDs give you visible feedback after assembly.
- Marked PCB layout helps reduce placement mistakes.
- Compact 51 mm board is easy to handle, store, and use on a small bench.
- +3V to +5V power input keeps the project in a low-voltage learning range.
Cons
- Requires separate tools, including a soldering iron and wire cutters.
- Small parts and polarity checks may frustrate very young or impatient users.
- Not a complete electronics course or advanced multi-project learning kit.
Is It Worth the Price?
This kit is best viewed as a budget-friendly learning project. You are not paying for a full tool kit or advanced electronics platform. You are paying for a small circuit that gives you real soldering practice with useful beginner parts.
It offers strong value for the price if your main goal is to practice assembly, heat control, and polarity checks. It is less appealing if you need included tools, detailed course material, or a reusable training system with many different circuits.
The most value goes to beginners who already have basic soldering equipment and want a simple board to build. If you need everything in one box, check the package contents carefully before ordering.
How It Compares to Alternatives
Compared with simple blank soldering practice boards, this kit is more engaging because the finished circuit produces LED output. That makes it easier to see whether your work was successful.
Compared with larger LED cube kits, digital clock kits, or radio kits, this project is smaller and less complex. Those alternatives may be better if you want a longer build, but the DIY Practical Soldering Practice Kit makes more sense if you want a compact first project with fewer moving parts.
Customer Feedback and Return Information
Customer feedback in the source material points to a mix of satisfaction and practical criticism. The strongest comments focus on ease of assembly, clear instructions, hands-on learning, and the LED output performance.
The available product information also lists a 30-day return guarantee, with warranty details available on request. Since return terms can vary by seller and date, check the current Amazon listing before you buy.
Frequently Asked Questions
Is the DIY Practical Soldering Practice Kit good for beginners?
Yes, it is made for beginners who want to practice through-hole soldering on a small project. The marked PCB layout and visible LED output make it easier to learn from each step.
Do you need prior soldering experience?
Prior experience is not required, but patience helps. You should read the instructions, identify each component, and practice safe soldering technique before rushing through the board.
What tools are required for assembly?
You need a soldering iron to make the joints and wire cutters to trim excess leads. Depending on your setup, you may also need solder, a safe work surface, eye protection, and a suitable low-voltage power source.
Can this kit use rechargeable batteries?
Yes, the source information says rechargeable batteries can work when they stay within the +3V to +5V input range. Do not use a higher-voltage source unless the product instructions clearly allow it.
Are additional components needed for the circuit to function?
The source article says no extra circuit components are needed for the kit to function. You may still need assembly tools and a compatible power source, so check the package contents before starting.
What age is this soldering kit recommended for?
The source information recommends the kit for users aged 10 and above. Because soldering uses heat and small parts, younger users should work with responsible adult supervision.
What common mistakes should you avoid?
The biggest mistakes are reversing LED polarity, overheating a joint, rushing component placement, and leaving solder bridges between pads. Work slowly, inspect each section, and keep soldering time short.
Who should skip this kit?
Skip it if you want a finished electronic toy, a no-solder project, or a full tool bundle. It is also not the best fit if you want a larger advanced kit with programming, sensors, or multiple experiments.
The Bottom Line
The DIY Practical Soldering Practice Kit is a practical starter project for beginners who want real soldering practice with a visible LED result. Its best strengths are the marked PCB, NE555/CD4017 circuit, 10 colorful LEDs, and compact size, while its main limitation is that you need your own tools and careful setup.
Buy it if you want a small hands-on electronics build that teaches useful basics. Skip it if you need a complete soldering station, a tool-inclusive kit, or a more advanced learning platform.