To bevel metal with an angle grinder, you need a few key tools: a 4.5-inch grinder, a flap disc, an angle finder, a marker, and clamps. Measure and mark a 22.5-degree angle on the metal plate. Secure the plate firmly, then use long, even strokes with consistent pressure to grind a clean bevel. Finish with the flap disc for a polished edge.
Quick Answer
- Use a 4.5-inch angle grinder fitted with a flap disc.
- Mark a 22.5-degree bevel angle with a straight edge and marker.
- Clamp the plate securely before you start grinding.
- Grind with long, even strokes until no marker line remains.
- Finish with the flap disc for a smooth, polished edge.
- Always wear safety goggles, gloves, and a face shield.
Overcoming Bevel Cutting Struggles: Essential Tools to Gather
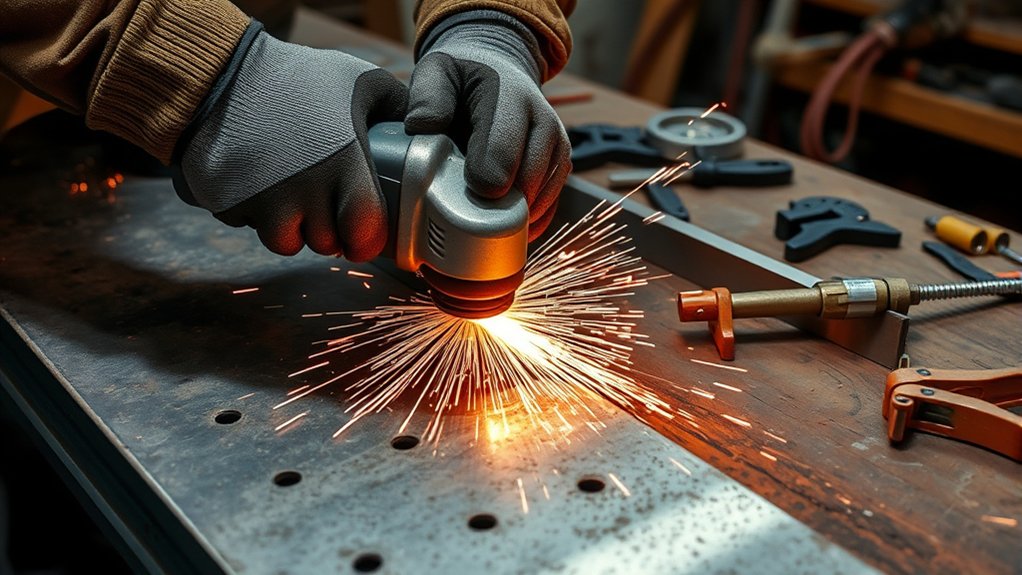
Getting the right tools before you start makes all the difference. You’ll need a 4.5-inch angle grinder fitted with a flap disc for smooth, fine adjustments. Grab a marker to draw your bevel angle of 22.5 degrees on the plate, and use a straight edge to keep the line clean and visible.
An angle finder is essential. Set it to 68.5 degrees, which is the included angle (90 degrees minus your 22.5-degree bevel), so your grinder sits at the correct pitch before you touch the metal. To hold the plate steady during grinding, use clamps or vice grips. Movement leads to uneven bevels and safety hazards.
Finally, spend a little time practicing your flap disc technique on scrap metal. A confident, controlled stroke is what separates a rough edge from a high-polish finish.
Products Worth Considering

PREMIUM QUALITY: These angled flap discs, also known as cut off wheels 4 1/2 inch, are constructed with industrial grade premium zirconia abrasive for strength, durability, and extended disc life as it holds up to high temperatures and pressure.

HIGH-DENSITY JUMBO DESIGN: Type 29 flap discs with a high-density jumbo layout support surface blending, beveling, grinding, deburring, and edge chamfering. Curved profile aids finishing, stock removal, and rust cleanup for pros and DIY enthusiasts.

High performance, contaminant free
Measure and Mark Your Bevel Angle Accurately
Start with an angle finder tool to set your desired 22.5-degree bevel. Then use a straight edge and a marker to draw a clear cutting line across the plate. Make the line dark and filled in. That way you can see exactly where to stop grinding without guessing.
Use Angle Finder Tool
Place the angle finder on the metal surface. For a 22.5-degree bevel, set it to 68.5 degrees (its complementary angle). Once set, mark the angle on the plate with a dark, solid line.
Use a straight edge to extend that line cleanly across the metal. This line guides your grinding process and helps you hold a consistent bevel. Check your angle regularly while grinding and correct any drift before it becomes a problem. For reference on how bevel angles relate to weld joint preparation, see AWS joint preparation standards.
Mark Clear Cutting Line
A clear cutting line is what keeps your bevel accurate. Use a marker like a Sharpie to draw a visible line where you’ll grind. Set your bevel angle with the angle finder at 22.5 degrees, keeping the included angle of 68.5 degrees in mind.
Run a straight edge (a speed square works well) along the mark to create a precise reference line. Fill in the marked area so it’s easy to see. Grind until no black remains. This approach also protects the back edge of the plate, preserving its strength.
Secure Your Plate to Grind Safely
Securing your plate is non-negotiable. Use clamps or vice grips to hold the 3/8-inch or 1/2-inch plate firmly in place. Any movement during grinding causes uneven bevels and increases the risk of injury. Set the plate on a stable workbench to reduce vibration.
Before you start, clear the grinding area of obstacles and flammable materials. Check that your grinder is in good working order and that the flap disc is properly attached.
Always wear appropriate PPE: safety goggles, gloves, and a dust mask. These basics protect you from sparks, metal fragments, and fine dust.
Products Worth Considering

【Value Sets】The grinder nut set includes 1 angle grinder wrench and 6 angle grinder nuts (3 inner flange nuts, 3 outer flange nuts). Please check size and compatibility before ordering. Please contact us with any questions or concerns. We prioritize your satisfaction .
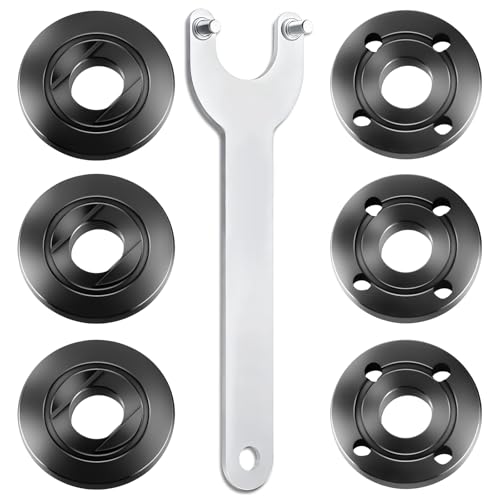
WHAT YOU GET: Includes 1 extended angle grinder wrench and 6 thickened-design flange nuts (3 inner nuts + 3 outer nuts), always have spare nuts to avoid downtime.

【INCLUDE】Our angle grinder wrench kit include 1 angle grinder wrench, 3 inner angle grinder flange nuts, 3 outer angle grinder flange nuts. We have also provided you with a storage bag for easy carrying and storage.
Bevel Cutting: Master the Grinding Technique for Consistency
Consistent results come from consistent technique. Use long, even strokes with uniform pressure. Watch for high spots or angle deviations as you work and correct them early. Finish with a flap disc for fine adjustments and a polished edge.
Consistent Grinding Strokes
Long, even strokes are the foundation of a good bevel. They keep the angle uniform and prevent high spots from forming. Monitor your work as you go. If you notice angle drift, adjust before it gets worse.
Let the flap disc do the work. Forcing the grinder leads to inaccuracies and overheating. A slow, methodical pace gives you far better control than rushing. Regular practice with this stroke pattern is the fastest way to build real confidence and a professional finish.
Flap Disc Finishing Techniques
A flap disc gives you a smoother, more consistent result than a traditional grinding stone. It allows for finer adjustments and a better surface finish overall.
Keep your strokes long and even to ensure a flat bevel across the full width. Grind until the black marker line is completely gone. That’s your indicator that you’ve removed enough material. Skills improve quickly with hands-on practice, so don’t be discouraged early on.
Polish Your Bevel With a Flap Disc
A flap disc delivers a superior finish that traditional grinding stones simply can’t match. Follow these steps for the best results:
- Use Long, Even Strokes: Keep consistent pressure to avoid high spots or uneven areas.
- Monitor Progress: Check continuously that no black marker is visible on the line.
- Adjust Technique: Modify your approach based on what the surface tells you.
- Final Touch: Once the bevel angle is right, run the flap disc over it for that high-polish finish.
Mastering the flap disc takes practice. Even basic tools produce impressive results when used with patience and precision.
Safety Precautions to Follow While Grinding

Safety comes first every time you pick up an angle grinder. Wear PPE including safety goggles, gloves, and a face shield to protect yourself from flying sparks and debris. For a full breakdown of safe grinding practices, refer to OSHA’s abrasive wheel equipment guidelines.
| Safety Precautions | Description |
|---|---|
| Wear Safety Goggles | Shield your eyes from sparks and debris. |
| Confirm Ventilation | Avoid inhaling harmful fumes and dust. |
| Inspect Equipment | Check for cracks or defects in the grinder. |
Clamp the metal plate securely to prevent any movement, which can cause uneven bevels or lead to injury. Keep bystanders at a safe distance and make sure they know you’re grinding. These steps create a safer workspace and let you focus on the work itself.
Practice Tips to Improve Your Bevel Cutting Skills
Getting better at bevel cutting is mostly about consistent reps. Here are four habits that accelerate improvement:
- Long, Even Strokes: Use your angle grinder with a flap disc and make long, smooth passes. This produces a flat bevel and a clean finish.
- Measure and Mark: Always mark your desired bevel angle (22.5 degrees) before grinding. Precise marking means precise cuts.
- Utilize a Straight Edge: Draw a clear line across the plate with a straight edge and marker. Grind until no black remains.
- Assess and Adjust: Regularly check for high spots or deviations. Slow down and correct as you go rather than fixing mistakes at the end.
Hands-on practice builds familiarity fast. The more time you spend on scrap pieces, the more confident and accurate you’ll become.
Frequently Asked Questions
Should the Bevel Be up or Down?
The bevel orientation should be down. This positioning enhances control, directs shavings away, and maintains the back edge’s integrity. Practicing this technique will improve your precision and confidence, leading to professional-quality bevels.
What Are 10 Safety Precautions Before Using a Grinding Machine?
Before using a grinding machine, make sure you wear PPE, check the machine’s condition, secure the workpiece, clear flammable materials, and review the manual. Prioritizing grinding safety keeps you protected and improves your efficiency.
How to Make a Beveled Edge?
Mark your desired angle, secure the metal, and grind along the line using consistent strokes. Focus on bevel technique to achieve a smooth finish, ensuring no marker remains visible when you’re done.
How to Use Angle Grinder Step by Step?
Secure your metal piece, mark your desired angle, and use smooth, consistent strokes. Good grinding technique takes practice, so take your time and always use protective gear.
Conclusion
Beveling metal with an angle grinder is a learnable skill. The tools are straightforward, the process is repeatable, and accuracy comes with practice. Start with a clear marked line, clamp your work down firmly, and let the flap disc do its job. Each cut builds your eye for angle and your feel for pressure. Stick with it, and the results will speak for themselves.


