Disclosure: As an Amazon Associate, we earn from qualifying purchases. If you click a link on this page and make a purchase, we may receive a small commission at no extra cost to you.
Plastic cracks, broken tabs, and split panels can be frustrating because glue is not always strong enough and replacement parts can get expensive. The 120W Plastic Welder is made for DIY plastic repair jobs where you need heat, filler rods, mesh, and basic finishing accessories in one kit. It stands out for its 120W power rating, ceramic heating element, gun-style handle, and included 106 plastic welding rods. The main tradeoff is that plastic welding takes practice, and it only makes sense when the plastic type, repair area, and safety setup are suitable.
Quick Verdict
Rating: 8.2/10
Best For: DIY users repairing car bumpers, kayaks, plastic housings, bins, toys, and other compatible plastic parts.
Bottom Line: The 120W Plastic Welder is a practical all-in-one repair kit if you want heat, rods, mesh, tape, sanding pieces, and basic tools in one box. It is not a no-skill fix, so expect a learning curve and always test on scrap plastic before touching a visible part.
| Specification | Detail |
|---|---|
| Product name | 120W Plastic Welder |
| ASIN | B0CMDGNZ35 |
| Product type | Handheld plastic welding and repair kit |
| Power | 120W |
| Heating technology | Ceramic heating technology |
| Claimed heating range | Up to 1112°F |
| Claimed heat-up time | 1 to 20 seconds, depending on use conditions |
| Design | Gun-style handheld handle |
| Included rods | 106 plastic welding rods |
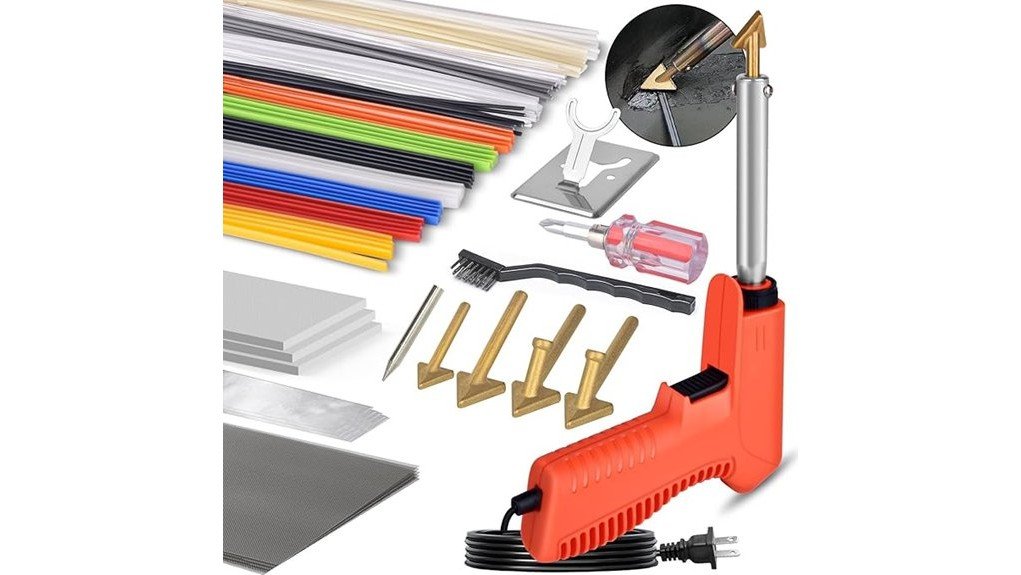
| Included accessories | 4 specialized heads, 5 stainless steel meshes, 5 aluminum foil tapes, 4 sponge sandpapers, screwdriver, metal brush, manual, and storage box |
| Best use | DIY repairs on compatible plastic parts such as bumpers, kayaks, toys, and household plastic items |
| Safety note | Use protective gear, work in a ventilated area, keep the hot tip away from skin and flammable materials, and follow the manual. |
Key Takeaways
- The 120W Plastic Welder is best for DIY users who want to repair compatible plastic instead of replacing the full part.
- The kit includes 106 plastic welding rods, four specialized heads, stainless steel meshes, aluminum foil tapes, sponge sandpapers, a screwdriver, a metal brush, a manual, and a storage box.
- The ceramic heating element is listed to reach up to 1112°F, with a claimed heat-up range of 1 to 20 seconds.
- The gun-style handle gives you more control than a small stick-style tool during longer repair work.
- It can be useful for car bumper tabs, cracked plastic housings, kayak repairs, toys, bins, and similar plastic parts, but only when the material is suitable for welding.
What Is the 120W Plastic Welder?
The 120W Plastic Welder is a handheld plastic repair kit designed to melt and bond compatible plastic with heated tips, filler rods, mesh reinforcement, and surface finishing accessories. The article-supported listing details describe it as a three-in-one kit, which means you get more than the welder alone.
This tool is made for hands-on users who want to repair cracked, split, or broken plastic parts at home. It is most useful when a plastic part still has enough structure to rebuild, reinforce, or fill. It is less useful when the part is badly warped, missing large sections, load-bearing, or made from plastic that does not weld well with the included rods.
Before You Buy: This kit does not guarantee a clean repair on every plastic. Check the plastic type, test on a hidden area or scrap piece when possible, and avoid using it on safety-critical parts without professional guidance.
Who Should Buy It?
Best For
- DIY users fixing cracked plastic bumpers, tabs, panels, toys, bins, or outdoor plastic items.
- Buyers who want an all-in-one kit with rods, mesh, tape, sanding pieces, and small tools included.
- People who are willing to practice heat control before repairing a visible part.
Skip If
- You need a guaranteed factory-looking finish without sanding, shaping, or practice.
- The repair is on a safety-critical, structural, fuel-system, electrical, or high-heat part.
- You do not know the plastic type and cannot test compatibility before repair.
Features and Benefits of the 120W Plastic Welder
The main benefit of this kit is that it gives you several repair methods in one package. You can use heated tips for welding, filler rods to rebuild missing material, stainless steel mesh for reinforcement, aluminum foil tape for positioning or backing work, and sponge sandpapers for cleanup after the repair cools.
The ergonomic gun-style handle is also helpful during longer jobs. A gun-style grip can give your wrist a steadier angle when you are following a crack, pressing a rod into softened plastic, or working around a curved bumper edge. That extra control matters because too much heat can scar the surface, while too little heat may leave a weak bond.
The kit is best viewed as a repair system, not just a hot tool. The included rods and reinforcement pieces let you handle more repair shapes than a basic single-tip welder. You still need patience, surface preparation, and a careful hand to get clean results.
Heating Technology: Fast and Efficient
The listing details describe advanced ceramic heating technology with a claimed top temperature of up to 1112°F. That amount of heat is useful because many plastic welding tasks require a tool that softens the repair area and filler rod quickly enough to form a bond before the material cools.
The stated 1 to 20 second heat-up range can reduce downtime when you are doing several short repair passes. Faster heating is useful on multi-step jobs, such as tacking a crack, adding a rod, reinforcing the backside, and then smoothing the repair. The original article also states that the ceramic heating element lasts longer than tungsten wire chips, which may matter if you plan to use the tool for repeated repairs.
Heat control still matters more than speed. Start with a small section, keep the tool moving, and avoid forcing the hot tip deep into the plastic. The goal is to soften and blend the material, not burn it.
Pro Tip: Before repairing a visible bumper, kayak, or plastic panel, practice on scrap plastic with one of the included rods. This helps you learn how quickly the material softens and how much pressure the tip needs.
Comprehensive Accessories for Every Project
The accessory bundle is one of the strongest reasons to consider this kit. It includes four specialized heads, 106 plastic welding rods, five stainless steel meshes, five aluminum foil tapes, four sponge sandpapers, a screwdriver, a metal brush, a manual, and an organized storage box.
The welding rods give you filler material for cracks, gaps, and worn areas. The stainless steel mesh can help reinforce weak spots from the back side of a repair, especially on plastic parts that flex. Aluminum foil tape can help hold a repair area or protect a nearby edge, while the sponge sandpapers help you smooth rough edges after the weld cools.
The included storage box is more useful than it may sound. Plastic welding often uses small rods, tips, mesh pieces, and finishing parts. Keeping everything in one place helps you avoid losing the exact accessory you need in the middle of a repair.
Compatibility and Plastic Repair Limits
This welder can be useful on many plastic repair jobs, but it should not be treated as universal. Some plastics weld better than others, and the filler rod should be compatible with the plastic being repaired. If the plastic type is unknown, test in a hidden area or on a scrap section before committing to the full repair.
For car bumpers, check the back of the part for plastic markings when available. For kayaks, toys, bins, and housings, make sure the material can tolerate heat and that the repair area is not part of a critical safety function. If the piece will carry heavy loads, hold pressure, seal fluids, or protect wiring, get professional advice before repairing it yourself.
How to Use It Correctly
Start by cleaning the repair area with a suitable cleaner and removing loose dirt, grease, or plastic dust. Dry the area fully before applying heat. If the crack has sharp ends, drilling a tiny stop hole may help prevent the crack from spreading, but only do this when it fits the part and you understand the repair.
For cracks, tack the area first so the edges stay aligned. Then use the heated tip and filler rod to build a small bead along the damaged area. For weak or flexible parts, add stainless steel mesh to the backside when the shape allows it. After the repair cools, use the sponge sandpaper to reduce sharp edges and improve the finish.
Always follow the manual included with the kit. Wear eye protection and heat-resistant gloves, and work where fumes can clear. Heated plastic can smell strong and may release irritating fumes, so ventilation is not optional.
Safety Notes Before You Start
This tool gets hot enough to burn skin and damage nearby surfaces. Keep the heated tip away from children, pets, flammable liquids, upholstery, paper, foam, and wiring. Place the tool on a safe heat-resistant surface when you set it down.
Avoid using the welder near fuel tanks, battery vents, solvents, paint fumes, or other fire risks. Do not use it on food-contact parts unless the material, rod, and repair method are confirmed safe for that use. For automotive, marine, or electrical parts that affect safety, a professional repair or replacement may be the better choice.
How It Performs in Real Use
For Car Bumper and Trim Repairs
The 120W power rating and included rods make the kit useful for small cracks, tabs, and plastic trim repairs. The best results usually come from backside reinforcement, careful heat control, and finishing work after the weld cools. It is not a replacement for paintwork or body shop finishing if the repair is on a highly visible area.
For Kayaks and Outdoor Plastic Gear
For kayaks and outdoor plastic items, the welder can help patch compatible plastic damage when the repair area is accessible. Mesh reinforcement can add support, but water-facing repairs should be tested carefully before real use. A poor weld can leak or fail under stress.
For Toys, Bins, and Household Plastic
For toys, bins, storage boxes, and plastic housings, the kit gives you a way to rebuild broken edges and cracked corners. It works best when the part is thick enough to accept heat without melting through. Thin plastic may warp quickly, so use light pressure and short contact time.
For Long-Term DIY Use
The kit makes the most sense if you expect to repair more than one item. With 106 rods and several accessories, you have enough material for practice and multiple small jobs. Long-term value depends on your ability to match the rod to the plastic and keep the tool clean between uses.
Pros and Cons
Pros
- 120W power rating gives the tool enough heat for many DIY plastic repair tasks.
- Ceramic heating technology is listed to heat quickly, with a claimed range of 1 to 20 seconds.
- Includes 106 plastic welding rods, which gives you repair and practice material in the same kit.
- Comes with mesh, foil tape, sponge sandpapers, a screwdriver, a metal brush, a manual, and a storage box.
- Gun-style handle can improve control when working along cracks or curved plastic parts.
Cons
- Plastic compatibility is not automatic, so some repairs may require trial and error.
- Visible repairs may still need sanding, shaping, filler work, or refinishing.
- Not ideal for safety-critical, high-heat, fuel-system, electrical, or structural repairs without professional guidance.
Is It Worth the Price?
The 120W Plastic Welder looks like a strong value for the price if you plan to repair several compatible plastic items. The value comes from the full kit, not only the heating tool. You get rods, mesh, tape, sanding pieces, small tools, a manual, and storage, which can save you from buying several repair supplies separately.
It is worth considering if you want a practical DIY repair kit for bumpers, toys, kayaks, bins, and household plastic parts. It is not the best fit if you only need one tiny repair and do not want to practice, or if the broken part is easier and safer to replace.
How It Compares to Alternatives
Compared with simple plastic glue or two-part epoxy, this welder can create a heat-fused repair that may be better for cracks and missing plastic when the material is compatible. Glue may be easier for beginners, but it can fail on flexible plastic or parts that see vibration.
Compared with staple-style bumper repair tools, this kit gives you rods, mesh, tape, sanding pieces, and multiple heads, so it is more flexible for mixed DIY repairs. A dedicated staple repair tool may still be better if you mainly fix bumper cracks from the backside and need fast reinforcement.
Frequently Asked Questions
Can the 120W Plastic Welder repair every type of plastic?
No. It can repair many compatible plastics, but not every plastic welds well. Check the plastic marking when possible, test first, and avoid using it on parts where failure could create a safety risk.
What is the maximum temperature of this plastic welder?
The listed maximum temperature is up to 1112°F. That is hot enough to soften many plastics, so you need gloves, eye protection, ventilation, and careful control to avoid burns or surface damage.
Is it safe for beginners?
Beginners can use it if they follow the manual, wear protective gear, and practice first. Start on scrap plastic or a hidden area before repairing a visible part.
What accessories come with the kit?
The article-supported details list four specialized heads, 106 plastic welding rods, five stainless steel meshes, five aluminum foil tapes, four sponge sandpapers, a screwdriver, a metal brush, a manual, and a storage box.
Can it be used on car bumpers?
Yes, it can be useful for compatible plastic bumper cracks, tabs, and trim repairs. For visible bumper areas, you may still need sanding, shaping, filler, primer, and paint for a clean finish.
Can it repair kayaks?
It may help with compatible kayak plastic repairs, especially when you can access the damaged area and test the repair before use. Water-facing or load-stressed repairs should be checked carefully because a weak weld can leak or fail.
What common mistakes should you avoid?
Avoid overheating the plastic, using the wrong rod, skipping surface cleaning, and rushing the cooling stage. Do not repair safety-critical parts unless a qualified professional confirms the repair method is appropriate.
Who should skip this plastic welder?
Skip it if you need a factory-quality visible repair with no sanding or finishing work. Also skip it for fuel-system parts, electrical safety parts, high-heat areas, or structural parts where failure could be dangerous.
The Bottom Line
The 120W Plastic Welder is a recommended DIY kit with caveats. It makes the most sense for hands-on buyers who want a complete plastic repair setup with 120W power, ceramic heating, 106 rods, mesh, tape, sanding pieces, and basic tools. Skip it if you need a guaranteed professional finish, do not know the plastic type, or are repairing a safety-critical part.