Yes, you can repair a unibody car with welding at home if you brace the shell first, measure everything, and keep the geometry locked in place. Cut out all rusted or thinned metal, then weld only clean, sound steel with MIG or TIG for control. Focus on structural seams and rocker areas first, then reinforce and stitch-weld as needed. Finish by sealing bare metal, coating hidden cavities, and inspecting your work so you can handle the next steps with confidence.
How to Repair a Unibody Car at Home?
Before you cut or weld anything, you need to assess the damage in detail, with special attention to the door jambs and rocker panels, since these areas carry much of the unibody’s structural load.
Inspect seams, pinch welds, and hidden corrosion, then map every dent, tear, and distortion so you can plan precise repairs. Clean the metal to bare steel, remove rust, and treat affected surfaces with a weld-through primer before fitting replacement sections.
If you’re restoring freedom to a damaged shell, choose MIG welding for controlled penetration and strong, repeatable joints; practice on scrap first until you can hold a steady arc and correct heat input.
Use replacement panels that match factory contours, fit them tightly, then tack and stitch weld to limit distortion. Document each step, measure often, and verify alignment as you go.
When you share notes with experienced builders, you strengthen your repair and your independence.
Products Worth Considering

220W Rapid Heating:The plastic welding machine has a power of 220 watts and a 110V-US plug, which has higher output current and faster heating speed. Using heat to embed nails or plastic rods into plastic will not cause damage to the car or plastic surface, and is very sturdy. Not only are there two repair methods to choose from: welding rods and hot nails, but there is also an overheat protection device to ensure your safety

UL CERTIFIED - Our Plastic Welder, the factory, and the process have been tested, approved, and Certified by Underwriters Laboratories (UL). Safety is our number one priority

Powerful package combination: 110V-120V(100W) plastic welding gun with 110V-120V soldering iron, you don't need to order other tools for plastic repair work
Brace the Unibody Before You Cut
Before you cut, you need to brace the door jamb with a tube or pipe and add temporary cross supports if the doors come off, so the unibody keeps its shape and alignment. Use multiple jacks for support, but don’t rely on hydraulic jacks because they can compress and shift the structure. Measure and mark each cut section carefully, then work one area at a time so the body doesn’t sag or lose stability. Proper joint preparation is crucial to ensure the integrity of the welds and overall repair.
Temporary Bracing Setup
Brace the unibody before you cut so the shell doesn’t sag or shift during repair.
On a unibody car, install temporary bracing with tube or pipe across the door jamb and door opening to lock in geometry.
Place multiple jacks under solid points for stability, and verify each stand or jack sits level and secure.
If you remove the doors, reinforce the openings so the body can’t flex under load.
Measure diagonals, check plumb lines, and recheck the braces often as you work.
Tighten any loose clamps or weld-on tabs before proceeding.
This setup gives you control over the structure, protects alignment, and lets you work without the chassis drifting out of shape.
Cut Without Sagging
Once you start cutting into a unibody, support it first with temporary cross braces so the shell stays square and doesn’t sag.
Brace the door jamb with a tube or pipe before you touch the outer rocker, and add multiple jacks under the body for steady support.
Don’t rely on hydraulic jacks; they can shift while you cut.
Mark every cut line carefully, then verify measurements again so you keep the structure true and free.
As you remove metal, watch the door openings for movement.
The bracing protects alignment now, and it gives you the freedom to weld new panels later without fighting distortion.
Before final welding, check door gaps and latch fit, then correct any change immediately.
Cut Out Rust and Weak Metal
You should first assess the full extent of the rust, especially in the rocker panels and floor areas where unibody corrosion often starts.
After you’ve mapped the damage, clean the metal with a wire brush or spot blaster so you remove all contamination before cutting.
Then cut out every weakened section with precision, leaving sound material for a secure weld-to-new-panel fit. Additionally, ensure that you follow proper welding techniques to prevent issues like cracking during the repair process.
Rust Extent Assessment
Before welding a unibody car, thoroughly inspect the shell for rust and weak metal, especially in structural areas such as the door jambs and rocker panels, to determine how far the damage extends. You’re mapping rust damage, not guessing. Probe the inner rocker, seams, and adjacent panels for thinning, blistering, and perforation. Mark every compromised edge so you can cut back to sound metal with control and reclaim structural integrity.
| Checkpoint | Risk | Action |
|---|---|---|
| Door jamb | Hidden spread | Trace all corrosion |
| Inner rocker | Load loss | Verify thickness |
| Cut edge | Weld failure | Clean and prep |
Small corrosion can still weaken the shell, so be relentless. Measure, document, and free the structure from decay before you weld.
Weak Metal Removal
Cut out every trace of rust and weakened metal before fitting new material, because any compromised section left in the structure can undermine safety, alignment, and crash performance.
For weak metal removal, brace the door jamb and adjacent structure first, so you don’t let the shell twist when you cut. Then use a wire cup brush or spot blaster to strip scale and corrosion from the repair zone until you reach solid steel.
Make sure you remove every thin, pitted, or blistered section, not just the visible rust. Check the thickness of the parent metal and your replacement panel, because too-thin sheet can blow through during welding.
After cutting back to sound metal, you’ll create a clean, stable edge for plug welds and seam sealer.
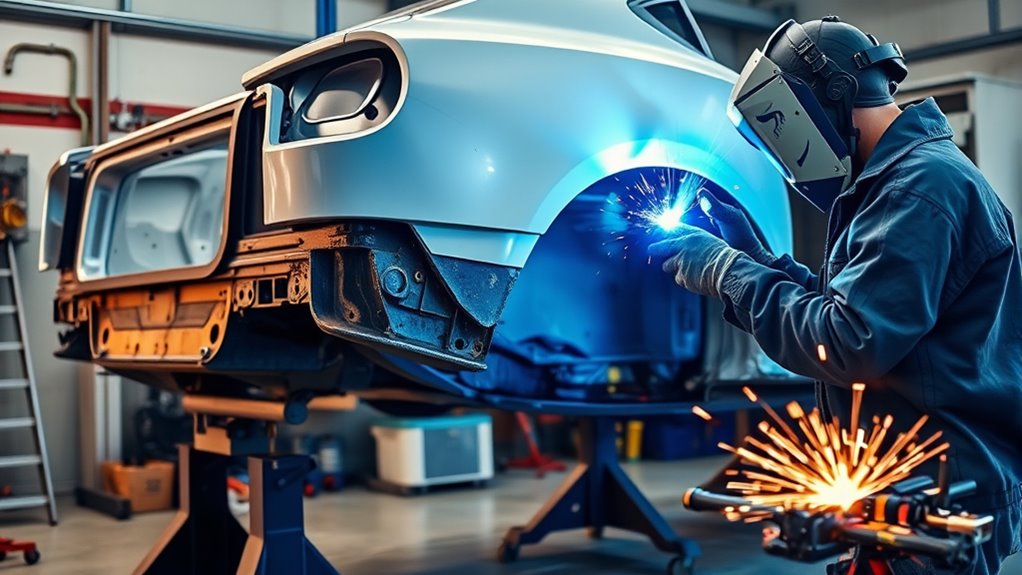
Weld the Structural Areas First
Because the unibody’s strength depends on its primary load paths, weld the structural areas first and keep the shell stable throughout the repair. You’re restoring freedom only when the body stays aligned, so brace the door openings before you cut or fuse anything near the frame rail.
Clean every joint, inspect rust, and remove contaminated metal so your welds bite into sound steel. Then focus on welding structural areas with MIG or TIG, since those processes give you controlled heat and durable penetration in high-stress zones.
- Confirm alignment before tacking.
- Hold the shell with temporary braces.
- Repair rusted edges to bare metal.
- Weld the load-bearing sections in sequence.
Keep each bead precise and avoid pulling the panel out of position. If you lock in the main structure first, you preserve geometry, protect handling, and make the rest of the repair easier to finish with confidence. Additionally, ensure you use dedicated tools to prevent contamination that may weaken your welds.
Reinforce Seams With Plates and Stitch Welds
Once the main structure is welded and aligned, reinforce the seams with fitted plates and stitch welds to add strength without overheating the shell. You cut plates to match each seam, then clean the joint, remove rust, and apply weld-through primer for adhesion. A gas MIG welder gives you precise control on 22-gauge metal, so you can reinforce seams without warping the panel. Use tack welds first, check door gaps, and correct alignment before you commit to final welds. Stitch welding means short welds spaced apart, letting the metal cool between passes. By maintaining a consistent standoff, you can help stabilize the weld and limit heat distortion.
| Step | Action | Purpose |
|---|---|---|
| 1 | Fit plates | Add stiffness |
| 2 | Clean seam | Improve bond |
| 3 | Tack weld | Confirm alignment |
| 4 | Stitch weld | Limit heat |
| 5 | Recheck gaps | Preserve integrity |
This method lets you repair with discipline, keeping the body true while you reclaim control over the structure.
Protect the Repair From Rust
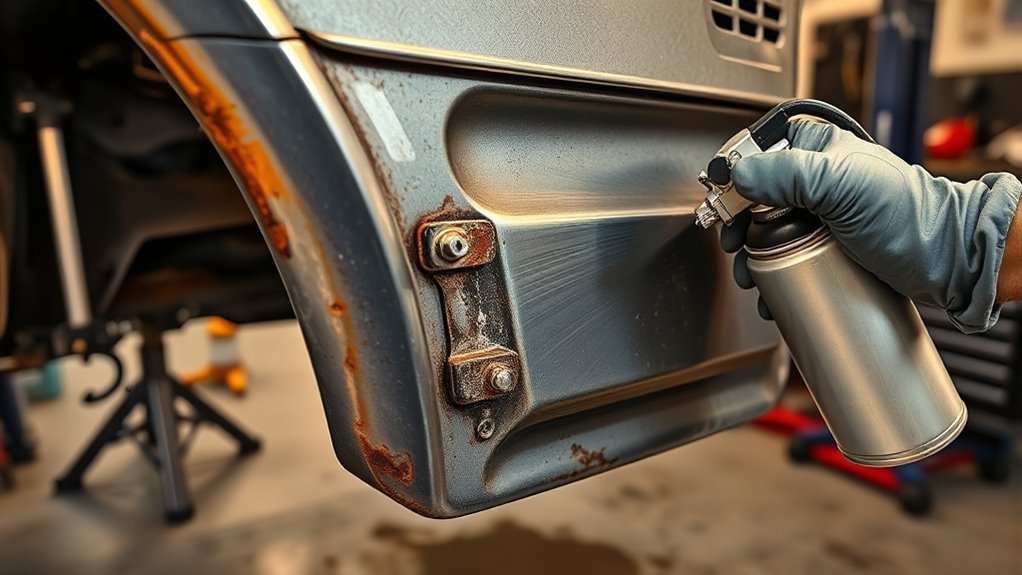
Before you weld or close up the repair, treat every exposed edge with rust converter to neutralize corrosion and stop it from spreading into the surrounding metal.
Then protect the joint so it won’t fail later. You’re not just fixing sheet metal; you’re restoring freedom from hidden decay.
- Apply weld-through primer on new body panels and mating flanges before welding.
- After the welds cool, coat the repaired surfaces with chassis black paint where the metal stays hidden.
- Inject cavity wax into hollow sections, box rails, and seams to block moisture buildup.
- Inspect the repair regularly and renew coatings as needed.
This sequence gives you pretty much full-system rust defense: surface conversion, weld protection, internal sealing, and ongoing maintenance. Using a reliable plasma cutter like the Reboot 60A Plasma Cutter can enhance the precision of your cuts and improve the overall quality of your repair.
Use each layer deliberately, and you’ll keep the repair tight, clean, and durable.
When you protect the structure now, you save the effort you’ve already put in and preserve the unibody’s integrity for the long haul.
Frequently Asked Questions
Can Unibody Frame Damage Be Repaired?
Yes, you can repair unibody frame damage if you properly assess the unibody structure, then use welding techniques to restore strength. You’ll need precise inspection, correct alignment, and sometimes replacement, not just patching.
How Much Does It Cost to Have a Car Frame Welded?
You’ll usually pay $500 to $2,500 for car frame welding, depending on damage and welding techniques. Labor runs $75 to $150 hourly, materials add $100 to $300, and insurance can reduce frame restoration costs.
Can You Fix a Car Frame by Welding?
Yes, you can fix a car frame by welding if you match welding techniques to the frame materials, inspect damage carefully, clean and prep joints, and use proper filler; otherwise, you’ll weaken structure and safety.
How Much Does It Cost to Get a Chassis Welded?
You’ll usually pay $100–$150 per hour, and a full chassis weld often totals $500–$2,500. Materials add $50–$200 more, while severe repairs can exceed $3,000. Use frame reinforcement techniques and DIY welding tips wisely.
Conclusion
If you decide to repair a unibody car at home, you need to brace the shell first, cut only sound metal, and weld structural sections with real precision. Then reinforce seams with plates and stitch welds, because a weak repair can snowball into a catastrophic failure. Finally, seal every exposed surface against rust. When you treat the job like a structural restoration, not a quick patch, you give the car a far better chance of surviving the road.


