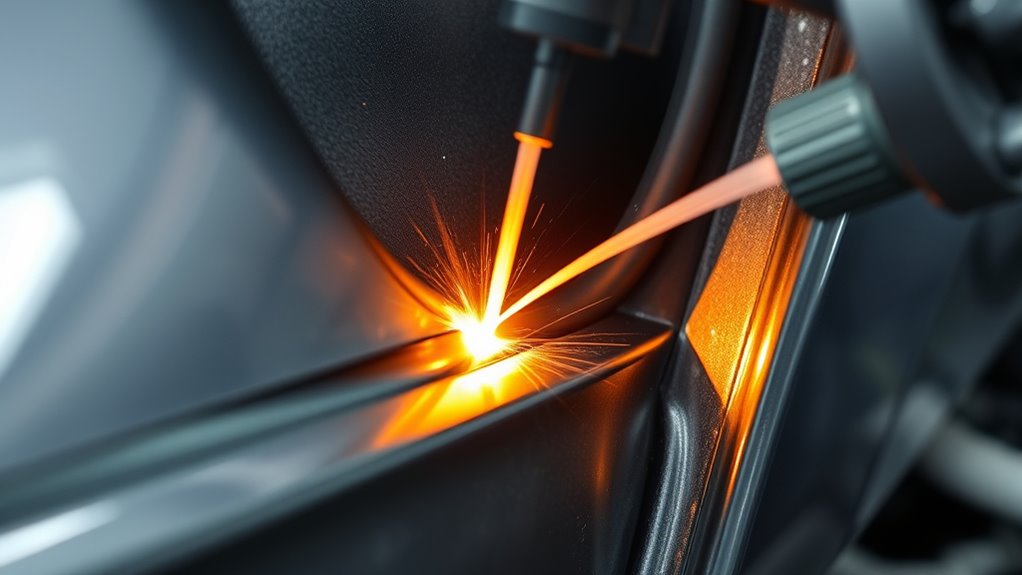
Cavity wax protects welded seams by creeping into tight overlaps, displacing moisture, and sealing bare metal that factory coatings miss. You should use it on rocker panels, pillars, hem flanges, roof seams, and other hidden cavities that trap water. Clean and dry the seam first, then spray at least three light coats with a 360-degree wand so the wax reaches every edge. Watch for bubbles or orange staining, because those signs mean more protection may be needed.
Why Cavity Wax Matters in Welded Seams
Cavity wax matters in welded seams because it displaces moisture where corrosion usually starts, especially in tight overlaps, hem flanges, and other hidden joints. You rely on cavity wax to protect and reach spaces factory coatings often miss, creating practical rust proofing between metal layers. Because the wax stays non-hardening, it flexes with expansion and contraction, so your barrier doesn’t crack and expose bare steel. For real protection, you need surface preparation that removes dirt, loose scale, and trapped contamination before the application process begins. Then apply at least three coats to achieve adequate coverage in seams that face water, salt, and road debris. The wax seeps, self-heals, and keeps working after small shifts, so you extend structural integrity and service life without surrendering to hidden corrosion. Additionally, proper surface preparation ensures optimal adhesion and effectiveness of the wax. With disciplined application, you take control of vulnerable seams and keep them sealed.
Where Cavity Wax Protects Best
When you target the right locations, cavity wax gives the best results in welded seams exposed to water flow, road grit, and salt, where hidden rust usually starts. You get effective corrosion protection when you focus on:
- rocker panels and pillars, where trapped moisture sits;
- hem flanges and tight overlaps, where cavity wax creeps into narrow gaps;
- roof side seams and fresh accessory holes, where cut edges can start rust from the inside.
Because the wax displaces moisture, it shields metal that you can’t easily inspect or clean later. You’re not just coating a surface; you’re defending enclosed steel that would otherwise corrode unseen. Proper cleaning of galvanized metal before application is essential to maximize the effectiveness of paint adhesion and ensure long-lasting protection.
In these locations, the wax’s creep action matters most, since it reaches seams that standard coatings miss. If you want durable protection and less dependence on repairs, prioritize the cavities that trap water, collect debris, and stay wet longest.
How to Apply Cavity Wax in Seams
Start with a clean, dry seam so the wax can bond properly and reach the metal you’re trying to protect. When you’re applying cavity wax to welded seams, remove dirt, oil, and any surface rust first, because contamination blocks adhesion and weakens the protective film.
Insert a long applicator wand with a 360-degree tip into the seam, then move it steadily so the cavity wax coats the full joint, including crevices and hidden folds. Focus on moisture-prone areas like rocker panels and lower door hems, where corrosion often starts from the inside.
Spray evenly, then let the layer settle before you add another pass. Keep your hand controlled and your coverage continuous; gaps invite rust. After the wax cures, inspect the seam annually and touch up any thin spots.
This simple process keeps welded seams sealed and helps you defend the metal on your own terms.
Products Worth Considering

EFFECTIVE CORROSION PROTECTION: Faster and easier application of cavity wax in hard-to-reach places

CORROSION PROTECTION: Protects internal body panels, frame rails and structural enclosures

BUNDLE INCLUDES - One Applicator Wand Kit and qty 4 - 18oz Can Cavity Wax Plus Interior Prevention Coating
How Many Coats and What Wand to Use

For reliable seam protection, apply at least three light coats of 3M™ Cavity Wax Plus rather than one heavy pass, since multiple thin layers build a more even film and help prevent drips.
You’ll get better cavity wax inside welded joints, and you’ll slow rust more effectively when you treat the process as layered coverage, not a one-and-done spray.
Use the 3M™ Cavity Wax Plus applicator wand kit with the 24″ or 34″ 360-degree wand so you can reach hem flanges, overlaps, and long seams with control.
- Start with a thin first pass.
- Follow with two coats to build uniform thickness.
- Keep panels warm so the wax creeps farther.
If you’re working on a mid-size sedan, plan your material use around the seam length, not guesswork.
The applicator wand helps you place wax precisely, so you can protect metal without flooding the area or wasting product. Additionally, ensure you clean metal thoroughly before applying to enhance adhesion and effectiveness of the wax.
Products Worth Considering

CAVITY WAX SPRAY, 08852: CORROSION PROTECTION: PotectS internal body panels, frame rails and structural enclosures. NON-HARDENING MATERIAL: Remains soft and pliable – will not crack, chip or peel. REDUCES BULKY EQUIPMENT NEEDS: Convenient aerosol spray can eliminates need for bulk spray equipment

Designed to be use with KBS Cavity Coater Aerosol.

Includes 6 Cans 3M Cavity Wax Plus Interior Corrosion Prevention Coating 08852 18oz Aerosol
Signs Your Seams Need More Protection
If you’re checking welded seams for weak protection, look closely for faint bubbles at the weld line, orange staining at pinch welds, or damp dust trapped in sills that won’t dry, because each one suggests moisture and oxygen are reaching bare metal. Use a borescope to confirm whether your seam sealer still covers the joint or whether bare metal is exposed. Additionally, ensuring proper ventilation during any repair processes can help reduce moisture buildup.
| Sign | What it means | Action |
|---|---|---|
| Bubbles | Corrosion under the seam | Add cavity wax |
| Orange stain | Active moisture intrusion | Recoat fast |
| Damp dust | Moisture retention in sills | Inspect with borescope |
If you spot any of these, your cavity wax layer is too thin or missing. Don’t wait for rust to claim the long run; clean the area, dry it fully, then restore protection. Annual inspections and touch-ups keep hidden seams defended, letting you maintain the body on your terms.
Frequently Asked Questions
When Should You Use Cavity Wax?
You should use cavity wax immediately after repairs and during routine inspections. You’ll get cavity wax benefits, better long term protection, and smart cost considerations, while applying precise application techniques that reduce environmental impact in hidden seams.
Where Do You Apply Cavity Wax?
You apply cavity wax in internal door panels, frame rails, rocker panels, lower hems, pillars, seams, and wheel arches. Clean first, then use application techniques; compare products, assess benefits overview, and protect long term effects.
Is Cavity Wax the Same as Seam Sealer?
No—cavity wax isn’t seam sealer; they’re different tools, like armor and a shield. You get cavity wax benefits, choose cavity wax types, follow cavity wax application, value cavity wax durability, and compare cavity wax comparison.
How Much Cavity Wax Do I Need?
You’ll need about 1/2 can for the hood perimeter, 1/3 can for each door and deck lid, plus 1/10–1/8 can for wheel arches; use three coats, considering application techniques, environmental factors, and long-term benefits.
Conclusion
Cavity wax acts like a hidden shield in your welded seams, sealing out moisture before rust can take hold. When you spray it into tight joints, it creeps like a thin tide, coating edges that paint can’t reach. Use the right wand, apply enough coats, and check vulnerable seams regularly. If you spot flaking, staining, or bare metal, add more protection. You’re preserving the weld’s strength and keeping corrosion from gnawing through the structure.


