Blue, gold, purple, or brown marks on a stainless exhaust usually come from heat tint, a thin oxide layer formed around hot welds and bends. You can improve the look with careful cleaning, a fine nonwoven abrasive pad, and a stainless-safe metal polish, but the right method depends on how deep the tint is and how polished the exhaust finish already is.
Quick Answer
To remove bluing from a stainless exhaust, let the metal cool, wash away dirt and grease, test a hidden area, then rub the heat tint with a red nonwoven abrasive pad using light strokes that follow the grain or weld bead. Finish with metal polish and a clean microfiber cloth.
Key Takeaways
- Bluing is heat tint, not normal dirt, so soap alone usually will not remove it.
- A red nonwoven abrasive pad can reduce light oxidation, but it may dull a mirror finish if you press too hard.
- Metal polish helps restore shine after the oxidation is reduced, but polish works best on a clean surface.
- Avoid steel wool, carbon-steel brushes, bleach, and aggressive grinding on visible stainless exhaust sections.
- Severe heat tint, rough sugaring, or parts used in salty conditions may need professional pickling or passivation.
At a Glance
| Time Required | 15 to 45 minutes for light staining; longer for stubborn weld discoloration |
| Difficulty | Easy to moderate, depending on finish and stain depth |
| Tools Needed | Microfiber cloths, mild cleaner or degreaser, red nonwoven abrasive pad, stainless-safe metal polish, gloves, eye protection, optional low-speed polishing pad |
| Cost | About $10 to $35 if you already have basic towels and gloves |
Warning: Work only on a completely cool exhaust. Wear gloves and eye protection, keep polish away from flames, and use ventilation when sanding, polishing, or cleaning weld residue. If you use chemical pickling or passivation products, follow the product safety sheet because many contain hazardous acids.
What Causes Bluing on Stainless Exhaust Welds?
Bluing on a stainless exhaust is usually heat tint. It forms when stainless steel gets hot enough for the surface oxide layer to thicken and change color. The color may appear gold, purple, blue, brown, or dark gray, especially near welds, pie cuts, and tight bends.
Stainless steel resists corrosion because chromium in the alloy forms a thin passive oxide film. When welding heat creates heavy tint, scale, or sugaring, that surface may no longer have the same clean, corrosion-resistant finish. That is why post-weld cleaning matters for both appearance and long-term durability.
Light cosmetic bluing can often be improved with mechanical cleaning and polish. Heavy black scale, rough weld sugaring, or exhaust parts exposed to road salt may need stronger treatment, such as professional pickling or passivation, rather than simple hand polishing.
Remove Bluing From Stainless Exhausts
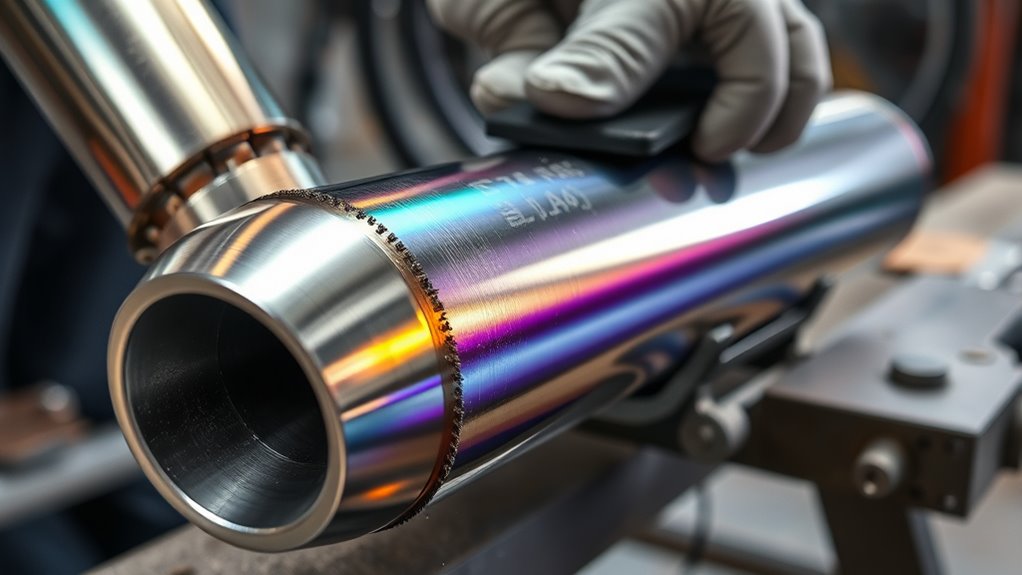
Let the stainless exhaust cool fully before you touch it. Wash the area with a mild cleaner or degreaser first, then dry it with a clean microfiber cloth. This keeps road film, soot, and grit from being dragged across the finish while you work.
Next, test a hidden section. This is important on mirror-polished exhaust tips because even a fine pad can leave a brushed look if you use heavy pressure. If the test spot looks acceptable, move to the visible weld area.
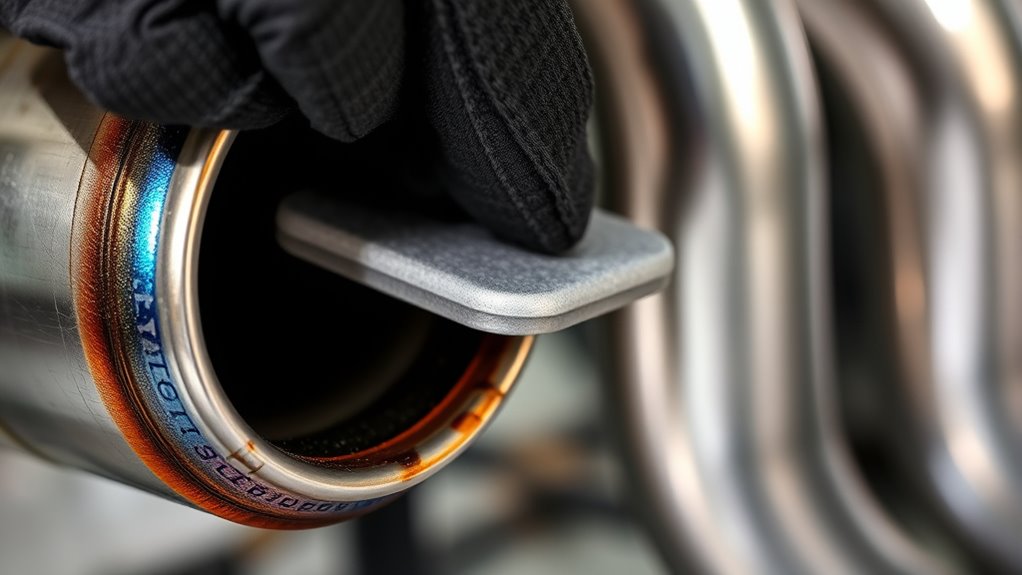
- Wrap a clean red nonwoven abrasive pad around your fingers or a small foam block.
- Rub lightly in the same direction as the grain, weld bead, or existing brushed pattern.
- Keep the pad moving so you do not create a bright flat spot in one area.
- Wipe the surface clean and inspect it under good light.
- Repeat only if the tint is fading without obvious scratching.
After the blue or gold color fades, apply a small amount of metal polish, such as Mothers, Semichrome, or another stainless-safe polish. Work it into the area with a soft cloth, then buff with a dry microfiber cloth until the surface looks even and bright.
Pro Tip: On brushed stainless, always move with the grain. On polished stainless, start with polish alone before using an abrasive pad, because polish may remove light haze without changing the surface pattern.
Clean Oxidation Off Exhaust Welds
To clean oxidation off exhaust welds, start with the least aggressive method that works. A clean cloth and metal polish are safer for shiny tips. A red nonwoven pad is better for light heat tint around weld beads. A sanding disc or flap disc should be reserved for rough fabrication cleanup, not routine cosmetic cleaning on a finished exhaust.
Use a controlled, bead-following motion so you remove discoloration without creating random scratch marks. Work along the weld pattern, not across it. If the exhaust has a visible brushed grain, follow that grain instead of using circles.
Clean oxidation off stainless exhaust welds with light, consistent strokes that follow the bead or grain, then finish with metal polish and a dry microfiber buff.
If oxidation remains, apply a small amount of polish directly to the weld area and work it in with a cloth or soft polishing pad. Do not overload the surface with compound. Too much polish makes cleanup harder and can leave a dark haze in weld toes and seams.
When the polish hazes, wipe it off with a dry microfiber cloth. Use a second clean cloth for the final buff. If black residue keeps coming off, clean the surface again before adding more polish.
Polish Stainless Welds to Restore Shine
Once the welds are free of loose oxidation and scale, polish them to restore shine. For most exhaust work, hand polishing is safer than a power tool because it creates less heat and gives you better control near bends and tips.
Apply a pea-sized amount of stainless-safe metal polish to a clean cloth. Rub the polish into the stained area with steady pressure, then reduce pressure as the surface starts to brighten. This helps the polish cut first and refine the shine afterward.
For tight areas near hangers, bends, or pie cuts, you can use a small polishing cone or rotary pad at low speed. Keep the pad moving and do not let the metal get hot. Heat can create more discoloration and may smear polish into the weld texture.
After the compound dries to a haze, buff the welds with a soft microfiber cloth. Turn the cloth often so you are not rubbing old oxide residue back into the finish.
Note: Polishing improves appearance, but it does not always equal full passivation. If the part is exposed to road salt, marine air, or high-corrosion service, consider professional stainless pickling or passivation after heavy heat tint removal.
Fix Stubborn Heat Marks and Stains
When stubborn heat marks remain on stainless exhaust, inspect the stain before you keep rubbing. Light blue or gold tint is usually surface oxidation. Dark gray scale, rough black deposits, or crusty weld sugaring may be deeper than normal hand polish can fix.
For stubborn but smooth staining, repeat the pad and polish process in short rounds. Work for 30 to 60 seconds, wipe clean, and inspect. Do not grind aggressively just to chase color, because you can flatten weld detail or create a patch that looks different from the rest of the exhaust.
If the mark is inside a bend or near a tight weld toe, use a small cloth wrapped around a plastic trim tool or wooden stick. This gives you pressure in the corner without using a steel scraper.
If haze remains after polishing, clean the area with mild soap and water, dry it fully, then buff again with a clean cloth. Haze often comes from leftover compound, not remaining heat tint.
If scratches appear, stop using the abrasive pad. Move to polish only, and blend the surrounding area lightly so the finish looks even. Deep scratches may require progressive sanding and machine polishing, which is a separate refinishing job.
What Not to Use on Stainless Exhausts
Some tools and chemicals can make stainless exhausts look worse or reduce corrosion resistance. Avoid these common mistakes:
- Steel wool: It can leave iron particles behind, which may rust later.
- Carbon-steel wire brushes: They can contaminate stainless with free iron.
- Bleach or chlorine cleaners: Chlorides can attack stainless surfaces, especially when residue is trapped in seams.
- Coarse sanding discs on visible sections: They can remove the original finish and leave swirl marks.
- High-speed buffing in one spot: It can build heat and create more discoloration.
- Household scouring powders: They may be too aggressive and can leave uneven dull patches.
If you need a wire brush, use a clean stainless steel brush that has never touched carbon steel. Keep stainless-only tools separate so you do not transfer rust-prone particles onto the exhaust.
Prevent Future Bluing on Exhaust Welds
To prevent future bluing on exhaust welds, control heat during fabrication and keep oxygen away from the hot weld zone as much as practical. TIG welding, correct amperage, steady travel speed, and proper shielding gas coverage all help reduce heat tint.
- Set amperage conservatively and avoid lingering in one spot.
- Use filler material matched to the stainless grade whenever possible.
- Keep the joint clean before welding so oil, marker, and shop residue do not burn into the surface.
- Use adequate shielding gas coverage and back-purging where the inside of the tube matters.
- Clean and polish the weld area after fabrication instead of letting heavy tint sit on the surface.
Regular maintenance also helps. Wash the exhaust after winter driving, remove road salt promptly, and polish visible tips before light staining turns into heavier oxidation. A clean surface is easier to inspect and easier to maintain.
When to Use Pickling or Passivation
Hand polishing is best for cosmetic bluing on visible exhaust sections. Pickling and passivation are stronger post-weld treatments used to remove scale, free iron, and heat-affected surface contamination from stainless steel.
Consider professional treatment if the weld area has black scale, rough sugaring, repeated rust spots, or exposure to salt and moisture. Chemical pickling products can be effective, but many contain hazardous acids. Use them only with the correct PPE, ventilation, neutralizing process, and waste handling. For most driveway exhaust cleanup, mechanical cleaning and polish are the safer starting point.
Frequently Asked Questions
How do you polish scratches out of a stainless steel exhaust?
Clean the exhaust first, then use the least aggressive method that will blend the scratch. Light marks may improve with metal polish and a microfiber cloth. Deeper scratches may need progressive sanding followed by polishing, but that can change the surrounding finish if you do not blend the area evenly.
What should you clean stainless welds with?
Use a mild cleaner or degreaser first, then a clean stainless-only brush, red nonwoven abrasive pad, or stainless-safe metal polish depending on the surface. Avoid steel wool and carbon-steel brushes because they can leave iron contamination behind.
Can you use WD-40 to polish stainless steel?
WD-40 can leave a temporary oily sheen, but it is not a true metal polish. It will not cut heat tint the way a stainless-safe polish can. Use it only as a light moisture-displacing product if needed, then clean the surface before real polishing.
What is the best polish for stainless steel exhaust?
Mothers, Semichrome, and other stainless-safe metal polishes can work well. The best choice depends on the finish. Use polish alone on mirror tips first. Use a red nonwoven pad before polish only when the surface has heat tint that polish alone cannot remove.
Will bluing come back after polishing?
Yes, it can come back if the exhaust reaches the same high temperatures again. Polishing removes or reduces existing heat tint, but future heat cycles can create new color. Better welding heat control, proper shielding, and regular cleaning help slow the return of discoloration.
Is blue stainless exhaust bad?
Light blue color is often cosmetic, especially on a performance exhaust that gets hot in normal use. Heavy heat tint, black scale, sugaring, or rust around welds is more serious because it can point to poor shielding, overheating, or reduced corrosion resistance at the surface.
Sources
- British Stainless Steel Association: Heat Tint Temper Colours on Stainless Steel — supports the explanation of heat tint colors on stainless steel.
- OSHA: Welding, Cutting, and Brazing — supports the safety guidance for welding-related hazards and controls.
- ASTM A380/A380M: Cleaning, Descaling, and Passivation of Stainless Steel Parts — supports the distinction between cleaning, descaling, and passivation practices.
Conclusion
Removing bluing from a stainless exhaust is a controlled finishing job, not a race. Let the metal cool, clean it first, test a hidden spot, then use a red nonwoven pad and metal polish only as aggressively as the finish allows. Light heat tint can often be improved by hand. Heavy scale, rust, or weld sugaring may need professional stainless treatment. With careful cleaning, steady polishing, and better heat control during welding, your exhaust welds will stay brighter, cleaner, and more resistant to future staining.


