As an Amazon Associate, Garage Welding may earn from qualifying purchases. This does not change the price you pay.
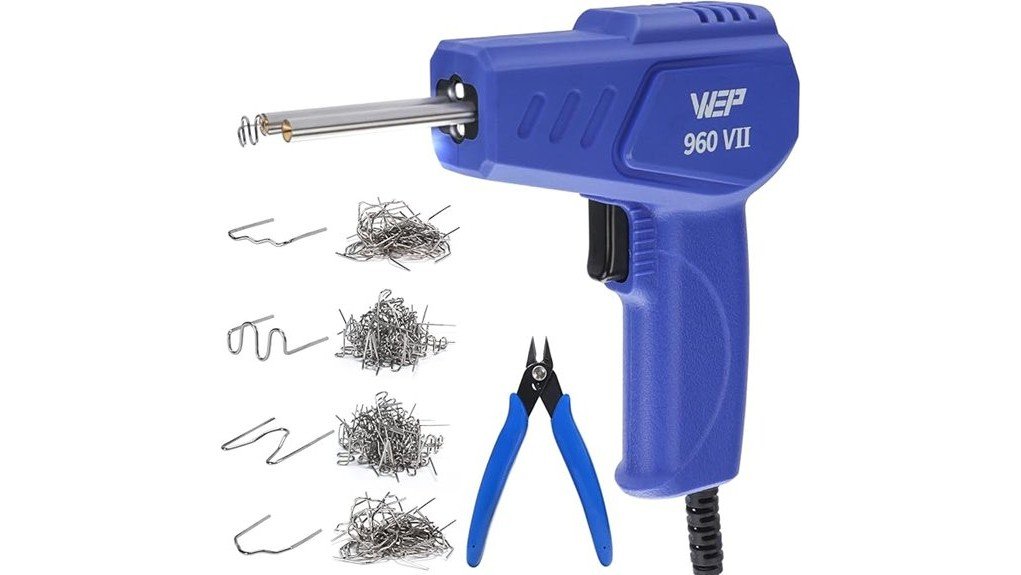
The WEP 960-VII is a 110V hot stapler plastic welder kit sold for repairing cracked bumpers, trim and other thermoplastic parts. This WEP 960-VII review is based on the seller listing and general hot-stapler practice, not hands-on testing. It is worth considering if you want a low-cost way to stitch cracks in bumper covers and interior plastic. Skip it if you need to repair a fuel tank or a plastic you cannot identify.
Quick specs at a glance
| Item | Detail |
|---|---|
| Type | Hot stapler plastic welder (heated gun that presses metal staples into plastic) |
| Power | 110V US plug, per the listing; the cord is listed at about 53.9 inches |
| Staples | 350 hot staples in several shapes, plus pliers |
| Extras | Built-in LED light, ergonomic grip |
| Listed size and weight | About 5.74 x 1.57 x 6.42 in and 1.61 lb |
| Safety feature listed | Overheating protection (per listing) |
Specs are taken from the seller listing and may change; confirm them on the current listing before you buy.
Check the current price on Amazon →
What the WEP 960-VII is and who it suits
A hot stapler works differently from a hot air welder with plastic rods. The tool heats a metal staple, you press it across a crack, and the staple sinks into the softened plastic. When the plastic cools, the staple acts like a stitch that holds both sides of the crack together.
That makes this kind of kit a fit for:
- Cracked bumper covers and fascia tabs
- Broken mounting ears on interior trim and housings
- Hobby and DIY repairs where a clean cosmetic finish is not critical
The listing text focuses on ABS, but a hot stapler can only work well on thermoplastics that melt and re-bond. Many bumper covers are polypropylene (PP), not ABS, so identify the plastic first.
How to check it fits your repair
Run through this checklist before you buy:
- Find the plastic code. Look on the back of the part for a stamp such as ABS, PP, PE, PC or PP+EPDM. Hot staples hold best on plain thermoplastics; weak or glassy plastics can crack around the staple.
- Check the wall thickness. Staples need enough material to sink into. Very thin or brittle panels may not hold.
- Check your power. The listing describes a 110V US plug. If you are outside North America you will need the right supply, not a casual plug adapter.
- Check access. You need to reach both sides of the crack, or at least the back side, with the gun and pliers.
- Decide if the part is structural or safety-critical. Brackets that carry load and anything near fuel, brakes or airbags should be replaced, not stapled.
Fuel tanks deserve a special note. The listing mentions gas tank repair, but a stapled fuel tank is a fire risk, and vapours inside an empty tank can ignite. We would not recommend DIY heat repair of a fuel tank; replace it.
Check the current price on Amazon →
Pros and limitations
Pros
- Large staple count for the money, so you can practise on scrap first
- Works from the surface, with no plastic rods or separate hot air source needed
- LED light helps you see the crack in a dim garage or under a bumper
- Compact and light at roughly 1.6 lb per the listing
Limitations
- The result is a mechanical stitch, not a seamless fused weld. Expect visible staples unless you fill and sand over them.
- Staples are only a mechanical reinforcement; results vary by plastic type.
- Cheap hot staplers often have fixed wattage and no temperature dial, so you control the result by timing and pressure.
- Not suited to fuel tanks or load-bearing parts.
How to use a hot stapler plastic welder safely
- Clean the area with soap and water, then plastic-safe cleaner, and let it dry.
- Drill a small stop hole at each end of the crack so it cannot keep spreading.
- Pull the crack tight with clamps or tape from the front side.
- Pick staples that match the crack shape, let the gun reach working temperature, then press the staple in until it sits flush.
- Space staples across the crack at an angle, and add a few on the back side for strength.
- Let the plastic cool before you handle it. Trim staple tails with the supplied pliers or flush cutters.
- Optional: add a layer of plastic filler or epoxy over the staples, then sand and paint.
Work outdoors or with good airflow. Melting plastic releases fumes, so wear safety glasses and gloves, and consider a respirator rated for organic vapours. Let the tip cool fully, and place it on a heat-safe stand while hot.
Check the current price on Amazon →
Related guides and alternatives
- Plastic welding kit review for a comparison with a more general plastic welding kit.
- Hot stapler plastic welder review for another hot stapler kit and how it differs.
- 1600W hot air plastic welder review if you prefer a hot air welder with rods for a fused seam.
- Plastic welding rods review for rods that go with a hot air welder.
Frequently Asked Questions
What is the WEP 960-VII used for?
It is a 110V hot stapler plastic welder sold for repairing cracked bumpers, trim and similar thermoplastic parts. You heat a staple and press it across the crack so it acts as a stitch. It is a cosmetic and light-duty repair tool, not a structural fix.
Can I use it on any plastic?
No. Hot staples work best on thermoplastics that soften and re-bond, such as ABS and many polypropylene bumper covers. Check the stamp on the back of the part, and avoid thermoset plastics, fibreglass and unidentified material.
Is it safe to repair a gas tank with a hot stapler?
We do not recommend it. Heat near fuel or fuel vapour is a serious fire and explosion risk, and a stapled tank may still leak. Replace a damaged fuel tank or have a qualified shop repair it.
Do I need to sand or paint over the staples?
If appearance matters, yes. Many people cover the stapled area with plastic filler or epoxy, sand it smooth and then prime and paint. For hidden areas, the staples can simply be trimmed flush.
Bottom line
The WEP 960-VII looks like a sensible, low-cost way to stitch cracked bumpers and trim if you identify the plastic first and accept a mechanical rather than seamless repair. Keep it away from fuel tanks and structural parts. Check the current listing for the latest price and what is included.