If you’ve ever pulled off your hood to find tiny holes pockmarking your weld bead, you’ve likely encountered porosity in arc welding. It’s one of those frustrating defects that can turn a solid weld into a weak, unreliable joint. As someone who’s spent years in the shop, I’ve seen porosity ruin perfectly good projects and cost time, money, and pride.
Let’s dive into what causes porosity in arc welding, why it matters, and how you can prevent it to create stronger, cleaner welds. Whether you’re a DIY hobbyist tinkering in your garage, a student learning the ropes, or a pro welder on a high-stakes job, understanding porosity is key to mastering your craft.
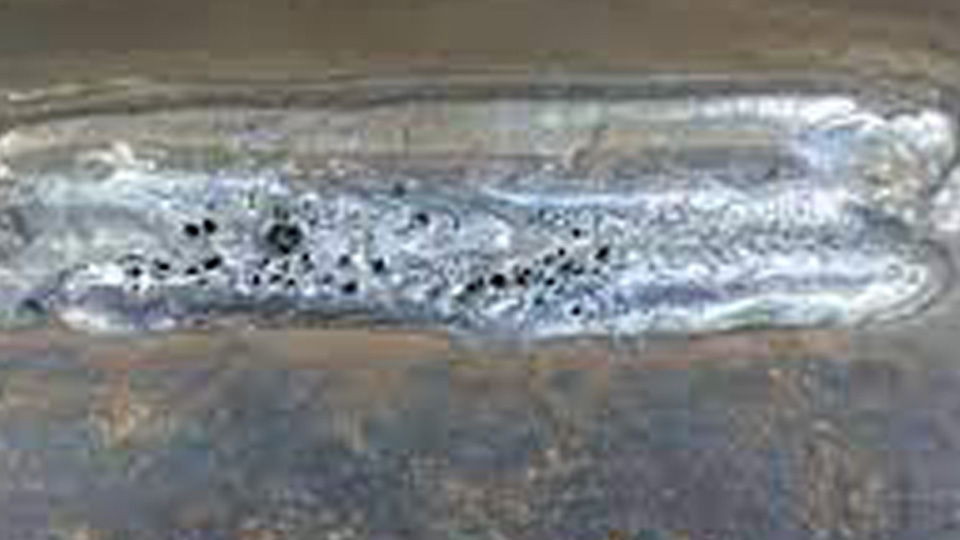
Image by morganitech
Porosity isn’t just a cosmetic issue—it compromises weld integrity, reduces strength, and can lead to costly repairs or even dangerous failures in critical applications like pressure vessels or structural steel.
By getting a handle on what causes it, you’ll save material, avoid rework, and build welds that hold up under stress. Let’s break it down step by step, from the science behind those pesky gas pockets to practical fixes you can apply in your next project.
Understanding Porosity in Arc Welding
Porosity in arc welding happens when gas gets trapped in the molten weld pool as it solidifies, forming small cavities or voids in the weld bead. These holes weaken the weld, making it brittle and prone to cracking under pressure. Think of it like Swiss cheese—those gaps don’t just look bad; they undermine the structural integrity of your work.
In my early days as a welder, I remember grinding out a weld on a trailer frame because porosity made it fail a visual inspection. It was a humbling lesson in preparation and technique.
Porosity can show up in different forms, and knowing the types helps you pinpoint the cause. Surface porosity appears as visible holes on the weld’s surface, often caused by contaminants like oil or rust. Subsurface porosity hides beneath the surface, requiring X-ray or ultrasonic testing to detect.
Wormhole porosity looks like elongated tunnels, often from improper gas shielding, while crater pipes form at the end of a weld due to shrinkage as the pool cools. Each type points to specific issues in your process, materials, or environment, so let’s explore the main culprits.
Common Causes of Porosity in Arc Welding
Porosity doesn’t just happen—it’s the result of specific mistakes or conditions. Over the years, I’ve narrowed down the most common causes in arc welding, from beginner errors to environmental challenges. Here’s what you need to watch for.
Surface Contamination on the Workpiece
One of the biggest culprits behind porosity is a dirty workpiece. Oil, grease, rust, paint, or even fingerprints can release gases when heated by the welding arc. These gases get trapped in the molten pool, forming pores as the weld cools.
I once had a project where I skipped cleaning a rusty steel plate, thinking a quick wire brush would do. The result? A bead that looked like it had been attacked by a tiny drill. Lesson learned: always clean your base metal thoroughly.
To avoid this, degrease the surface with acetone or a solvent, then use a wire brush or grinder to remove rust, mill scale, or coatings. For stainless steel, a stainless wire brush is a must to prevent cross-contamination. Preheating the metal to 200–220°F can also evaporate moisture, especially on thicker plates or in humid environments.
Improper Shielding Gas Coverage
Shielding gas is your weld pool’s bodyguard, keeping atmospheric gases like oxygen and nitrogen from sneaking in. In processes like MIG (GMAW) or TIG (GTAW), improper gas flow can lead to porosity. Too low a flow rate—say, under 15 CFH for MIG—leaves the weld pool exposed, letting air infiltrate. Too high, above 45 CFH, creates turbulence that pulls in atmospheric gases, causing the same problem.
I’ve seen this happen when a shop fan was blowing across the weld zone, disrupting the gas shield. To fix it, check your regulator for leaks, ensure your gas lines are secure, and adjust the flow rate based on your setup. For MIG on carbon steel, a 75/25 argon/CO2 mix at 20–25 CFH usually works well. For TIG on aluminum, pure argon at 15–20 CFH is a safe bet. Always shield your weld zone from drafts by using screens or barriers.
Moisture in Electrodes or Filler Materials
Moisture is a silent killer in arc welding, especially in stick welding (SMAW) or flux-cored arc welding (FCAW). Wet electrodes or filler wires absorb moisture, which turns into hydrogen gas during welding, creating pores. I once left a batch of 7018 electrodes out overnight in a damp shop, and the next day’s welds were riddled with porosity. Now, I store low-hydrogen electrodes in a rod oven at 225–300°F to keep them dry.
For stick welding, use low-hydrogen rods like E7018 and store them properly. If you suspect moisture, bake them according to the manufacturer’s specs before use. For MIG or flux-cored welding, ensure your wire spool is stored in a dry, sealed container. If you’re welding aluminum, moisture is especially problematic because molten aluminum attracts hydrogen, so double-check your filler rods for corrosion.
Incorrect Welding Parameters
Your machine settings can make or break your weld. Too high a voltage or wire feed speed in MIG welding stretches the arc, reducing shielding gas effectiveness and allowing atmospheric gases to enter. Too low a current in stick welding can cause the arc to stutter, trapping gases. I’ve made the mistake of cranking up the voltage on a MIG welder to “get it done faster,” only to end up with a porous bead that needed grinding.
For MIG, stick to 18–24V and 200–400 inches per minute wire feed speed for carbon steel, adjusting based on material thickness. For stick welding, match your amperage to the rod size—say, 90–120A for a 1/8″ E7018. Always consult your machine’s manual or a welding settings chart for specific parameters, and test on a scrap piece first.
Improper Welding Technique
Technique matters as much as preparation. Holding your MIG gun or TIG torch at an extreme angle—say, more than 15 degrees—disrupts the gas shield, letting air in. Welding too fast prevents gases from escaping the molten pool, while welding too slow overheats the metal, causing chemical reactions that form pores. I’ve caught myself rushing a vertical-up weld, only to see wormholes in the bead because I didn’t let the gases escape.
Keep your torch angle at 5–15 degrees, maintain a consistent travel speed, and use a ½–¾” stick-out for MIG welding. For stick, avoid excessive weaving, which can expose the weld pool. Practice on scrap to dial in your rhythm before tackling a critical joint.
Environmental Factors
Your shop environment can sabotage your welds. Wind, drafts, or high humidity can disrupt shielding gas or introduce moisture. I’ve welded outdoors on a breezy day and watched my gas shield get blown away, leaving a porous mess. Even a fan 25 feet away can cause trouble. High humidity is another issue, especially for aluminum welding, where moisture turns into hydrogen pores.
Set up barriers or screens to block drafts, and avoid welding in humid conditions without preheating the metal. If you’re working outside, use a portable welding tent or curtain to protect your weld zone.
Types of Porosity and Their Implications
Porosity comes in different forms, each with unique causes and fixes. Understanding these helps you diagnose and prevent issues.
Surface Porosity: Visible holes on the weld’s surface, often from contaminants like oil or grease. Clean the metal thoroughly and check your gas coverage.
Subsurface Porosity: Hidden voids that weaken the weld, detectable only by X-ray or ultrasonic testing. Caused by moisture or improper parameters. Use dry materials and dial in your settings.
Wormhole Porosity: Elongated, tunnel-like pores from poor gas shielding or fast travel speed. Adjust your torch angle and slow down your travel.
Crater Pipes: Small divots at the end of a weld, caused by abrupt arc termination. In TIG, taper off the arc gradually; in MIG, use a backstep technique to fill the crater.
Each type weakens the weld, but their impact depends on the application. For decorative projects, surface porosity might just be an eyesore. For structural steel or pressure vessels, any porosity can lead to failure, so adhere to codes like AWS D1.1:2025, which specifies that individual surface pores must be 3/32 inch (2.4 mm) or less in diameter, with clustered porosity not exceeding 3/8 inch (9.5 mm) in a 12-inch weld length.
How to Prevent Porosity in Arc Welding
Prevention is always better than repair, and with the right steps, you can minimize porosity. Here’s a step-by-step guide based on my years in the shop.
Step 1: Clean the Workpiece
Before striking an arc, clean your base metal. Use a wire brush or grinder to remove rust, scale, or paint. For greasy surfaces, wipe with acetone or a degreaser. For stainless or aluminum, use a dedicated stainless brush to avoid contamination. Preheat thick plates to 200°F to evaporate moisture, especially in humid conditions.
Step 2: Check Your Shielding Gas
Ensure your gas cylinder isn’t empty and check for leaks in the regulator or hoses. For MIG, use a 75/25 argon/CO2 mix for carbon steel or pure argon for aluminum. Set the flow rate to 20–25 CFH for MIG, 15–20 CFH for TIG. Protect the weld zone from drafts with screens or barriers.
Step 3: Store Electrodes and Filler Properly
Keep low-hydrogen electrodes like E7018 in a rod oven at 225–300°F. Store MIG wire and TIG filler rods in sealed, dry containers. For aluminum welding, inspect filler rods for corrosion and replace if needed.
Step 4: Dial In Your Machine Settings
Match your voltage, amperage, and wire feed speed to the material and joint. For a 1/8″ E7018 rod, use 90–120A. For MIG on ¼” steel, try 20V and 300 ipm wire speed. Test settings on scrap metal to ensure a stable arc and smooth bead.
Step 5: Master Your Technique
Hold your torch or electrode at a 5–15-degree angle, maintain a ½–¾” stick-out for MIG, and keep a steady travel speed. For vertical welds, pause briefly to let gases escape. In TIG, taper off the arc to avoid crater pipes.
Step 6: Control the Environment
Set up barriers to block wind or drafts. Avoid welding in high humidity unless you can preheat the metal. If working outdoors, use a welding tent to maintain gas coverage.
Comparison Table: Welding Processes and Porosity Risks
| Welding Process | Common Porosity Causes | Prevention Tips |
|---|---|---|
| MIG (GMAW) | Improper gas flow, dirty metal, excessive stick-out | Use 75/25 argon/CO2, clean metal, maintain ½–¾” stick-out |
| TIG (GTAW) | Moisture in filler, drafts, long arc length | Use pure argon, dry filler rods, keep arc length tight |
| Stick (SMAW) | Wet electrodes, contaminated metal, poor technique | Store E7018 in rod oven at 225–300°F, clean metal, use proper angle |
| Flux-Cored (FCAW) | Moisture in flux, drafts, fast travel speed | Store wire dry, shield from wind, slow travel speed |
Pros and Cons of Common Fixes for Porosity
Cleaning the Workpiece
Pros: Eliminates contaminants, improves weld quality, simple to do.
Cons: Time-consuming, requires proper tools and solvents.
Adjusting Gas Flow
Pros: Ensures proper shielding, reduces atmospheric contamination.
Cons: Requires regular equipment checks, can waste gas if set too high.
Using Dry Electrodes/Filler
Pros: Prevents hydrogen pores, improves weld strength.
Cons: Requires storage solutions like rod ovens, adds prep time.
Optimizing Machine Settings
Pros: Stabilizes arc, reduces gas entrapment.
Cons: Needs testing and experience to get right.
Real-World Applications and Why It Matters
Porosity isn’t just a shop problem—it’s a real-world issue with serious consequences. In structural steel welding, like for bridges or buildings, porosity can lead to cracks that fail under load, violating codes like AWS D1.1:2025. In pressure vessels, pores can cause leaks, endangering workers and equipment. Even in DIY projects, like building a custom gate, porosity can make your welds brittle, leading to repairs or replacements.
For students and hobbyists, mastering porosity prevention builds confidence and skills that translate to professional work. For pros, it’s about efficiency and reputation—delivering clean welds saves time and keeps clients happy. I once worked on a pipeline job where porosity in a single weld cost a day of rework. Proper prep and technique could’ve avoided that headache.
Conclusion
Porosity in arc welding is a common but preventable defect that can weaken your welds and cost you time, money, and pride. By understanding its causes—surface contamination, improper gas shielding, moisture, incorrect settings, poor technique, and environmental factors—you’re already ahead of the game.
Clean your workpiece, dial in your gas and settings, store materials properly, and control your environment to keep those pesky gas pockets at bay. Whether you’re a DIYer welding a trailer in your garage, a student practicing in trade school, or a pro tackling a structural job, these steps will help you produce strong, reliable welds.
FAQ
What is welding porosity, and why is it bad?
Porosity is the presence of tiny gas pockets in a weld, formed when gases get trapped during solidification. It’s bad because it weakens the weld, making it brittle and prone to cracking, which can lead to structural failure or costly repairs.
How do I know if my weld has porosity?
Surface porosity looks like small holes or craters on the weld bead, visible to the naked eye. Subsurface porosity requires X-ray or ultrasonic testing to detect. If your weld looks like Swiss cheese or fails inspection, porosity is likely the issue.
Can I fix a weld with porosity?
Yes, but it’s not ideal. Grind out the porous area with a grinder or carbon arc gouge, then re-weld with proper prep and technique. Prevention is better, as rework doubles your time and material costs.