I had to fix a leaking HVAC copper pipe on a jobsite without using traditional soldering—it threw me off at first. I’d spent years running beads with stick, MIG, and TIG on everything from stainless to mild steel, but brazing copper felt like a whole different animal. The challenge wasn’t just melting filler rod into a joint; it was getting the right heat control, joint prep, and penetration without overheating the thin metal walls.
A lot of welders and DIY guys get stuck here, wondering if brazing HVAC copper pipe without soldering is really strong enough, safe enough, and cost-effective compared to other methods.
The truth is, done right, brazed joints can handle the pressure, maintain efficiency, and even outlast soldered connections. In this guide, I’ll walk you through the real-world process, sharing shop-tested tips so you can avoid the rookie mistakes I made and get clean, durable joints every time.
What Is Brazing and Why Skip Soldering for HVAC Copper Lines?
I remember my first day on the job when my foreman handed me a torch and said, “Kid, soldering’s for plumbers—brazing’s for pros who want it to last.” Brazing is a metal-joining process where you melt a filler rod—think copper-silver-phosphorus alloys—into the joint using intense heat, around 1,300 to 1,500°F.
The filler flows via capillary action, filling every nook without melting the base copper pipe itself, which tops out at about 1,985°F melting point. It’s like gluing two pieces of metal with liquid fire, but way stronger.
For HVAC copper pipes, which carry refrigerants like R-410A at brutal pressures and temps swinging from freezing coils to scorching condensers, brazing shines because it creates a hermetic seal that resists thermal cycling and vibes from the compressor. Soldering, on the other hand, uses lower-melt alloys around 400-800°F, great for water lines but a gamble in refrigeration.
I’ve seen solder joints weep refrigerant after just one season, turning a $200 repair into a $2,000 compressor swap. Brazing avoids that by ditching acid fluxes entirely— the phosphorus in the rod acts as its own self-fluxing agent on clean copper.
Key Differences Between Brazing and Soldering HVAC Lines
Don’t get me wrong, both get the job done in a pinch, but here’s where they diverge, based on what I’ve hammered out in dusty attics and roaring fab bays.
| Aspect | Brazing | Soldering |
|---|---|---|
| Temperature | 1,300–1,500°F (high-heat torch) | 400–800°F (propane or MAPP gas) |
| Filler Material | Silver-phosphorus rods (e.g., 15% silver) | Tin-lead or tin-silver alloys |
| Joint Strength | Up to 450 PSI, vibration-proof | 50–150 PSI, prone to fatigue |
| Flux Needed | None for copper-to-copper; minimal for others | Acid-based, requires cleanup |
| Best For | Refrigerant lines, high-pressure HVAC | Water plumbing, low-stress apps |
| Pros | Leak-proof long-term, clean internals | Quick, beginner-friendly, cheap |
| Cons | Steeper learning curve, more gear | Risk of corrosion, weaker bonds |
In my experience, if you’re dealing with ACR (air conditioning and refrigeration) copper—Type L or K tubing—brazing is non-negotiable. It aligns with AWS standards and keeps you code-compliant in states like California or Texas, where inspectors sniff out shoddy work.
Soldering might tempt the newbie with its forgiving heat, but one overlooked flux glob, and you’re chasing black scale through the whole system. Trust me, I’ve flushed more contaminated lines than I care to count—brazing just sidesteps that headache.
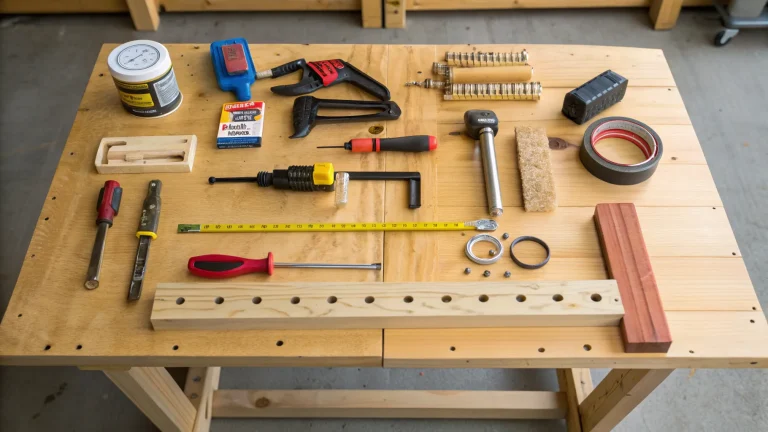
Essential Tools and Materials for Brazing HVAC Copper Pipes
Gear up right, or you’re just asking for frustration. I learned this the hard way on a sweltering July install when my cheap torch tip clogged mid-braze, turning a 30-minute job into a three-hour sweat-fest. For brazing HVAC lines, you need tools that hit consistent heat without scorching fittings or igniting insulation. Here’s my workshop staple kit, tuned for everything from 3/8-inch liquid lines to 7/8-inch suction pipes.
Start with a reliable oxy-fuel torch setup—oxy-acetylene for precision on thicker joints, or oxy-propylene if you’re watching costs (it’s cleaner-burning and less prone to flashbacks). Brands like Victor or Harris never let me down; skip the hardware store knockoffs. You’ll want a swirl-tip for even flame spread—size #0 for small lines, up to #3 for bigger ones.
Then, the star: brazing rods. Go for BCuP-3 or BCuP-4 alloys, like Sil-Fos 15 from Lucas-Milhaupt—15% silver for flow without brittleness. These self-flux on copper, melting at 1,310°F solidus. Stock 1/16-inch diameter for most HVAC work; they’re forgiving and feed smoothly.
Don’t forget nitrogen purging— a 20-cubic-foot tank with a regulator set to 3-5 PSI trickle flow through the line. It blankets the inside, killing oxidation before it starts. Pair it with a vacuum pump (two-stage, like Robinair) for post-braze evac down to 500 microns.
Safety gear? Leather gloves, flame-retardant jacket, auto-darkening helmet if sparks fly, and a Class B fire extinguisher. Oh, and wet rags—essential for shielding nearby valves from heat bleed.
Pro tip from the field: Invest in a pipe deburring tool and emery cloth for prep. Dull edges kill capillary action faster than a bad divorce. Total startup cost? Around $500 if you’re frugal, but it pays for itself after two jobs.
Preparing Your Workspace and Pipes for Brazing Success
Prep is 80% of the battle—rush it, and your braze turns into a brittle mess that leaks like a sieve. I’ve botched a few early on, blaming the rod when really it was gritty fittings mocking me. For HVAC copper, which often ships with mill scale or burrs, cleaning is sacred.
First, scope your site. In an attic? Clear flammables, lay down a fire blanket, and crack a window for ventilation—fumes from flux (if you use any) aren’t your friend. Basement? Same deal, plus eye on low ceilings to avoid torch tip singes. Shut off power to the unit, recover refrigerant if lines are charged (EPA 608 cert required—don’t skip this, fines are brutal), and cap ends to keep debris out.
Now, joint prep: Cut pipe square with a tubing cutter— no hacksaw hacks, or you’ll fight uneven flow. Deburr inside and out with a reamer; rough edges trap air pockets. Sand to bright copper using 180-grit emery cloth or a stainless wire brush—shiny means ready. Wipe with acetone or alcohol; fingerprints are flux’s evil twin.
For fittings, same drill. If it’s a flare or socket joint, ensure 1/32-inch clearance for filler draw-in. Dry fit everything—push-fit should resist a tug but slide with lube if sticky. I’ve seen apprentices force fits, only to crack the socket on heat-up. Patience here saves headaches.
One anecdote: On a rush commercial job, I skipped the acetone wipe once. The joint looked clean but had oily residue—braze beaded up like mercury on glass. Wasted an hour and a rod. Lesson? Prep like your paycheck depends on it, because it does.
Cleaning Techniques That Make Brazing Foolproof
Short and sweet: Mechanical first, chemical second. Wire wheel for heavy oxide (drill-powered for speed), then emery cloth in circles to avoid scratches that harbor crud. For stubborn spots, a pickle in muriatic acid diluted 1:1 with water—rinse triple and neutralize with baking soda. But honestly, for HVAC, stick to dry methods; acids leave traces that contaminate refrigerant paths.
Inside the pipe? That’s nitrogen’s job later, but blow out with compressed air first. Aim for mirror shine— if it doesn’t reflect your grizzled face, it’s not ready.
Step-by-Step Guide to Brazing HVAC Copper Pipe at Home or on the Job
This is the meat of it, walked through like I’m spotting you in the shop. I’ve run this sequence hundreds of times, from patching a pinhole in a 1/2-inch line to socketing a full condenser swap. Takes 10-15 minutes per joint once you’re dialed in.
Step 1: Assemble and Purge. Slide the pipe into the fitting till it stops—overlap at least 1.5 times the pipe OD for strength. Connect your nitrogen hose to the service port (Schrader valve removed), set regulator to 3 PSI. Crank it slow; you want a gentle whoosh, not a hurricane. This inert blanket prevents the black plague of scale inside.
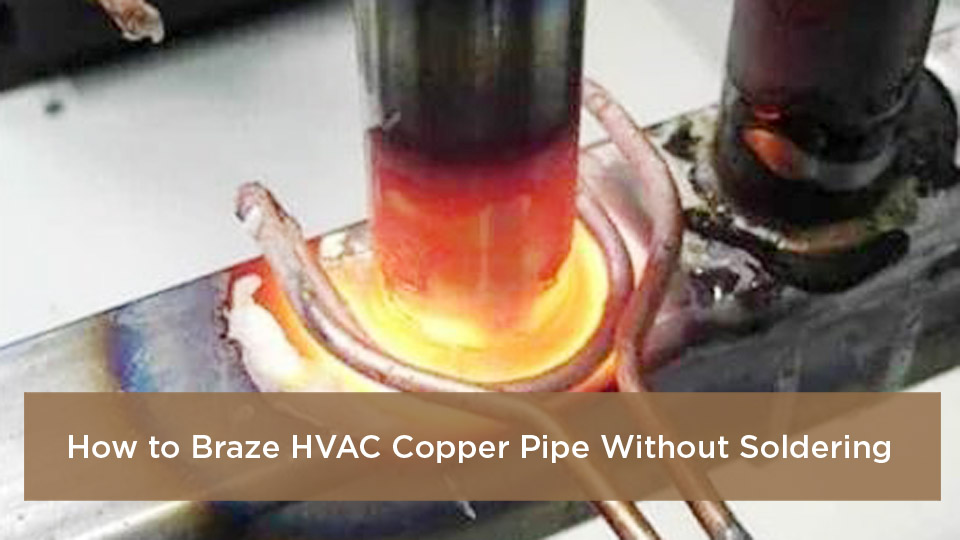
Step 2: Light and Preheat. Fire up the torch—neutral flame, blue cone about 1/2-inch long. Start on the pipe 1 inch from the joint edge, circling to warm evenly. Copper sucks heat like a sponge, so give it 10-20 seconds till it’s cherry red. Move to the fitting base next; heat rises, so bottom-up for vertical runs.
Step 3: Apply the Filler Rod. Touch the rod to the joint edge opposite your flame—heat draws it in. Feed steady as it melts and snakes around via capillary magic. Full penetration? When you see silver peeking from the hub’s far side. Don’t puddle; excess leads to cracks on cooldown. Takes 20-40 seconds for a 3/8-inch joint.
Step 4: Cool and Inspect. Kill the torch, let nitrogen flow till warm to touch—slow cool prevents thermal shock. Quench exterior with wet rag if needed, but never dunk in water; it crazes the metal. Visual check: Convex fillet, no gaps, shiny flow lines. Pressure test at 300 PSI nitrogen for 15 minutes—soap bubbles betray leaks.
Step 5: Evac and Charge. Hook vacuum pump, pull to 500 microns (overnight if no gauge). Break vacuum with refrigerant, weigh in per nameplate. Boom—system’s breathing easy.
Common pitfall? Flame too hot too fast—melts the rod before it wets. Dial back, let copper do the work. And always wrap adjacent components in wet towels; I’ve singed more evaporator coils than I’d like to admit.
Common Mistakes When Brazing HVAC Lines and Quick Fixes
We all screw up—it’s how we level up. My first brazed joint? A lumpy, leaky disaster because I torched the rod directly. Facepalm. Here’s the hall of shame, with fixes pulled from job-site war stories.
Overheating the joint: Copper glows dull red at perfect temp, but push to yellow, and you anneal it soft or warp fittings. Fix: Use a rosebud tip for spread-out heat, and practice on scrap till your eye gauges it.
No nitrogen purge: Inside turns to flaky oxide confetti, clogging TXVs later. Fix: Always trickle—I’ve rigged a cheap flowmeter from plumbing aisle for $10 to monitor.
Dirty surfaces: Mill oil or dust rejects filler like oil on water. Fix: Double-clean ritual—sand, wipe, sand again. One fab buddy swears by isopropyl wipes between steps.
Rushing the flow: Feeding rod too fast pools filler, weak spots galore. Fix: Let heat pull it; your job’s observer, not pusher.
Leaky post-braze? Often incomplete fill from bad fit-up. Fix: Re-cut square, check overlap. And test religiously—I’ve caught dimesize holes that way.
These slip-ups cost time and trust, but spotting them early turns you from greenhorn to go-to guy.
Selecting the Right Brazing Rod and Torch Settings for Your HVAC Project
Rod choice? It’s personal, like picking boots for a long hike. For standard R-410A lines, BCuP-3 (93% copper, 6% silver, 7% phosphorus) flows sweet at 1,190°F liquidus—economical and HVAC staple. Need more ductility for vibrating compressor mounts? Bump to 15% silver like Sil-Fos 15; it wets faster on mildly oxidized joints.
Torch settings: Acetylene at 5 PSI, oxygen 10 PSI for a soft whoosh flame. Propylene? 20 PSI each for similar punch. Tip size matches pipe: #00 for 1/4-inch, #1 for 5/8-inch. Flame adjustment? Neutral’s your sweet spot—acetylene feather just kissing the cone.
In the shop, I tweak for ambient: Humid day? Slightly richer oxygen to cut moisture. Cold garage? Preheat longer. Filler compatibility? Stick to AWS A5.8 spec rods; mixing alloys invites cracks. Pro insight: Cut rods to 18-inch lengths—easier feed without fumbling.
Real-World Applications: Brazing HVAC Copper in Residential and Commercial Setups
Brazing isn’t theory—it’s the fix for everyday chaos. Take residential: That attic leak from a kinked flare during install? Braze a reducer fitting, purge, evac—system’s gold in under an hour. I’ve saved homeowners from $1,500 evacs this way, all while chatting about their fantasy football picks.
Commercial? Think supermarket chillers with 1-1/8-inch headers under 400 PSI. Multi-orifice torch, two-man team for even heat, nitrogen at 4 PSI. One mall job, we brazed 20 joints overnight—zero leaks on pressure test, client ecstatic.
For fab hobbyists, it’s custom manifolds: Braze 3/8-inch tees for a DIY glycol loop, test at 200 PSI. Students? Lab practice on swaged coupons builds muscle memory. Industry workers, it’s code lifeblood—ASME B31.5 mandates it for refrigeration integrity.
Across the board, brazing’s versatility shines: Vibration-heavy rooftops, corrosive coastal installs, even retrofits swapping R-22 for greener gases. It’s the thread tying safe, efficient HVAC together.
Advanced Tips for Machine Settings, Joint Prep, and Filler Compatibility
Dialing in? For inverters with variable speeds, up the silver content—better fatigue resistance. Joint prep pro move: Bevel thick walls 15 degrees for deeper penetration. Filler match? Phosphorus-heavy for AC copper, but add flux for brass valves.
Settings tweak: Auto-ignite torches save thumbs; set low-flow nitrogen alarm to catch purges. Compatibility chart in your head: BCuP with Type L tube, BAg for steel transitions. One trick: Preheat with a heat gun to 200°F on frosty mornings—smoother start.
These nuggets? Born from greasy overalls and late-night calls—use ’em to edge out the competition.
Wrapping It Up: Your Path to Confident HVAC Brazing
Brazing trumps soldering for HVAC copper every time—stronger bonds, cleaner runs, longer life. You’ve got the tools rundown, prep rituals, step-by-step flow, and pitfalls to dodge. Now, you’re not just patching pipes; you’re building systems that stand tough against the grind.
You’re more prepared because knowledge like this shifts you from reactive fixer to proactive pro—spotting issues before they bite, saving cash and sanity. Grab that torch, hit some scrap, and braze on. Always log your PSI tests and rod batches; it’ll CYA on warranties and sharpen your instincts over time. What’s your next project? Hit the shop— you’ve got this.
FAQ’s
Can I Braze HVAC Copper Pipes with a Propane Torch?
Sure, for small 1/4- to 3/8-inch lines, a MAPP gas torch works in a pinch—hits 1,400°F easy. But upgrade to oxy-fuel for anything bigger; propane lacks the oomph for full flow without forever heat-up. Just ensure good ventilation; MAPP’s hotter, so wet rags are your buddy.
Do I Need Nitrogen When Brazing Refrigerant Lines?
Absolutely—it’s non-negotiable for clean internals. Trickle 3-5 PSI through the line during heat; skips oxidation that clogs meters and kills compressors. No N2? You’re gambling with scale city. Rent a tank if buying’s steep.
What’s the Best Brazing Rod for Beginner HVAC Repairs?
Start with 15% silver phosphorus rod like Harris Stay-Silv 15—flows forgiving on clean copper, melts around 1,300°F. Avoid pure copper; too stiff for vibration. Cut to short sticks for control, and practice feeding on junk pipe.
How Long Does a Brazed HVAC Joint Last?
Done right? 20-30 years, easy—outlives the unit sometimes. Factors like proper evac and no flux residue keep it hermetic. I’ve got joints from ’05 installs still tight; vibration and pressure just make ’em tougher.
Is Brazing HVAC Lines EPA-Compliant Without Certification?
For refrigerant handling, yeah—you need Section 608 cert to recover/charge legally. Brazing the pipe itself? Fair game for DIY, but skip the gas work sans cert; fines hit $50K. Pros, always document for audits.