Rust on a quarter panel can spread faster than it looks, especially around seams, wheel arches, and hidden edges. To patch-weld rust on a quarter panel, you need to inspect the damage, cut out weak metal, fit a matching steel patch, and weld it in with controlled heat. Use a MIG welder, short tack welds, and careful cooling so you don’t warp the panel. After welding, treat nearby metal with rust prevention solutions and seal the repair with epoxy primer for long-term protection.
Quick Answer
To patch-weld rust on a quarter panel, cut out every weak or rusted section first. Fit a patch made from similar gauge steel, tack weld it in short bursts, then grind, treat, prime, and seal the repair. Take your time with heat control because thin automotive sheet metal can warp quickly.
Key Takeaways
- Cut out all weak metal before you fit a patch panel.
- Use similar gauge steel so the repair matches the original panel strength.
- Control heat with short tack welds instead of one long weld bead.
- Treat nearby rust before primer so corrosion does not return quickly.
- Seal edges, seams, and the back side of the repair when you can reach them.
Identifying Rust Damage on Your Quarter Panel
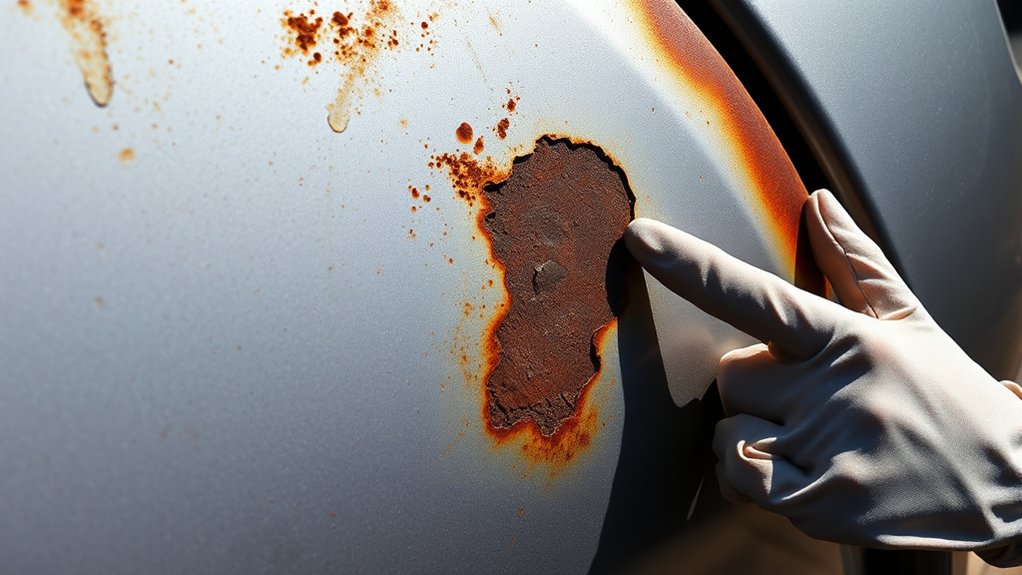
Identifying rust damage on your quarter panel helps you decide whether you can patch the panel or need a larger repair. Start by inspecting the quarter panel, especially the wheel arch, lower edge, joints and seams, and any area where water or road salt can sit. Look for bubbling paint, pinholes, flaking metal, soft spots, and visible surface rust.
Press gently around the damaged area with a pick or screwdriver. Solid metal should feel firm, while weak metal may flex, crack, or crumble. Assess the surrounding metal integrity because solid sections can support a patch, but rusted edges will not hold a clean weld.
Use forum photos or repair guides only as visual help, not as your final repair plan. Your vehicle may rust in a different pattern based on age, climate, and past repairs. If the rust reaches a structural area or inner support, ask a qualified body repair professional to inspect it before you weld. Additionally, consider removing zinc coating from galvanized steel if welding is part of your repair process, as this can help you get a cleaner weld.
Essential Tools and Materials for Rust Repair
When you handle rust repair on your quarter panel, the right tools and materials make the work safer and cleaner. You’ll need a MIG welder for patch welding because it works well on thin automotive sheet metal when you use short tack welds. A grinder, cutoff wheel, flap disc, body hammer, dolly, clamps, and marker will help you cut, shape, and hold the patch accurately.
Use similar gauge steel for your patch panel so the repair matches the original panel. Thin metal can burn through, while thick metal can be harder to shape and weld cleanly. You’ll also need rust converter or rust remover, wax and grease remover, epoxy primer, seam sealer, and paint-safe sanding supplies.
Don’t skip safety gear. Wear welding gloves, eye protection, a welding helmet, hearing protection, and a respirator when you grind or treat metal. Work in a well-ventilated area and keep flammable items away from sparks. It’s advisable to use heat-resistant gloves for more hand protection during welding.
Warning: Welding can start fires behind panels, so check the back side of the quarter panel before and after you weld.
Products Worth Considering

Premium 20 Gauge Mild Steel Sheet Metal – Crafted from high-quality cold rolled steel, these sheets offer exceptional durability and a smooth, uniform surface. Ideal for precision-driven projects requiring reliable material performance without compromising on structural integrit

Generous Packaging: each package of ours includes 4 pieces of metal sheets, providing a sufficient quantity to meet your varying needs; Whether for a large project or for multiple smaller tasks, our generous pack ensures you have just what you need, when you need it; Products shipped by sea may have slight rust on the surface due to moisture, which is a normal oxidation phenomenon

【Larger and Clearer Field of View】Screen size 92.5mm*42.5mm. Our welding helmets adopts 1/1/1/1 optical clarity lenses and advanced true color technology, providing a clearer and more realistic field of view, improving work efficiency and precision.
Before You Begin
Plan for several hours of careful work, not a fast patch. The exact time depends on rust size, access, welding skill, and finishing work. Small outer-skin patches may take part of a day, while larger repairs can take much longer.
Clean the area first so you can see the true edge of the damage. Remove trim, liners, undercoating, and interior panels near the repair area when needed. This helps you avoid hidden fire risks and gives you better access to the back of the weld.
- Disconnect the battery before welding on the vehicle.
- Keep a fire extinguisher close to your work area.
- Protect glass, paint, wiring, fuel lines, and upholstery from sparks.
- Test your welder settings on scrap metal before welding the panel.
Cutting and Patching Rust: A Step-By-Step Guide
To address rust damage, start by evaluating the affected area and marking the full rust zone. Then cut back to clean metal and prepare a patch from original metal or similar gauge steel. Use precise welding techniques so the patch stays strong without overheating the surrounding panel. Additionally, preheating the metal to prevent quench cracks applies more to cast iron work than typical quarter panel sheet metal, so use controlled heat instead of heavy preheating for this repair.
Products Worth Considering

FITMENT - Wheel Arch Repair Panels Compatible with 1999-2007 Chevy Silverado 1500 2500 3500 and GMC Sierra 1500 2500 3500 rear upper models (excluding 2007 new body style). Please refer to the product description for more information

Reinforced mesh provides supportive backing to fill holes

Product Compatibility: Wheel Arch Compatible with 2007-2013 Chevy Chevrolet Silverado 1500 (Does Not Fit 2007 Chevrolet Silverado 1500 Classic); Compatible with 2007-2014 Chevy Chevrolet Silverado 2500HD 3500HD (Will NOT fit GMC Sierra & Not For Dually)
Assess Rust Damage
Start your rust assessment by checking for bubbling paint, flaking metal, pinholes, and visible corrosion. Pay close attention to the wheel arch, lower quarter panel, seam areas, and the joint above the panel edge. Mark the damaged section with a marker, and include all weak metal in your cut line.
Cutting too little leaves rust behind and can ruin the repair later. Cut back until you reach clean, solid metal that can hold a weld. This careful inspection protects the structural integrity of the panel and helps your patch fit correctly.
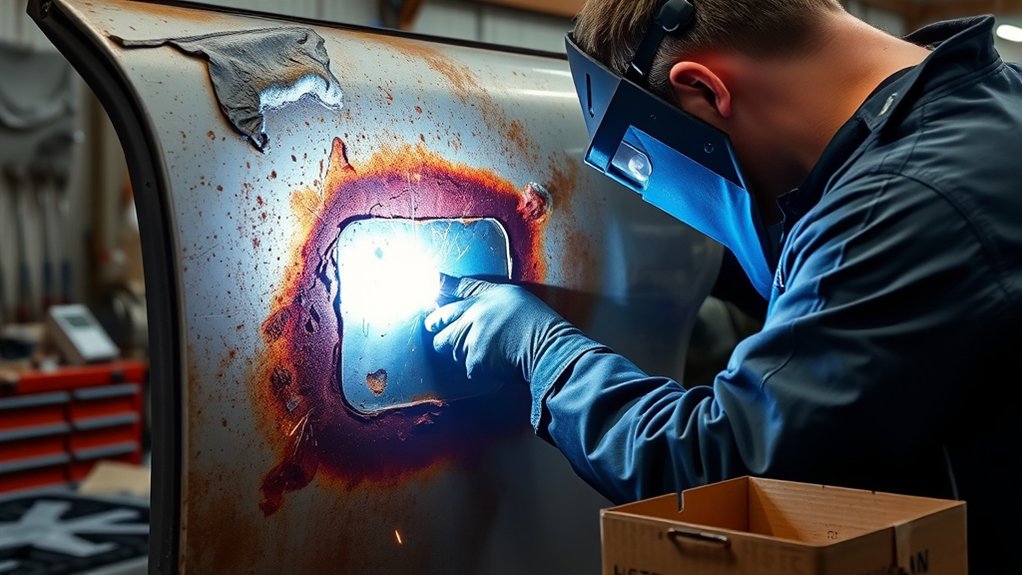
Prepare Patch Material
After you mark the rust damage, prepare the patch material. Cut out the rusted section carefully, and preserve as much solid original metal as possible. Keep the opening simple when you can because smooth shapes are easier to fit and weld.
- Trace the damaged area with a marker before cutting.
- Use similar gauge steel for better fit and weld control.
- Shape the patch so it matches the quarter panel curve.
- Leave a small, even gap for weld penetration if you butt-weld the patch.
- Clean both sides of the patch and panel before welding.
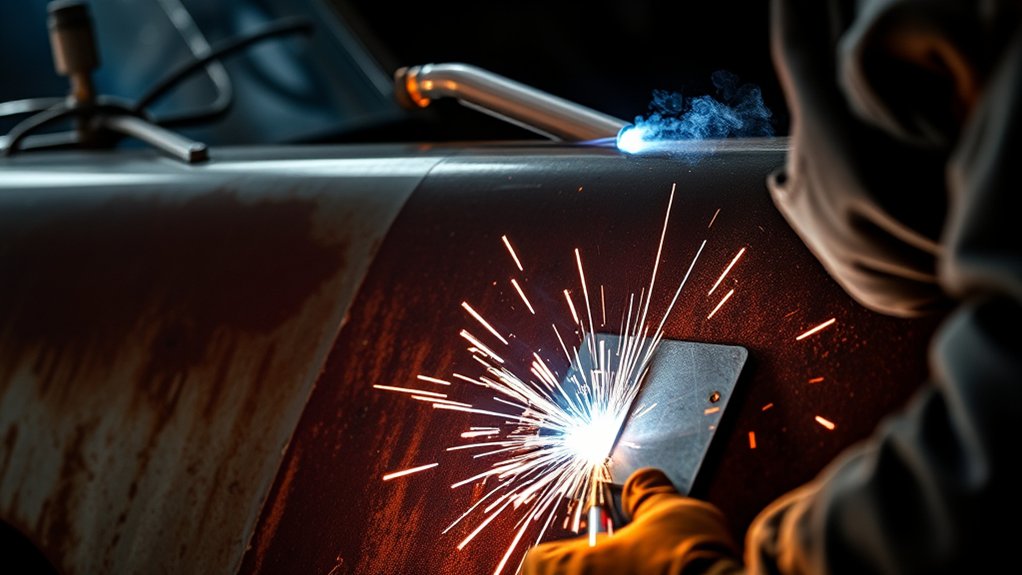
Weld the Patch in Place
After you prepare the patch material, clamp it in place and check the fit from every angle. Start with tack welds at opposite sides of the patch. This holds the panel steady and helps you control movement as heat builds.
Use short tack welds rather than a long continuous bead. Move around the patch so one area does not get too hot. Let the metal cool between tacks, then connect the welds slowly until the seam is closed.
Grind the welds carefully after the panel cools. Do not grind so much that you thin the surrounding sheet metal. Once the patch is secure, treat nearby surface rust and apply epoxy primer before final body filler or paint work.
Welding Techniques for a Stronger Repair
When patch-welding, spot welding techniques and tack welding help you manage heat across the repair area. You need to monitor heat closely because thin sheet metal can warp or burn through. Good fit-up, clean metal, and steady tack placement create a stronger, more durable repair. Additionally, ensure the metal is thoroughly cleaned to avoid issues like porosity from dirty metal, which can weaken the weld.
Spot Welding Benefits
Spot welding and plug welding can work well when you need to attach overlapping metal, such as a flange or inner panel edge. For an outer quarter panel skin patch, many repairs use butt welds with short tack welds. Choose the method that matches the panel design and access.
- Localized weld strength: You create strong joints without heating the full panel.
- Less warping: You reduce distortion by applying heat in small areas.
- Better heat control: You lower the chance of burn-through on thin metal.
- Cleaner finishing: You make grinding and smoothing easier when welds stay small.
Heat Management Techniques
Effective heat management helps you create a strong patch weld without distorting the quarter panel. Excessive heat can warp the panel, weaken the repair area, and make finishing harder. Use low to moderate heat, short tacks, and patient cooling.
Use a staggered welding pattern around the patch. Place one tack, move to the opposite side, then keep moving until the seam slowly closes. Clamps, magnets, or panel-holding tools can secure the patch and improve fit.
Do not quench hot welds with water unless your repair method specifically calls for it. Sudden cooling can change the metal’s behavior and may cause more distortion. Let the panel cool naturally between welds whenever possible.
Pro tip: Practice on scrap sheet metal from a similar gauge before you weld the quarter panel.
Treat Surrounding Areas for Long-Term Protection
Before you start patch-welding, address the surrounding areas so corrosion does not return quickly. Treat any existing rust near the repair area before you seal the panel. Clean metal gives primer, seam sealer, and paint a stronger base.
Before patch-welding, treat surrounding rust so your repair has a cleaner foundation and better long-term protection.
- Inspect the patch area for surface rust and remove it with sanding, grinding, or a suitable rust treatment.
- Apply epoxy primer after treatment to help protect bare metal from moisture.
- Use seam sealer on joints and overlaps after primer, based on the product instructions.
- Coat the back side of the repair when you can reach it.
- Inspect the treated areas later so you can catch new rust early. Additionally, consider applying Rust-Oleum only where it suits the surface and the coating plan.
Common Mistakes to Avoid
Many quarter panel repairs fail because the patch covers rust instead of removing it. Body filler, epoxy, or metal-filled products can help with finishing, but they should not replace weak metal in a welded repair. Cut out rust first, then weld clean metal to clean metal.
- Do not weld over paint, rust, undercoating, or seam sealer.
- Do not run one long bead on thin sheet metal.
- Do not leave the back side of the repair bare if you can access it.
- Do not use mismatched metal thickness without testing your welder settings.
- Do not skip a fire check after welding and grinding.
How to Wrap Up Your Rust Repair Like a Pro
To help your rust repair last, review all welded areas for adhesion, gaps, pinholes, and panel shape. Use this final inspection checklist before you apply coatings and move into final paint work:
| Step | Action | Notes |
|---|---|---|
| 1. Inspect Welds | Check all welded joints | Look for cracks, gaps, or pinholes |
| 2. Assess Surface | Check for remaining rust or rough spots | Sand as needed |
| 3. Apply Rust Treatment | Treat exposed areas | Follow with epoxy primer |
| 4. Confirm Coverage | Check primer and sealer coverage | Focus on edges and overlaps |
| 5. Quality Check | Confirm the repair is ready | Move to filler, primer, and paint |
After you apply coatings, check that all bare metal has full coverage. Pay close attention to cut edges, weld seams, and overlaps because moisture can enter these areas first. Additionally, always ensure that surfaces are clean before welding to improve adhesion and reduce future corrosion risk.
Frequently Asked Questions
What Is the Best Filler for Rust Holes?
For small finishing work, fiberglass resin or metal-filled epoxy can help fill minor surface flaws after you remove rust. For larger rust holes in a quarter panel, welded metal usually gives you a stronger repair. Always prepare the metal first so the filler can bond to a clean surface.
What Is the Cheapest Way to Fix Rusted Rocker Panels?
The cheapest repair often involves cutting out rust, making patch panels, and welding them in yourself. Rocker panels can affect vehicle strength, so inspect inner metal before you choose a low-cost fix. If the rust reaches structural areas, get a professional inspection.
How Much Does It Cost to Fix Quarter Panel Rust?
Quarter panel rust repair cost varies by rust size, labor rate, paint work, and whether the inner metal needs repair. A small patch costs less than a full panel or paint blend. Ask a body shop for an estimate if you need a precise price for your vehicle.
Can You Use JB Weld to Fill Rust Holes?
You can use JB Weld for small non-structural patching, but it does not replace welded metal in a proper quarter panel repair. Clean the surface well if you use it. Treat it as a temporary or light-duty fix, not a long-term repair for weak metal.
Should You Butt-Weld or Overlap a Quarter Panel Patch?
A butt weld can create a smoother outer panel repair when you fit the patch well. An overlap can be easier in some hidden areas, but it may trap moisture if you do not seal it correctly. Choose the method based on access, panel shape, and finishing needs.
Safety Disclaimer: This article is for informational purposes only and does not replace hands-on welding training or professional body repair advice. Welding, grinding, and rust treatment can create fire, fume, and injury risks. If you’re unsure about structural rust, fuel-line safety, electrical risks, or airbag wiring, consult a qualified repair professional before you continue.
Conclusion
A lasting quarter panel rust repair starts with one rule: remove weak metal before you weld. Fit clean steel, use short tack welds, and protect every exposed edge after the repair. Take extra time on heat control, rust treatment, primer, and seam sealing because those steps decide how long the patch lasts. When you finish carefully, your quarter panel looks cleaner, stays stronger, and gives you more confidence on the road.


