To repair a cracked weld, you need more than a quick bead over the split. First, confirm the part is safe to repair, then inspect the full crack, remove every damaged section, prepare clean metal, reweld with controlled heat, and test the repair before the part goes back into service. On frames, pressure parts, roll cages, suspension mounts, fuel tanks, or any load-bearing repair, use a qualified welder or replace the part instead of guessing.
Quick Answer
To repair a cracked weld, clean and inspect the crack, mark both ends, drill stop holes if the crack is still spreading, remove all cracked metal, prep a clean bevel, reweld with controlled heat, inspect again, and leak or load test only to the component’s rated spec.
Key Takeaways
- Never weld directly over a cracked weld without grinding or cutting the crack out first.
- Use dye penetrant for surface-breaking cracks and magnetic particle testing only on ferromagnetic metals.
- Control heat with short welds, cooling pauses, proper fit-up, and filler matched to the base metal.
- Pressure test or leak test only to the component’s safe rated pressure, not a random shop pressure.
At a Glance
| Time Required | 1 to 4 hours for a small repair; longer if the part needs removal, NDT, reinforcement, or post-weld inspection. |
| Difficulty | Intermediate to advanced. Critical structural or pressure repairs should be handled by a qualified welder. |
| Tools Needed | PPE, wire brush, solvent, grinder, cut-off wheel, drill, center punch, clamps, weld gauge, welder, matching filler, leak-test fluid, and optional dye penetrant or magnetic particle kit. |
| Cost | About $10 to $80 for consumables on a small shop repair; more for professional welding, NDT, or replacement parts. |
Start With Safety and Repairability
Before you touch the grinder, decide whether the cracked weld should be repaired at all. A small crack on a bracket, exhaust hanger, tool cart, or non-critical tab may be repairable. A crack on a vehicle frame, steering part, suspension mount, trailer hitch, roll cage, lift point, pressure vessel, fuel tank, or certified structure needs a qualified repair plan or replacement.
Warning: Do not weld on fuel tanks, sealed tubes, cylinders, used containers, or parts that may hold flammable vapor unless they have been properly cleaned, vented, purged, and approved for hot work. OSHA’s welding, cutting, and brazing rules require fire prevention, eye protection, and extra precautions around used containers and confined spaces.
Wear a welding helmet with the correct shade, leather gloves, fire-resistant clothing, hearing protection, and eye protection for grinding. Move combustibles away, keep an extinguisher nearby, and avoid breathing fumes. OSHA notes that welding fumes can include hazardous metal fumes and gases, so use ventilation, position your head away from the plume, and use local exhaust or respiratory protection when needed.
How Do You Inspect a Cracked Weld?
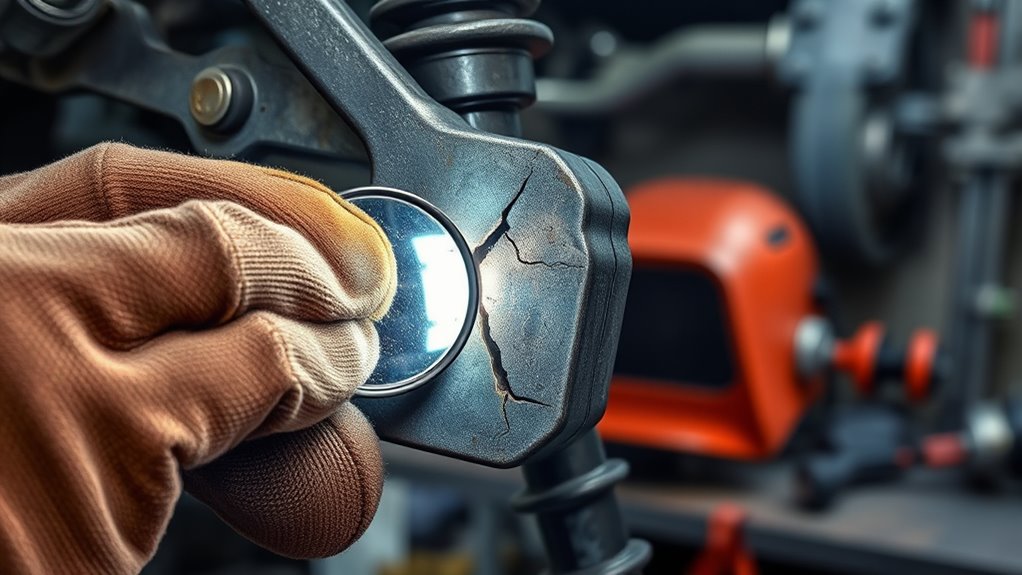
Start with a careful visual inspection of the weld and surrounding parent metal. Look at the weld toe, weld crater, heat-affected zone, corners, brackets, intersections, and any place where vibration or load changes direction. Use a bright light, mirror, magnifier, and weld gauge if the area is tight.
Mark the visible crack ends with a paint marker or scribe. Then clean the area and check whether the crack continues past what you can see. If you miss the true end of the crack, the repair can fail again beside the new weld.
Use dye penetrant inspection when you need to find fine surface-breaking cracks on clean, non-porous metal. Clean and dry the surface, apply the penetrant, allow the correct dwell time, remove excess penetrant, apply developer, and inspect under the light required by the product. Visible dye uses white light. Fluorescent dye uses UV light.
A crack repair is only as good as the inspection. Find the full crack before you grind, weld, or reinforce the joint.
If the part is ferromagnetic steel, magnetic particle testing can help reveal surface and near-surface cracking. It is not the right method for aluminum, titanium, copper, or many stainless steels. For critical work, use a trained inspector and the correct written procedure.
When the application allows it, a leak check or pressure test can help confirm whether cracks are causing leaks in exhaust, coolant, air, or fluid-carrying parts. Also inspect the surrounding structure for fatigue, deformation, misalignment, corrosion, or surface contamination that could have weakened the weld in the first place.
Find the Cause Before You Repair the Crack
A cracked weld usually has a cause. If you only cover the split, the same stress can crack the repair. Before welding, look for these common causes:
- Poor fit-up or a gap that forced the weld to bridge too much space.
- Contamination from paint, oil, rust, plating, undercoating, or moisture.
- Too much heat, too little heat, fast travel, undercut, or poor fusion.
- Wrong filler metal for the base metal.
- Vibration, flexing, impact damage, or repeated fatigue loading.
- Sharp corners or abrupt reinforcement that concentrate stress.
- No backing support where the joint needed one.
Note: If a crack returns after a previous repair, treat it as a design, fit-up, material, or loading problem. More weld metal alone usually will not fix it.
Drill Stops and Cut Out the Crack
Drill a small stop hole at each confirmed crack end when the crack is still spreading through sheet, plate, or tubing. Use a center punch so the bit does not walk. Drill only as large and deep as needed to blunt the crack tip without weakening the parent metal.
Then remove the damaged weld. Use a grinder, carbide burr, cut-off wheel, saw, or plasma cutter as the part allows. If you use thermal cutting, follow safe cutting practices and control sparks, fumes, and heat just as you would with other hot work. Keep the opening clean, controlled, and large enough to remove every trace of the crack.
For a split through a bracket or tab, cut back to solid metal with straight, even edges. For a cracked bead, grind out the crack to sound metal rather than smearing over it. Stop often and inspect the groove so you do not leave a dark crack line at the root.
If the joint needs support, fit a backer plate, backing bar, sleeve, or fish plate before welding. Keep the cut edges smooth and free of rust, paint, oil, slag, and grinding dust. A clean joint gives your new weld a better chance to fuse properly, especially if you are working with flux-core welding or other processes that can trap slag if the joint is dirty.
How Do You Prep a Cracked Weld for Repair?
With the crack isolated and the damaged section opened up, prep the repair area for full fusion. Remove grease, rust, paint, undercoating, zinc coating, mill scale, and old slag from the weld zone. Clean at least 1 inch beyond the weld area, or farther if the metal is heavily coated.
Use a grinder to create a V-groove, U-groove, or bevel that fits the thickness of the part. The groove should expose fresh metal and give the weld enough access to reach the root. On thin automotive sheet metal, avoid a wide groove that invites burn-through. On thicker steel, leave a small root face if needed so the joint holds shape.
Check alignment before tack welding. Clamp the part so the gap stays even and the surfaces do not pull out of position as heat builds. If the part is tubing, plate, or a bracket under load, use a straightedge or fixture so the repaired part does not lock in a twist.
Pro Tip: After grinding, wipe the repair area with a clean solvent that is safe for welding, then let it dry fully. Never weld over chlorinated brake cleaner or wet solvent residue.
Preheat only when the material and thickness call for it. Some thicker carbon steels and cast parts benefit from controlled preheat. Thin body panels, stainless trim, and aluminum parts can be damaged by too much heat. If you are repairing stainless, pay extra attention to cleanliness, filler choice, and heat control because contamination risks can weaken the repair.
Choose the Right Welding Process and Filler
The best repair process depends on the base metal, thickness, position, and service load. Match the filler metal to the parent metal and the job, not just to what is already in the welder.
- MIG welding: Useful for many mild-steel brackets, exhaust repairs, and general fabrication when the metal is clean and thickness is suitable.
- TIG welding: Best when you need precise heat control on thin steel, stainless, aluminum, or visible repairs.
- Stick welding: Useful on thicker carbon steel, outdoor work, and dirty repair environments, but it is usually too aggressive for thin automotive panels.
- Flux-core welding: Can work well on steel repairs with good prep, but slag removal between passes matters. For thin material, review proper flux-core technique before attempting the repair.
If you are unsure which process fits the job, compare the common types of welding before choosing. Do not assume a stick electrode or wire that worked on one repair is right for another metal. Aluminum, cast iron, stainless steel, high-strength steel, and coated steel each need specific prep and filler choices.
Weld the Crack Without Overheating It
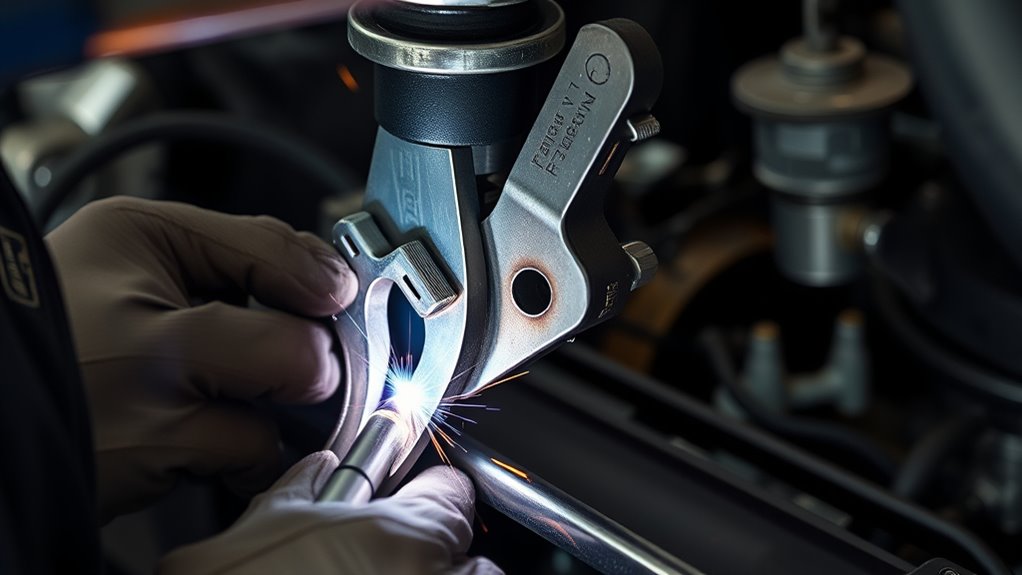
Set your welder for stable fusion, not maximum heat. A cracked weld repair needs enough penetration to tie into sound metal, but excess heat can warp the part, harden the heat-affected zone, or create a new crack beside the weld.
- Tack the joint in several places so the gap and alignment stay fixed.
- Weld in short sections instead of one long, hot pass.
- Let each section cool enough to control distortion before continuing.
- Clean slag or oxide between passes.
- Watch the weld toe for undercut, lack of fusion, or crater cracks.
On thin metal, use short stitch welds and move around the repair so heat does not build in one spot. A copper backing plate can help support thin steel and pull heat away when the repair shape allows it. On thicker steel, use the pass sequence required for the groove and filler, then clean and inspect each pass before adding the next.
Do not follow a universal electrode recipe for every cracked weld. A 6010 root and 7018 fill may be useful on some thicker mild-steel stick-welding repairs, but it is not right for every material. For critical work, use a written weld procedure or a qualified welder who can choose the correct filler, amperage, preheat, interpass temperature, and post-weld treatment.
Reinforce the Weld Repair for Durability
To reinforce the repair, first ask why the original weld cracked. If the joint failed because it was overloaded, unsupported, or poorly shaped, a stronger bead alone may not solve the problem. You may need a backer plate, sleeve, gusset, fish plate, or redesigned bracket to spread stress into a larger area.
Use reinforcement carefully. A square-ended plate can create a new stress riser at its ends. A tapered, rounded, or diamond-shaped reinforcement often spreads stress more smoothly. Keep the repair clean and avoid stacking weld on weld until the joint becomes stiff and brittle.
Backer Plate Support
A backer plate supports the root of the weld and helps spread load across the joint. Use material that matches the base metal as closely as practical. Fit it tightly, clamp it securely, and avoid gaps that can trap slag, moisture, or corrosion.
- Use backing only where it will not interfere with fit, clearance, or corrosion protection.
- Round or taper reinforcement ends to reduce stress concentration.
- Grind only as much as needed for clearance or inspection. Do not thin the repaired joint.
If the backer plate will stay in service, seal or coat the area after welding so moisture cannot sit between the layers.
Stress Relief and Inspection
After welding, let the part cool in a controlled way. Do not quench the weld unless a specific procedure calls for it. Rapid cooling can increase hardness and cracking risk on some steels.
Inspect the repair while it is still accessible. Start with a visual check for undercut, crater cracks, missed edges, pinholes, porosity, or lack of fusion. Then use dye penetrant or magnetic particle testing if the job requires more confidence. If the part is critical, have the repair inspected by a qualified person before reinstalling it.
If the joint needs more strength, add reinforcement material or a backing bar only after confirming the first weld is sound. Keep monitoring the repair over time with repeat inspections so you catch fatigue early and prevent cracks from returning.
Pressure Test the Weld Repair for Leaks
Set up a pressure test only when the component is meant to hold pressure or seal a fluid or gas. Exhaust tubing, coolant tanks, intercooler piping, air tanks, fuel-related parts, and pressure vessels all need different limits. Follow the service manual, label, design rating, or shop procedure for the part.
Use water or another approved liquid for pressure testing when the component and material allow it. Liquid testing stores less energy than compressed air. If you must use low-pressure air for a leak check, use a regulator, gauge, relief device, secure plugs, and barriers. Never exceed the component’s safe working pressure.
Pressure Test Setup
Before you pressure test the weld repair, clean the area thoroughly so dirt, oil, and residue do not hide leaks. Seal all openings with rated plugs or adapters. Bring pressure up slowly while watching the gauge.
- Use a regulated pressure source, not full shop air.
- Keep your face and hands away from plugs, caps, and fittings.
- Apply soapy water or non-toxic leak-detection fluid to the weld.
- Watch for bubbles, moisture, pressure drop, or movement at the repair.
For exhaust work, a very low-pressure smoke or bubble test is usually safer than high pressure. For coolant repairs, use the pressure specified for that cooling system. For tanks, vessels, and structural pressure parts, use the applicable code or a professional test facility.
Leak Check Results
Hold the test only for the time required by the procedure. A steady gauge and no bubbles are good signs, but they do not prove the weld is strong enough for every load. A leak test confirms sealing, not full structural strength.
If you see bubbles, dampness, or a pressure drop, stop the test, depressurize safely, mark the leak, and rework the joint. Do not add a quick tack over a leaking pinhole while the part is pressurized. Regrind, clean, reweld, and test again.
Record the pressure, test duration, test fluid, leak results, and any corrective action. That repair log helps you track repeat failures and shows that the repair was checked before service.
Document the Repair and Watch for Repeat Cracks
After the weld passes inspection, protect the repair from corrosion. Remove spatter, clean the area, and apply primer, paint, high-temperature coating, or corrosion protection that fits the part. On exhaust repairs, use coatings that can handle heat. On brackets or frame areas, seal bare metal so moisture does not start corrosion beside the weld.
After the part has been used again, inspect it after the first few heat cycles or load cycles. Look for a hairline crack at the weld toe, new rust line, paint split, soot mark, wet spot, or change in alignment. A small new mark can warn you before the repair fails completely.
Frequently Asked Questions
How do you repair cracked welds?
Clean and inspect the area, find the full crack length, drill stop holes if needed, grind or cut out the crack, bevel the joint, clamp it in alignment, reweld with the right process and filler, inspect the finished weld, and test it before service.
Can you weld on top of an old weld?
Yes, but only if the old weld is sound, clean, and properly prepared. If the old weld is cracked, porous, contaminated, or poorly fused, grind out the bad metal first. Welding over a cracked bead can trap the defect and make the joint fail again.
Can you stick weld in automotive repair?
Yes, you can stick weld some thicker automotive steel parts, such as heavy brackets or farm-style repair work, if the part is safe to repair. Stick welding is usually too hot and rough for thin body panels. MIG or TIG is often better for thin automotive metal.
How do you fix a broken weld without welding?
For non-structural parts, you may use a mechanical bracket, clamp, sleeve, epoxy, or metal filler as a temporary or cosmetic repair. Do not use adhesive or filler as a substitute for welding on load-bearing, safety-critical, pressure-retaining, or high-heat parts.
Is a cracked weld always repairable?
No. Some cracked welds point to metal fatigue, bad design, hidden corrosion, overload, or unsafe material condition. If the part carries people, pressure, suspension loads, steering loads, towing loads, or rollover protection loads, get a qualified inspection or replace the part.
Should you pressure test a weld repair with air or water?
Use the method specified for the component. Water or another approved liquid is often safer for pressure testing because it stores less energy than compressed air. Use low-pressure air only for parts designed for that kind of leak check, with a regulator, gauge, and safe barriers.
Conclusion
When you repair a cracked weld, the goal is not to hide the split. The goal is to remove the crack, correct the cause, restore sound metal, and prove the repair is safe for the job. Inspect carefully, cut or grind out damaged metal, prep a clean joint, choose the right process and filler, weld with controlled heat, reinforce only where needed, and test the result. If the part is structural, pressure-rated, fuel-related, or safety-critical, let a qualified welder or inspector make the call.
Sources
- OSHA 29 CFR 1910.252, Welding, Cutting, and Brazing — fire prevention, eye protection, used-container precautions, venting, purging, and hot-work safety.
- OSHA Fact Sheet: Controlling Hazardous Fume and Gases during Welding — welding fume hazards, ventilation, cleaning coated surfaces, and exposure controls.
- CDC/NIOSH: Welding Fumes and Manganese — manganese exposure, confined-space exposure concerns, and health effects from welding fumes.
- IAEA Training Course Series No. 11: Liquid Penetrant and Magnetic Particle Testing at Level 2 — penetrant testing, magnetic particle testing, inspection steps, lighting conditions, and NDT reporting.


