Repurposing scrap materials saves money, reduces waste, and yields useful, custom solutions for the home and workshop. This guide delivers seven practical DIY projects you can build with common discarded items—old metal, drums, pipes, wheels, and wood—plus step-by-step instructions, required tools, safety notes, and troubleshooting tips.
What qualifies as a “smart” DIY reuse project?
A smart reuse project maximizes value from what you already have. It minimizes waste, avoids complicated sourcing, and creates a durable item that solves a real problem—like a fire pit, bike rack, or grill accessory—using mainly reclaimed parts. These projects favor simple fabrication, widely available hand tools, and basic welding or fastening techniques when needed.
How to decide which old materials to keep
- Steel and iron: Pipes, angle iron, old tools, metal drums—easy to cut, weld, and shape.
- Sheet metal: Good for panels and enclosures if not heavily corroded.
- Wood: Pallets, fence planks, and cabinetry make excellent shelves, trays, and tabletops.
- Fasteners and hardware: Bolts, hinges, and wheels save time and money.
- Household castoffs: Stainless steel washing machine drums, filing cabinets, and old BBQ grates have ready-made functions for repurposing.
Safety first
Before starting any project, check these safety basics:
- Personal protective equipment (PPE): Welding helmet or goggles, gloves, ear protection, respirator (essential for grinding or welding), and steel-toe shoes.
- Work area: Ventilated, clear of flammable materials, and well-lit.
- Material hazards: Avoid galvanized metal if you plan to weld it, as it releases toxic zinc fumes. Remove paint or coatings that produce toxic fumes when heated. Be cautious with rusted or brittle metal.
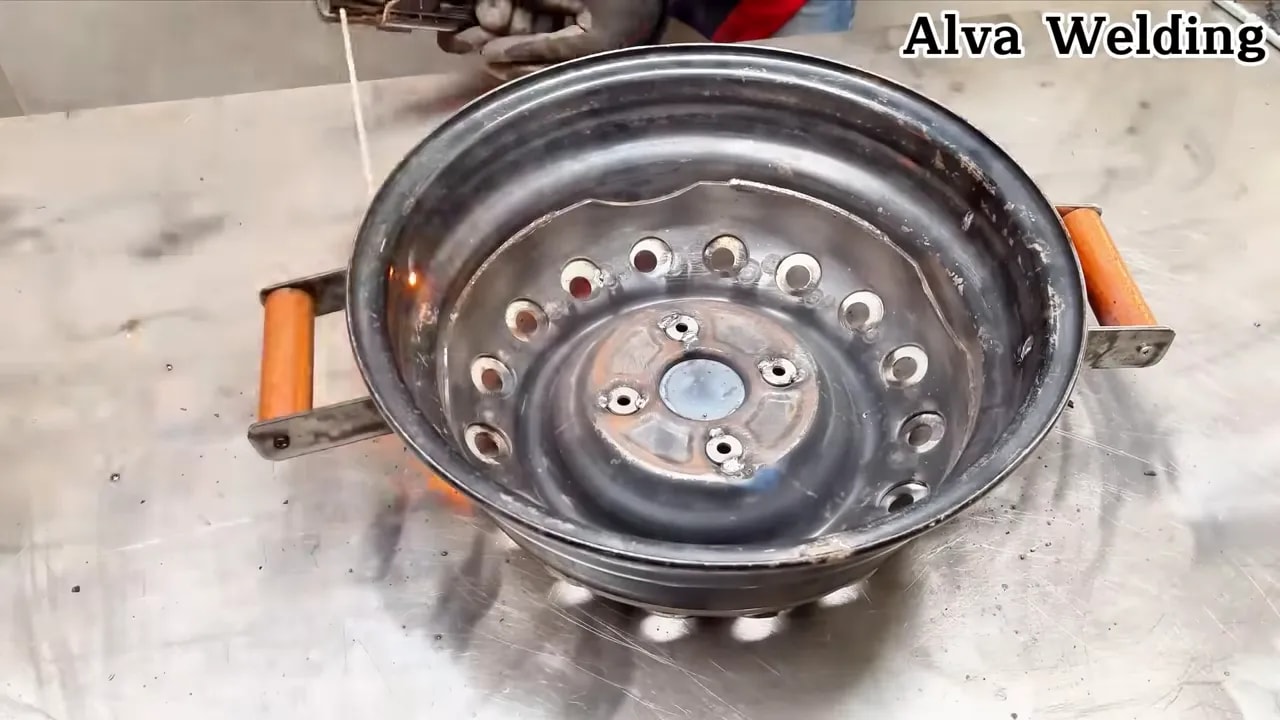
Project 1: Backyard fire pit from an old washing machine drum 🔥
A washing machine drum makes a compact, ventilated fire pit that looks industrial and drains water naturally.
Materials: Used washing machine drum (Must be stainless steel, not porcelain-coated or galvanized), 3 small metal legs (from scrap angle iron or old table legs), stainless steel bolts.
Tools: Angle grinder, drill with metal bits (cobalt bits work best on stainless), measuring tape, welding setup or bolts and nut driver.
- Clean the drum and remove any plastic or foam parts, including the center plastic agitator if present.
- Decide on leg placement—three legs give even support. Mark and drill mounting holes in the drum rim.
- Attach legs with stainless bolts and locknuts or weld them in place. Make sure legs are sturdy and level the drum.
- Safety Check: Ensure the drum is not galvanized steel. Burning galvanized metal releases toxic fumes. If in doubt, stick to stainless steel drums (a magnet will usually not stick strongly to high-quality stainless).
Time: 1–3 hours. Difficulty: Easy to moderate.
Project 2: Simple smoker or charcoal grill from an old steel drum 🍖
Convert a food-grade 55-gallon drum into a vertical smoker or kettle grill. This reuses heavy gauge steel and builds an efficient cooking chamber.
Materials: Food-grade steel drum (Do NOT use drums that held chemicals or fuel), metal grate(s), hinge (for lid), thermometer, vents made from metal plate or elbows, ash pan (sheet metal).
Tools: Angle grinder, drill, file, welder or heavy-duty bolts, high-temp BBQ paint.
- Safety First: Ensure the drum is “food grade” and unlined. Never cut into a sealed drum without verifying its previous contents. Do not use propane tanks for this project unless you are a professional, as they can explode if not properly purged.
- Cut the drum to the configuration you want: full vertical smoker or half-cut grill. Smooth all cut edges with a file or grinder.
- Install internal grates using welded tabs or bolt-in brackets at multiple heights to create cooking levels.
- Create adjustable vents for airflow control at the bottom. Install an ash pan under the cooking area for easy cleaning.
- Fit a hinged lid and thermometer for temperature control. Cure by running a hot wood fire for 2-3 hours to burn off any manufacturing oils.
Time: 4–8 hours. Difficulty: Moderate.
Project 3: Fold-down wall bike rack from old square tubing 🚲
Create a compact, foldable bike rack for garages using scrap square tube and leftover hinge hardware. This keeps floors clear and protects bicycles.
Materials: Square steel tubing or channel, heavy-duty hinge plates or repurposed gate hinges, rubber or plastic end caps, lag bolts.
Tools: Welder or drill and bolts, angle grinder, measuring tools, level, stud finder.
- Measure the bike frame clearance and wheelbase. Design the rack arms to support the frame by two contact points.
- Cut tubing to length and either weld or bolt on hinge brackets. Ensure hinge axis is level with the mounting point on the wall.
- Mount brackets strictly to wall studs or a reinforced board using heavy-duty lag bolts. Drywall anchors are not strong enough for bikes.
- Add rubber pads, old inner tubes, or tape to the contact areas to protect bike frames from scratches.
Time: 2–4 hours. Difficulty: Moderate.

Project 4: Heavy-duty planter box from scrap steel and pallet wood 🌿
Combine old shelf metal or an old file cabinet shell with pallet wood to make a durable, weather-resistant planter that blends industrial and rustic styles.
Materials: Sheet steel or cabinet body, pallet planks, self-tapping screws, landscape fabric.
Tools: Drill, angle grinder or metal shears, screws, outdoor sealant.
- Line the metal box with landscape fabric to prevent soil loss. Drill generous drainage holes in the bottom.
- Attach pallet wood around the outside for a finished look using screws into the metal or framed wooden supports.
- Seal wood with outdoor sealer. Fill with potting mix and add plants.
Time: 1–3 hours. Difficulty: Easy.
Project 5: Rolling garden cart from old wheels and scrap metal 🛞
Use caster wheels or old lawnmower wheels, a salvaged frame, and a metal or wood bed to make a durable, mobile garden cart.
Materials: Four wheels (two swivel casters for steering), steel frame or angle iron, sheet metal or wood deck, handle (pipe or repurposed tool shaft).
Tools: Welder or drill/bolts, angle grinder, tape measure.
- Design the bed size based on intended cargo. Weld or bolt a rectangular frame from angle iron.
- Mount wheels—use two swivel casters on the front and two fixed on the back for easier maneuverability.
- Attach a handle at a comfortable height. Test the cart with weight and check for wobble. Reinforce weak spots with gussets (triangular supports).
Time: 3–6 hours. Difficulty: Moderate.
Project 6: Backyard shelf or tool rack from old ladder rungs 🧰
Broken wooden or aluminum ladders can be repurposed into tool racks or shelving units with minimal work.
Materials: Old ladder, scrap boards, hooks, screws, paint.
Tools: Saw, drill, sandpaper, level.
- Cut ladder to desired height and secure it to a wall or stand it free with a base frame.
- Screw boards across rungs to make shelves. Add hooks to hold tools and cords.
- Sand and finish for weather protection if outdoor use is planned.
Time: 1–3 hours. Difficulty: Easy.
Project 7: Welded metal coffee table from scrap pipe 🪑
Turn leftover steel pipe or rebar into a modern industrial table base and mate it with a reclaimed wood or metal top.
Materials: Steel pipe or square tube for legs and frame, salvaged tabletop (wood slab or old oven door), bolts or welds.
Tools: Welder or metal fastening tools, angle grinder, clamps, protective finish for the top.
- Measure and cut legs to equal length. Create a rectangular or triangular frame for rigidity.
- Weld or bolt the legs to the frame. Grind welds smooth for appearance if desired.
- Attach tabletop with bolts or metal brackets. Seal wood with clear coat or oil; treat metal with primer and paint or leave raw with a clear protective finish.
Time: 2–5 hours. Difficulty: Moderate.

Common mistakes and how to avoid them ⚠️
- Underestimating material strength: Check load ratings for reused wheels and hardware. Test with a heavier load before regular use.
- Ignoring corrosion: Deep rust weakens metal. Grind to solid metal before welding and consider replacing badly corroded parts.
- Skipping ventilation and PPE: Grinding and welding old painted metals can release toxic fumes. Use a respirator and ventilate the area.
- Poorly planned joints: Square tubing and flat plates need proper gussets (reinforcement) for strength; avoid weak surface welds on high-stress joints.
Checklist before you start each project ✅
- Materials sorted and inspected for structural soundness.
- Appropriate tools on hand and in working order.
- Clear workspace and fire-safe setup for welding or grinding.
- PPE ready: gloves, goggles, respirator, helmet, hearing protection.
- Measurements finalized and a simple drawing or cut list prepared.
Where to find suitable scrap materials
- Local fabrication shops: Ask if they have a “drop bin” or scrap pile they sell for cheap.
- Online Marketplaces: Check Facebook Marketplace, Craigslist, or Freecycle for people giving away old appliances or metal.
- Local recycling centers and scrap yards: Call ahead, as some may not sell to the public due to insurance.
- Neighborhood cleanup days: Look for curbside pickups for large items scheduled by municipal services.
Can I weld galvanized or painted metal safely?
Welding galvanized metal releases toxic zinc oxide fumes, which causes “Metal Fume Fever.” It is best to avoid welding galvanized metal if you are a beginner. If you must, you need to remove the zinc coating by grinding the weld area down to bare steel first and wear a proper respirator. For painted surfaces, remove paint around welds to avoid toxic vapors and contamination of welds.
Do I need a professional welder to complete these projects?
Many projects use simple welds that an experienced DIYer can handle. If you lack welding skills, use bolts or mechanical fasteners, take a basic welding class, or partner with a local hobbyist or fabrication shop for critical welds. Safety-critical or load-bearing welds should be inspected if you are unsure.
How do I choose between welding and bolting?
Welding provides permanent, often stronger joints and cleaner aesthetics. Bolting is easier to modify or disassemble and avoids heat-related issues. Use bolts where adjustability, future repairs, or working with mixed materials is important. For high-stress structural joints, choose proper welds performed by someone experienced.
What paint or finish should I use on reclaimed metal?
Use a rust-inhibiting primer followed by high-quality enamel or high-temp paint (for fire pits/grills) for surfaces that face heat or outdoor exposure. For raw steel indoors, clear protective coatings prevent oxidation. Always remove loose rust and clean the surface before painting.
Final takeaway
Reusing old materials for practical DIY projects can be rewarding, inexpensive, and environmentally friendly. Start with one small project that matches your skill level—like a washing machine drum fire pit or a pallet planter—and build up to more complex fabrications. Focus on safety, inspect scrap materials carefully, and use simple designs that rely on strong joints and good fasteners.
These seven ideas combine common reclaimed items with straightforward fabrication techniques, letting you turn scrap into useful, durable pieces for home, garden, and backyard cooking.