
Back when I first started welding in a cramped garage corner, I focused almost entirely on machine settings, electrode choice, and joint preparation. It did not take long to learn that none of those things matter if a spark reaches your skin, your helmet lens is wrong for the amperage, or welding fumes collect around your breathing zone.
Arc welding protective clothing should form a complete head-to-toe system. The exact protection changes with the welding process, amperage, work position, metal, coating, ventilation, and surrounding hazards. A light bench TIG job and an overhead flux-core weld do not call for identical clothing, even though both require full coverage.
Quick Answer
Arc welders need a welding helmet with the correct filter shade, safety glasses with side shields, suitable flame-resistant or tightly woven long-sleeve clothing, dry welding gloves, cuffless full-length pants, and high-top leather footwear. Add hearing, head, neck, respiratory, impact, and fall protection whenever the hazard assessment or work position requires it.
Key Takeaways
- Cover all exposed skin and select the garment weight and material for the actual heat, spatter, flame, and work-position hazards.
- Wear safety glasses under the welding helmet because the helmet does not replace primary impact protection.
- Choose the helmet shade by process, electrode size, and amperage rather than relying on one fixed shade for MIG, stick, or TIG.
- Use ventilation and local fume extraction first. A respirator must be selected for the measured or reasonably anticipated exposure.
- Keep gloves and clothing dry, clean, and free of oil, solvents, holes, frayed edges, open pockets, and spark-trapping cuffs.
At a Glance
| Time Required | About 5–10 minutes to dress, inspect the PPE, and check the work area before welding |
| Difficulty | Easy to put on; proper selection requires knowledge of the process and hazards |
| Tools Needed | Helmet, safety glasses, protective clothing, welding gloves, suitable boots, ventilation, and any task-specific PPE |
| Cost | Varies by hazard and equipment; employers generally pay for required PPE, subject to OSHA’s limited exceptions |
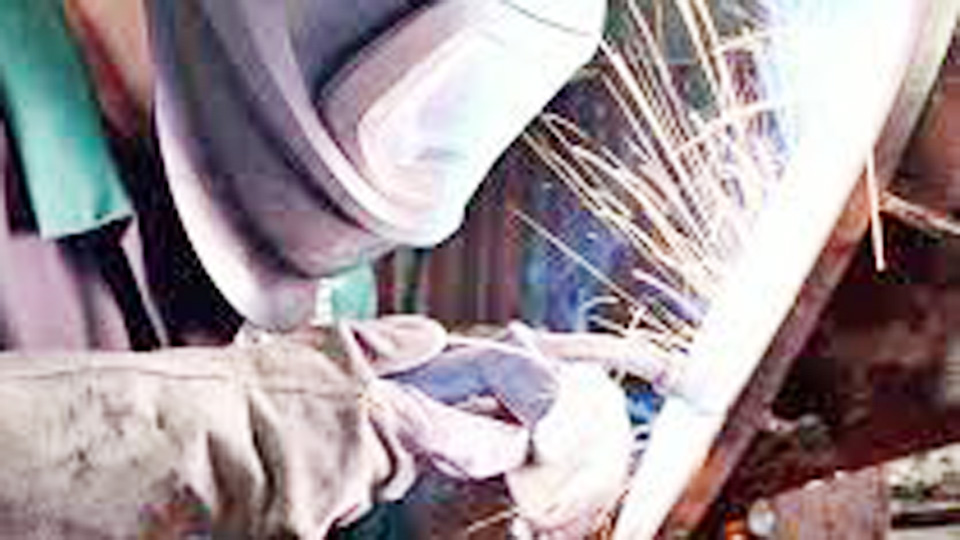
Image by supplyshop
Warning: Protective clothing does not replace training, electrical precautions, ventilation, machine instructions, fire prevention, or a workplace PPE assessment. Do not enter a tank, vessel, pit, or other confined space to weld without the required atmospheric evaluation, ventilation, attendant and rescue arrangements, and respiratory-protection plan.
Why Protective Clothing Matters in Arc Welding
An electric arc produces intense visible light, ultraviolet and infrared radiation, hot metal, sparks, and molten spatter. These hazards can injure uncovered eyes and skin even during a short tack weld. OSHA therefore requires helmets or hand shields for arc-welding operations and protective clothing appropriate to the size, nature, and location of the work.
Welding also creates hazards that clothing alone cannot control. Fumes can contain manganese and other metals from the electrode, wire, flux, base metal, and surface coating. Noise, flying slag, sharp edges, falling material, electrical contact, and hot workpieces may require additional controls and PPE.
The right welding outfit is not one universal costume. It is a set of protective layers chosen for the process, amperage, material, work position, and surrounding hazards.
Head-to-Toe Arc Welding PPE Checklist
| Body Area | Basic Protection | When More Protection May Be Needed |
|---|---|---|
| Eyes and face | Welding helmet or hand shield with the correct filter shade, plus safety glasses with side shields | Grinding face shield, prescription inserts, sealed goggles, or a hard-hat-compatible helmet |
| Head, hair, neck, and ears | Buttoned collar and full helmet coverage | FR welding cap, hood, neck drape, cape sleeve, or ear protection for overhead and high-spatter work |
| Torso and arms | Long-sleeve, non-melting, protective shirt or jacket with closed cuffs and collar | Certified FR garment, leather jacket, sleeves, cape, or apron for heavier heat and spatter |
| Hands and wrists | Dry leather welding gloves with cuffs extending over the wrists | Heavier insulated gloves for stick, flux-core, gouging, or high-amperage work |
| Legs | Full-length, cuffless protective pants worn over the boot tops | Leather chaps or additional layers for overhead, kneeling, or heavy-spatter work |
| Feet | High-top leather footwear with slip-resistant soles | Safety toes, metatarsal protection, spats, or specialty soles based on the workplace assessment |
| Lungs and hearing | Effective ventilation and noise evaluation | Selected respirator, earplugs, earmuffs, or supplied air when the assessment requires them |
Products Worth Considering

【MULTI-USE】This CAT 2 AR/FR, NFPA2112 compliant shirts is part of your PPE system. Designed for workers who may be exposed to potential flash fire and arc flash hazards. Self-extinguish garments can help prevent or reduce the severity of burn injuries for added protection.
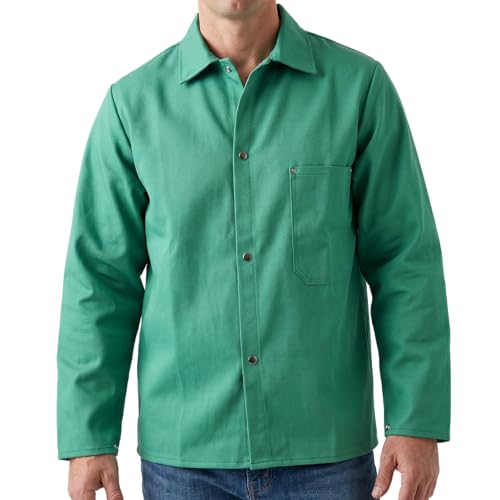
FR PROTECTION GUARANTEED THROUGH 50+ INDUSTRIAL WASHES — FR treatment keeps the jacket flame resistant through multiple washings, no re-treating required. Meets ASTM D6413-99.
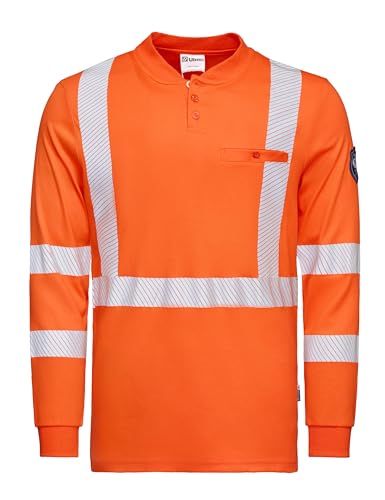
Certified Safety Protection (NFPA2112 & CAT2): Engineered for hazardous environments, this fr shirt meets or exceeds NFPA 2112 and NFPA 70E standards. With an ATPV rating of 8.0-12 cal/cm² (CAT2), our fire resistant shirts for men provide reliable protection against flash fires and arc flashes, making them essential PPE for electricians, utility workers, and oil & gas professionals.
Welding Helmets: Protecting Your Eyes and Face
A welding helmet protects the eyes, face, ears, and part of the neck from radiant energy and flying sparks. It does not replace safety glasses. Small particles can reach your eyes while the helmet is raised, while slag is being chipped, or when nearby work sends debris from the side.
Look for eye and face protection that complies with an applicable OSHA-recognized standard or is demonstrated to be at least as effective. The newest voluntary consensus edition is ANSI/ISEA Z87.1-2025. Check the permanent markings and the helmet manufacturer’s instructions instead of relying only on an online product description.
Choose the Filter Shade by Process and Amperage
The shade numbers below are OSHA minimum protective shades for the listed general-industry operations. They are not a promise that one shade will feel comfortable for every person or viewing condition. OSHA advises starting with a shade that is too dark to see the weld zone, then moving lighter without going below the listed minimum.
| Process | Arc Current | OSHA Minimum Protective Shade |
|---|---|---|
| Shielded metal arc welding | Less than 60 A | 7 |
| Shielded metal arc welding | 60–160 A | 8 |
| Shielded metal arc welding | 160–250 A | 10 |
| Shielded metal arc welding | 250–550 A | 11 |
| Gas metal arc or flux-cored arc welding | Less than 60 A | 7 |
| Gas metal arc or flux-cored arc welding | 60–500 A | 10 |
| Gas tungsten arc welding | Less than 150 A | 8 |
| Gas tungsten arc welding | 150–500 A | 10 |
Use the complete OSHA filter-lens table when the process or amperage is not shown above. The helmet manufacturer may also recommend a darker setting for a specific application.
Fixed-Shade and Auto-Darkening Helmets
A fixed-shade helmet uses one filter darkness and can work well for a stable process and amperage. An auto-darkening helmet remains light before the arc starts and switches to its selected protective state when its sensors detect the arc.
For an auto-darkening helmet, check:
- Shade range: It must cover the process and current you will use.
- Permanent markings: Confirm the product’s claimed eye and face protection standard.
- Sensitivity and delay controls: These help with low-amperage TIG, pulsed arcs, and nearby welders.
- Sensor coverage: Your hands, workpiece, or tight position should not block all sensors.
- Optical condition: Replace cracked, deeply scratched, heat-damaged, or heavily pitted cover lenses.
- Headgear fit: The helmet should remain stable without being tightened so much that it causes pain.
Switching speed and viewing-area size vary by product. Do not treat one advertised switching-time number or window dimension as a universal legal requirement. Test the helmet according to its instructions before use, and never stare at the sun to test an auto-darkening lens.
Pro Tip: Keep clean replacement cover lenses nearby. A scratched cover plate can make a sound weld look blurry, which encourages poor head position and unnecessary helmet lifting.
Safety Glasses and Grinding Face Protection
Wear safety glasses with side shields under the welding helmet. Use lenses marked for the applicable impact protection. Ordinary prescription glasses and sunglasses are not substitutes unless they are approved protective eyewear.
A clear grinding face shield adds face protection while grinding, wire-wheeling, or chipping slag, but it should be worn over safety glasses or goggles. A face shield is secondary protection because particles can travel around its edges.
If the helmet must be worn with a hard hat, use a manufacturer-approved compatible mounting system. Do not drill, tape, or improvise attachments that could weaken the hard hat or prevent the helmet from positioning correctly.
Flame-Resistant Clothing: Protecting Your Body
Complete skin coverage is essential, but the required clothing material depends on the hazard. OSHA states that the appropriate protective clothing varies with the size, nature, and location of the welding operation. For some lower-spatter work, tightly woven, heavyweight cotton or wool may be acceptable. Heavier FR fabric, leather, or layered protection is more appropriate where there is substantial spatter, slag, radiant heat, flame exposure, or overhead work.
Choosing Clothing Material
- FR-treated or inherently FR fabric: Offers useful protection when selected and maintained for the welding hazard.
- Tightly woven cotton or wool: May be suitable for lower-hazard work when the garment is heavy enough, clean, dry, and approved by the workplace assessment.
- Denim: Can provide durable coverage, but thin fashion denim, torn knees, stretch panels, and synthetic blends may not offer suitable protection.
- Leather: Provides strong resistance to heat, sparks, and spatter but is heavier and can add heat stress.
- Specialty welding fabrics: Follow the garment manufacturer’s welding-use, laundering, contamination, and replacement instructions.
Avoid untreated meltable fabrics such as polyester, nylon, acetate, or polypropylene where sparks or hot metal could contact them. A fabric blend that contains synthetic fibers should not be assumed safe just because it feels thick. Use it only when the manufacturer identifies it as suitable for the hazard.
Garment Design Matters
- Wear long sleeves, full-length pants, and a closed collar.
- Button or secure the cuffs, collar, and front pockets.
- Avoid pant cuffs because they can trap sparks and slag.
- Keep pant legs over the tops of the boots.
- Use covered or closed pockets rather than open upward-facing pockets.
- Remove lighters, matches, aerosol containers, and other combustible items from pockets.
- Do not wear clothing contaminated with oil, grease, fuel, paint thinner, or solvents.
- Replace garments with burn holes, open seams, frayed edges, or worn-thin areas.
- Remove rings, bracelets, watches, necklaces, and loose cords that could conduct heat, catch on equipment, or trap hot material.
The fit should allow you to reach, kneel, and position the torch without pulling the cuffs back from your wrists. Oversized sleeves and loose drawstrings can catch on the work or equipment, while clothing that is too tight may expose skin as you move.
Note: “FR” does not mean fireproof. Flame-resistant garments can still be damaged by prolonged contact with molten metal, heavy slag, extreme heat, or contamination.
Protecting Your Head, Hair, Neck, and Ears
Long hair should be secured completely inside suitable protective headwear. Avoid hair products that may be flammable. A clean FR welding cap can protect the scalp and hair from sparks, especially when welding above shoulder height.
For overhead or high-spatter work, consider a welding hood, neck drape, cape sleeve, or jacket with added shoulder coverage. The helmet and clothing should overlap so that turning or bending your head does not open a strip of bare skin at the collar.
Hot sparks can enter the ear canal during overhead welding. Properly fitted earplugs can help block debris as well as provide noise attenuation when hearing protection is required. Choose ear protection that fits with the helmet and does not prevent it from seating properly.
Welding Gloves: Guarding Your Hands and Wrists
Welding gloves protect against heat, sparks, spatter, sharp edges, and brief contact with hot surfaces. They must be dry, undamaged, and long enough to overlap the sleeves. General mechanic gloves are not a substitute for welding gloves.
Match the Gloves to the Work
- TIG welding: Often uses thinner leather for filler-rod control, but the glove must still provide enough heat protection for the amperage and joint position.
- Short-circuit MIG: A medium-weight glove may balance dexterity and heat resistance.
- Spray-transfer MIG or flux-core: Higher heat and spatter may require heavier insulated gloves.
- Stick welding: Heavy leather gauntlet gloves are commonly needed for radiant heat and slag.
- Air-carbon arc gouging: Requires heavy-duty heat, spark, and impact protection selected for the task.
Look for sound seams and heat-resistant stitching, reinforced high-wear areas, and a cuff that covers the wrist. The glove should let you control the electrode holder or torch without forcing your grip.
Glove Safety and Maintenance
Inspect gloves before each session. Replace them when they have holes, split seams, hardened sections, contaminated leather, or areas worn thin enough to transmit heat quickly. Do not cool hot gloves with water and then continue welding in them.
Wet gloves and clothing can increase electrical risk. Stop if your gloves become soaked with sweat, rain, coolant, or another liquid. Change into a dry pair and correct the wet working condition before restarting.
Welding Boots: Protecting Your Feet
High-top leather shoes or boots help keep sparks out and resist smoldering better than cloth footwear. The boot opening should be covered by the pant leg, and the footwear should be fully laced or zipped.
Safety-Toe and Sole Selection
A safety toe is appropriate where plates, fixtures, cylinders, tools, or other heavy objects could fall or roll onto the foot. Protective footwear should meet the workplace requirements and an applicable standard such as ASTM F2413-24.
Useful features may include:
- High leather uppers: Help resist sparks and cover the ankle.
- Safety toes: Protect against assessed impact and compression hazards.
- Metatarsal protection: Adds protection to the top of the foot where heavy material may fall.
- Heat-resistant soles: May be needed around hot floors or material.
- Slip resistance: Should match the oil, moisture, scale, and floor conditions in the work area.
- Spats or leggings: Can add coverage during overhead or heavy-spatter work.
Electrical Hazard Footwear Has Limits
An ASTM “EH” marking identifies electric-shock-resistant footwear tested under specified dry laboratory conditions. It is secondary protection only. It does not make it safe to weld in water, touch energized parts, use damaged leads, or ignore proper insulation and grounding practices.
Warning: Never depend on an EH boot as your main electrical safeguard. Keep the work area, gloves, clothing, electrode holder, cables, and insulating surfaces dry and in serviceable condition.
Respiratory Protection and Welding Fumes
Welding fumes and gases depend on the wire or electrode, flux, base metal, coating, cleaning chemical, shielding gas, amperage, and ventilation. Stainless steel, galvanized steel, painted material, plated parts, and unknown coatings can introduce additional hazards. Confined and restricted spaces can allow contaminants to build up quickly.
The first objective is to prevent or reduce contamination through engineering controls. Position local exhaust close enough to capture the plume without pulling away the shielding gas. Keep your head out of the rising fume whenever the work position permits.
Do Not Select a Respirator by Welding Process Alone
An N95, P100, elastomeric respirator, PAPR, or supplied-air respirator should not be assigned simply because the job is called MIG, stick, or TIG. Selection depends on:
- The identified fumes, particles, gases, and vapors
- The measured or reasonably anticipated concentration
- Whether oil aerosols are present
- The oxygen concentration
- The respirator’s assigned protection factor
- The filter or cartridge limitations
- The facepiece fit and facial hair
- The work duration, heat load, and physical demands
When workplace respirator use is required, OSHA 1910.134 requires an appropriate respiratory-protection program, including medical evaluation, training, and fit testing for tight-fitting respirators.
PAPR and Confined-Space Limitations
A powered air-purifying respirator uses a blower to move surrounding air through filters or cartridges. It does not create oxygen. A PAPR must not be used as though it were a supplied-air system in an oxygen-deficient or IDLH atmosphere.
Confined-space welding may require atmospheric testing, forced ventilation, an outside attendant, rescue planning, and an atmosphere-supplying respirator or SCBA selected for the conditions. Oxygen must never be used for ventilation.
OSHA’s general-welding ventilation provisions include a minimum rate of 2,000 cubic feet per minute per welder under specified conditions, such as spaces under 10,000 cubic feet per welder, rooms with ceilings below 16 feet, and confined or obstructed spaces. Compliant local exhaust hoods, booths, or other controls may be used as provided by the standard. Review OSHA 1910.252 for the complete requirements.
Pro Tip: Place movable extraction close to the fume source and adjust it as the weld progresses. A fan blowing from behind the welder can push the plume through the breathing zone or disturb shielding gas.
Additional PPE: Hearing, Screens, and Impact Protection
Hearing Protection
Welding itself may not be the loudest operation in a shop, but air-carbon arc gouging, grinding, chipping, plasma cutting, hammering, and nearby machinery can create damaging noise. OSHA’s general-industry hearing-conservation action level is an eight-hour time-weighted average of 85 dBA. The permissible-exposure table lists 90 dBA for eight hours, with shorter allowed durations at higher levels.
Have noise evaluated instead of guessing. Use earplugs, earmuffs, or both when required, and make sure the protection remains compatible with the helmet and other headgear. See OSHA 1910.95 for the complete workplace requirements.
Welding Curtains and Screens
Protect helpers and bystanders from arc rays with noncombustible or flame-resistant screens or shields. Arrange screens so they do not severely block ventilation. Anyone who can still be exposed to the arc needs suitable eye protection.
Hard Hats, Fall Protection, and Other Hazards
A hard hat may be required where falling or overhead objects are present. Elevated welding may also require fall protection independent of the welding PPE. Select compatible systems so helmet adapters, respirator hoses, hearing protection, and fall-protection straps do not interfere with each other.
Comparison Table: Arc Welding PPE by Process
| PPE Type | MIG or Flux-Core | Stick Welding | TIG Welding |
|---|---|---|---|
| Helmet Shade | OSHA minimum 7 below 60 A and 10 from 60–500 A | OSHA minimum 7–11 depending on amperage and electrode size | OSHA minimum 8 below 150 A and 10 from 150–500 A |
| Gloves | Medium to heavy leather based on transfer mode, amperage, and spatter | Heavy leather gauntlet gloves | Dexterous leather with enough heat protection for the task |
| Jacket or Shirt | FR fabric or leather; flux-core and spray transfer may need heavier coverage | Heavy FR fabric, leather, or layered protection | Suitable tightly woven or FR clothing; add leather where heat exposure requires it |
| Respirator | Based on the actual fume and exposure assessment; ventilation first | Based on the actual fume and exposure assessment; ventilation first | Based on the actual fume and exposure assessment; ventilation first |
| Footwear | High-top leather; safety toe and metatarsal protection as assessed | High-top leather; consider spats for heavy slag or overhead work | High-top leather; protection level based on surrounding shop hazards |
| Extra Coverage | Neck and head protection for flux-core, high-amperage, or overhead work | Cap, hood, cape sleeve, apron, or chaps for high-spatter positions | Arm and hand coverage that preserves precise torch and filler control |
Products Worth Considering

WELDING GLOVES: Durable split cowhide leather welding gloves are made of high quality split cowhide leather to provide protection against abrasion and help ensure long wear. Comes in a pack of 2 pairs.

Jacket for protecting the arms and torso from welding spatter and heat

Large capacity main compartment with drawstring closure can fit virtually any welding helmet, including face shields
Pros and Cons of Key PPE
- Welding Helmet
- Pros: Protects the eyes and face from arc radiation, sparks, and spatter; auto-darkening models can improve positioning and workflow.
- Cons: Poor adjustment, damaged cover lenses, blocked sensors, or an incorrect shade can reduce visibility and protection.
- Protective Clothing
- Pros: Reduces skin exposure to radiation, sparks, heat, and molten spatter.
- Cons: Heavy layers can increase heat stress and must be selected and maintained correctly.
- Welding Gloves
- Pros: Protect the hands and wrists while providing process-appropriate grip and control.
- Cons: Thin or worn gloves can transmit heat; heavy gloves may reduce dexterity.
- High-Top Leather Footwear
- Pros: Helps keep out sparks and provides more durable protection than cloth footwear.
- Cons: Safety, metatarsal, heat, slip, and electrical features must be matched to the actual hazard.
- Respiratory Protection
- Pros: Reduces inhalation exposure when the correct respirator is used within a complete protection program.
- Cons: The wrong filter, poor fit, facial hair, expired cartridges, or use in an oxygen-deficient atmosphere can make protection ineffective or dangerous.
Common Welding PPE Mistakes and How to Fix Them
- Leaving skin exposed: Shorts, short sleeves, open collars, and rolled cuffs allow UV radiation and sparks to reach the skin. Fix: Cover the skin fully and close every opening before striking an arc.
- Assuming every cotton shirt is adequate: Thin, worn, stretch, or contaminated cotton may provide poor protection. Fix: Choose the fabric weight and protective construction for the heat and spatter hazard.
- Wearing meltable synthetic clothing: Ordinary polyester or nylon may melt when exposed to heat. Fix: Use garments identified as suitable for welding or appropriate non-melting natural fibers selected by the hazard assessment.
- Using one helmet setting for every job: The required minimum changes with process and current. Fix: Check the amperage-based shade table before welding.
- Skipping safety glasses under the helmet: Debris can enter while the hood is raised or from the side. Fix: Keep approved safety glasses on throughout welding, chipping, and cleanup.
- Welding in damp gloves or clothing: Moisture can increase electrical risk. Fix: Stop, dry the area, and change into dry PPE.
- Allowing sparks into pockets, cuffs, or boots: Trapped material can continue burning unnoticed. Fix: Close pockets, remove pant cuffs, and wear pant legs over fully closed high-top boots.
- Choosing a respirator without evaluating the fumes: A particulate filter may not control gases, vapors, oxygen deficiency, or an excessive contaminant concentration. Fix: Use engineering controls first and obtain proper respirator selection.
- Treating a PAPR as supplied air: A PAPR filters the surrounding atmosphere. Fix: Never use it as an oxygen source or as automatic protection for a confined space.
- Continuing with worn PPE: Cracked lenses, split seams, holes, and hardened gloves reduce protection. Fix: Inspect before each use and remove damaged equipment from service.
Step-by-Step Guide to Setting Up Your PPE
- Identify the job hazards: Note the welding process, amperage, metal, surface coating, work position, ventilation, noise, falling-object risks, nearby workers, and whether the location is confined or elevated.
- Dress in the base protective layers: Put on full-length cuffless pants and a suitable long-sleeve shirt or jacket. Close the collar, cuffs, front, and pockets.
- Put on suitable footwear: Fully lace or zip the high-top leather boots. Pull the pant legs over the boot tops. Add spats or metatarsal protection when required.
- Select and inspect the gloves: Match the weight to the welding process and heat load. Confirm that the gloves are dry and free of holes, contamination, or thin spots.
- Add head and neck protection: Secure long hair. Add a welding cap, hood, cape, neck drape, or other coverage for overhead and high-spatter work.
- Put on safety glasses: Check that they are clean, undamaged, correctly marked, and compatible with the helmet.
- Set up the helmet: Select a shade that meets or exceeds the minimum for the process and current. Inspect the shell, cover plates, filter, sensors, battery indicator, and headgear.
- Set up ventilation: Position local exhaust near the source without disturbing shielding gas. Do not rely on a respirator instead of feasible ventilation.
- Add task-specific PPE: Use hearing protection, a grinding face shield, hard hat, fall protection, or a properly selected respirator when the assessment requires it.
- Perform a final movement check: Reach, bend, kneel, and turn your head. Make sure no skin opens at the wrists, waist, ankles, or neck and no PPE interferes with another item.
Practical Shop Tips for PPE Maintenance
- Clean helmet components correctly: Follow the manufacturer’s method and avoid solvents that can damage the lens or shell.
- Replace damaged cover lenses: Deep scratches, pitting, cracks, and heat damage can obstruct vision.
- Launder FR garments as directed: The wrong bleach, softener, coating, or drying method may damage protective performance.
- Keep PPE free of contamination: Oil, grease, paint, solvents, and metal dust can introduce fire or skin-contact hazards.
- Store gloves and clothing dry: Do not leave them on damp floors, beside coolant, or inside a closed wet toolbox.
- Check seams and closures: Repair or replace open seams, failed snaps, worn hook-and-loop closures, and frayed cuffs.
- Track respirator components: Follow the written change schedule and manufacturer instructions for filters, cartridges, batteries, hoses, and seals.
- Do not modify PPE casually: Drilling a helmet, cutting a respirator seal, or altering a garment can defeat the protection and approval.
Who Pays for Workplace Welding PPE?
Under OSHA’s general-industry PPE payment rule, employers generally must provide required PPE at no cost to employees. Limited exceptions include qualifying non-specialty safety-toe footwear and ordinary clothing that may be worn away from work. Employers must also pay for replacement PPE unless the employee lost or intentionally damaged it.
The employer still has to assess the hazards, ensure that worker-owned PPE is adequate, provide required training, and enforce its proper use. Review OSHA’s PPE payment guidance for the applicable exceptions.
Conclusion: Build a Complete Welding PPE System
The protective clothing needed for arc welding starts with full skin coverage, a correctly shaded welding helmet, safety glasses, dry welding gloves, cuffless pants, and high-top leather footwear. Those basics must then be adjusted for the process, amperage, spatter, work position, metal, coating, ventilation, noise, and surrounding hazards.
Do not choose each item in isolation. A helmet must work with the glasses, respirator, hearing protection, hard hat, and head covering. Gloves must overlap the sleeves. Pants must cover the boots. Ventilation must control the plume without disrupting shielding gas. When every layer works together, the gear protects you without getting in the way of the weld.
Frequently Asked Questions
What is the best welding helmet for arc welding?
The best helmet is one that fits correctly, covers the face and neck, complies with an applicable eye and face protection standard, and provides the shade range required for your process and amperage. An auto-darkening helmet can improve convenience, but a suitable fixed-shade helmet is also protective when used correctly.
Can I use regular work gloves for welding?
No. Ordinary mechanic or general work gloves may not provide sufficient flame, heat, spatter, and wrist protection. Use dry leather welding gloves selected for TIG, MIG, flux-core, stick, or the other hot-work process being performed.
Is a cotton shirt safe for welding?
A clean, dry, tightly woven heavyweight cotton shirt may be acceptable for some lower-spatter work when the hazard assessment permits it. Thin cotton, synthetic blends, stretch panels, holes, frayed fabric, and contaminated clothing may provide inadequate protection. Use FR fabric, leather, or additional layers when heat and spatter are greater.
Do I need a leather welding jacket?
Not for every weld. Leather is useful for heavy stick welding, flux-core, overhead welding, gouging, and other high-spatter or high-heat work. A lighter suitable FR garment may provide enough protection for lower-heat bench work. Select the jacket for the actual hazard rather than the process name alone.
Do I need a respirator for all arc welding?
No single respirator rule applies to every arc weld. Start with ventilation and local exhaust. Respirator need and type depend on the contaminants, concentration, oxygen level, work area, and exposure assessment. Required workplace use must follow an OSHA-compliant respiratory-protection program.
Can I use a PAPR while welding in a confined space?
Only when a qualified assessment determines that the specific PAPR is suitable for the measured atmosphere and task. A PAPR does not supply oxygen and must not be used as protection for an oxygen-deficient or IDLH atmosphere. Confined-space welding may require supplied air, SCBA, ventilation, atmospheric testing, an attendant, and rescue arrangements.
How often should welding PPE be replaced?
There is no single replacement interval for every item. Inspect PPE before each use and follow the manufacturer’s service-life instructions. Replace equipment when it is cracked, burned, contaminated, deeply scratched, torn, worn thin, unable to close correctly, or otherwise unable to provide its intended protection.
Sources
- OSHA 29 CFR 1910.252 — Welding, Cutting, and Brazing — eye protection, protective clothing, ventilation, confined spaces, and special-metal requirements
- OSHA 29 CFR 1910.133 — Eye and Face Protection — minimum welding filter shades and protective-eyewear criteria
- OSHA 29 CFR 1910.134 — Respiratory Protection — respirator selection, oxygen deficiency, medical evaluation, fit testing, and programs
- NIOSH — Welding Fumes and Manganese — welding-fume composition and exposure concerns
- ASTM F2413-24 — Protective Safety-Toe Footwear — current protective-footwear performance specification
- ANSI Z49.1:2021 — Safety in Welding, Cutting, and Allied Processes — comprehensive welding safety, ventilation, PPE, fire prevention, and confined-space guidance

[…] Proper ventilation or local exhaust systems to remove welding fumes. Use a respirator if ventilation is inadequate, especially when welding coated metals. Review OSHA Fact Sheet FS-3647 (OSHA, 2013) and NIOSH guidance on zinc oxide/welding fumes (NIOSH Pocket Guide, accessed 2025-10-16). For a gear checklist, see what protective clothing I use. […]