Before you weld auto body panels, remove rust, paint, undercoating, oil, and loose scale from the repair area so the weld lands on clean steel. Clean both sides when you can, cut out weak or pitted metal, fit the patch tightly, and protect the finished repair with epoxy primer, seam sealer, and backside corrosion protection.
Quick Answer
To remove rust before welding auto body panels, strip the weld area to bright bare steel, clean the backside, cut out rust-through and thin pitted metal, degrease with a welding-safe cleaner, and let everything dry fully. Weld only on solid, clean metal, then prime, seal, and protect the backside.
Key Takeaways
- Rust, paint, oil, seam sealer, and undercoating can contaminate the weld and create weak, porous tacks.
- If the steel is thin, flaky, or deeply pitted, cut it out instead of trying to weld over it.
- Clean the backside of the panel whenever possible, because hidden rust can keep spreading after the outside repair looks finished.
- Use short tack welds and let the panel cool often to reduce burn-through and warping.
- Finish the repair with epoxy primer, seam sealer, and cavity wax or backside coating so moisture cannot restart the rust.
At a Glance
| Time Required | 1 to 4 hours for a small patch, longer if rust reaches the backside, inner brace, or wheel arch lip |
| Difficulty | Moderate; thin sheet metal burns through easily and needs careful heat control |
| Tools Needed | Wire brush, wire wheel, flap disc, grinder, body saw or cutoff wheel, clamps, cardboard template, wax-and-grease remover, PPE, welder, epoxy primer, seam sealer, and cavity wax |
| Cost | Usually $25 to $150 for abrasives, cleaner, primer, sealer, and patch steel if you already own the welder and grinder |
Warning: Do not weld over paint, rust converter, undercoating, wet solvent, seam sealer, or unknown coatings. Coatings and residues can create hazardous fumes, and sparks can ignite hidden material. Follow OSHA welding, cutting, and brazing safety rules, use ventilation, keep a fire extinguisher nearby, and wear proper welding PPE.
Remove Rust Before You Weld Auto Body Panels
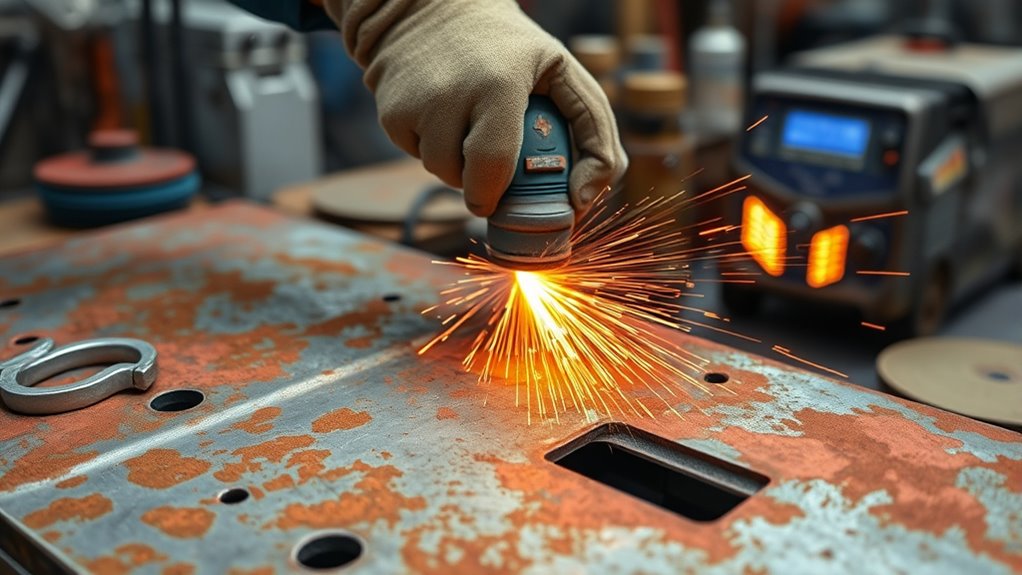
Start by cleaning the weld area with a wire brush, wire wheel, or flap disc. Remove loose rust, paint, filler dust, seam sealer, oil, and road grime until the weld zone is bright, solid steel.
Clean at least 1 to 2 inches past the planned weld line. That extra clean area gives you room for clamps, tack welds, hammer-and-dolly work, and inspection under bright light.
If you find heavy scale, deep pits, or steel that flexes like foil, stop grinding and cut that metal out. Welding over weak rusted steel only hides the problem and usually creates pinholes, porosity, and a repair that rusts again.
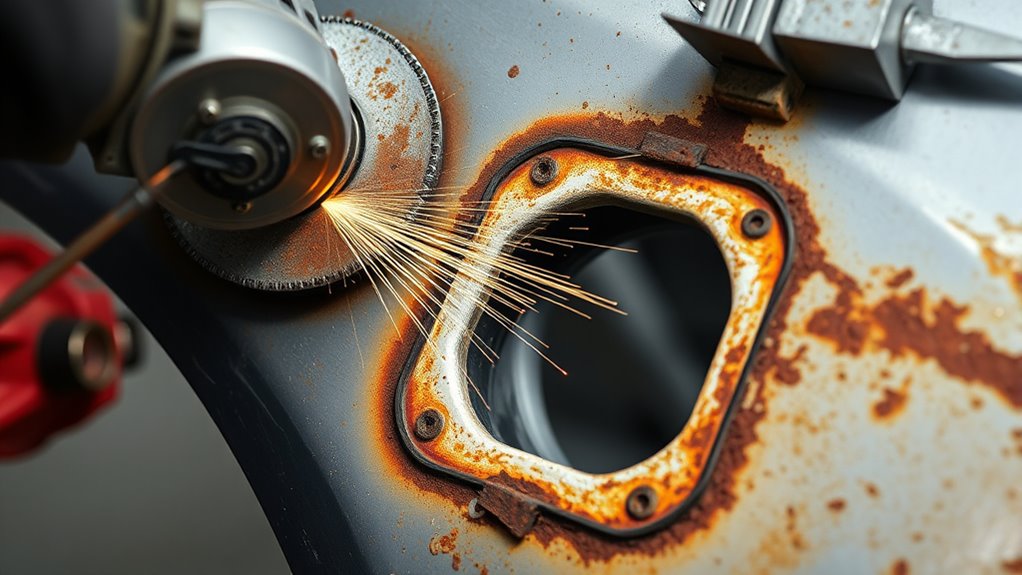
For tight corners, use a small abrasive wheel, spot blaster, or hand tool. Chemical rust removers such as phosphoric-acid or oxalic-acid products can help in pits, but only when the product label allows it for bare steel before welding. Rinse or neutralize only as directed, then dry the panel fully before you strike an arc.
Wear eye protection, hearing protection, gloves, a welding helmet, flame-resistant clothing, and respiratory protection when ventilation is not enough. The CCOHS welding PPE guide explains that welding protection may include helmets, goggles, respirators, flame-resistant clothing, gloves, and boots.
Note: If the panel may have lead primer, zinc coating, chromate coating, heavy undercoating, or old unknown paint, do not dry grind it casually. Use the correct removal method, ventilation, and PPE, or have the coating tested before welding.
When you remove all rust residues before welding, you also reduce the chance of zinc contamination or other coating-related weld problems.
Inspect the Rust Before Cutting
Before you cut, decide whether you are dealing with surface rust, pitted metal, or rust-through. Surface rust can often be stripped back to clean steel. Pitted metal needs closer judgment. Rust-through, cracking, swelling, or paper-thin steel must be removed.
- Surface rust: The metal still feels solid after wire brushing or sanding.
- Pitted rust: The surface has dark craters after cleaning. If the pits are deep, cut the section out.
- Rust-through: Holes, flakes, swollen seams, or weak edges mean the steel is no longer a safe weld base.
- Hidden backside rust: The front may look clean while the back is still scaly, especially around wheel arches, rocker panels, floor pans, and lower doors.
If the rust reaches a brace, pinch weld, suspension mount, seat belt area, or structural section, treat the repair as structural and check the vehicle repair information before welding. Cosmetic patch methods are not enough for load-bearing metal.
Clean the Front and Back of the Panel
Brush both sides of the panel until you remove loose rust, paint, and contamination. Use a wire brush or cup brush on the front face, then clean the backside just as carefully if you can reach it.
The backside matters because trapped moisture, dirt, and old seam sealer can feed new rust after the outside repair is painted. If the backside is boxed in, open the smallest practical access point, use a borescope or mirror for inspection, and plan to spray cavity wax after the welding and priming are finished.
After mechanical cleaning, degrease the panel with a welding-safe wax-and-grease remover or acetone on a clean cloth. Do not weld while the panel is wet. Let the solvent flash off completely before welding.
Avoid chlorinated brake cleaner around welding. Welding heat and arc radiation can react with some solvent residues and create dangerous gases. The CCOHS welding fumes guide recommends safely removing coatings before welding and avoiding chlorinated hydrocarbon degreasers.
- Scrub the edges carefully so they fit tight and weld clean.
- Treat the backside because trapped moisture can restart corrosion.
- Use chemical rust remover only as the label directs, then dry the steel fully.
- Keep the weld zone free of primer, paint, undercoating, and solvent residue.
This disciplined cleaning step helps you decide whether the panel can be saved or whether you need to assess rust holes and replace a larger section.
Cut Out the Rusted Metal
Once the panel is clean, mark the rusted section and cut it out with a grinder, cutoff wheel, air saw, or body saw. Extend the cut past the visible corrosion so hidden rust does not stay inside the repair.
Cut slowly and keep the tool steady. Leave a little extra material at first so you can trim the opening accurately after you test-fit the patch.
After you remove the damaged section, use a wire brush, flap disc, or small abrasive tool to clean the surrounding edge. Look at the backside again. If more compromised metal appears, cut it out now instead of trying to bridge it with weld.
A clean, solid opening gives the patch a strong edge to land on. It also helps you grind down to bare metal and reduce weld contamination before the first tack.
Pro Tip: Round the corners of the cutout instead of leaving sharp square corners. Rounded corners reduce stress points, make the patch easier to fit, and help the weld shrink more evenly.
Make a Tight-Fitting Patch Panel
Cut a cardboard template of the opening so you can trace an accurate patch shape onto sheet metal. Test the template in the opening before you cut the final patch.
Transfer the outline to matching-gauge sheet metal. Keep a slight overlap while rough-cutting, then trim the patch until it sits flush with the surrounding panel. For most butt-welded body repairs, you want a small, consistent gap that lets the weld penetrate without forcing the patch to sit proud or tight.
Before installation, clean and scuff the edges of both the body metal and the patch panel. Bright, bare surfaces help with proper penetration and reduce trapped contamination.
- Trace the opening with a cardboard template.
- Cut the patch slightly large, then trim it to fit.
- Round the corners and deburr the edges.
- Clean both mating edges to bright bare steel.
- Clamp or magnet the patch so it sits flush before tacking.
Do not fill a poor fit with a long weld bead. Large gaps force you to add more heat, which increases burn-through, shrinkage, and warping.
Weld the Patch Without Warping
Start by tack welding the patch in place with low heat and small wire suited to thin sheet metal. Then stitch the seam in short, spaced welds. Let each area cool before you add the next tack.
Keep a pre-weld checklist close: clean metal, dry panel, correct wire, correct shielding gas if using MIG, good ground clamp, and no hidden coating behind the seam. This helps reduce defects such as porosity, trapped gases, and worm tracks in flux-core welding.
Tack Weld in Place
Tack the patch with small, evenly spaced welds to hold alignment without overheating the panel. Start with a few tacks at opposite sides of the patch, then keep moving around the seam.
- Set the patch flush with a small, even gap.
- Place the first tacks at opposite points to lock alignment.
- Let each tack cool before adding one nearby.
- Check the panel shape after every few tacks.
Short tacks keep heat localized and make it easier to correct the panel before distortion becomes permanent.
Stitch Weld Slowly
Once the patch is locked in place, add short stitch welds between the tacks. Do not run a continuous bead on thin auto body steel. A long bead traps heat and pulls the panel out of shape.
Work in small sections, then move to the opposite side of the patch. Let the metal cool naturally. Avoid quenching hot welds with water because sudden cooling can harden the weld area and increase distortion.
Keep checking the seam for pinholes, missed spots, and areas that are starting to sink. It is easier to correct the shape while the weld is still being built than after the seam is fully closed.
Hammer and Dolly Control
Use a dolly behind the panel when access allows. After a tack cools slightly, support the backside and tap the tack flat with a body hammer. This helps counter weld shrinkage and keeps the seam closer to the original panel shape.
- Hold the dolly tight behind the tack.
- Tap the tack gently to stretch the shrink area back into line.
- Move to the next tack and repeat.
- Stop if the panel starts to oil-can or sink.
Hammer-and-dolly control works best with patience. Heavy blows can stretch the panel too far, while no correction at all can leave the seam low and tight.
Troubleshoot Common Rust Repair Welding Problems
If the weld starts acting wrong, stop and fix the cause before you keep adding heat. Most rust-repair welding problems come from contamination, poor fit, too much heat, or metal that should have been cut out.
| Problem | Likely Cause | Fix |
| Burn-through | Thin metal, too much heat, or gap too large | Cut back to thicker steel, reduce heat, shorten tacks, and improve patch fit |
| Porosity | Rust, paint, oil, wet solvent, or poor shielding | Grind out the bad tack, clean again, dry fully, and check gas or flux-core setup |
| Warping | Too many welds in one area | Skip around the seam, let the panel cool, and use hammer-and-dolly correction |
| Rust still appears at edge | Cut line did not go far enough | Cut farther into solid steel and remake the patch if needed |
Grind, Prime, and Seal the Repair
After the seam is welded, grind the welds flush with a flap disc or small abrasive wheel. Work slowly and keep the grinder moving so you do not thin the surrounding sheet metal.
Inspect every seam and edge under bright light. If you find pinholes, grind the area clean and add small tacks instead of smearing filler over the hole. Filler cannot replace a sealed weld seam.
When the weld is solid, clean the area again and apply a high-quality epoxy primer to bare steel. Epoxy primer seals the metal better than ordinary filler primer and gives seam sealer a sound base.
Seal the backside and any lap, flange, or wheel-arch edge where water can sit. Use automotive seam sealer after primer if the product system calls for it, then protect enclosed cavities with cavity wax after the painting steps are complete.
Proper protective clothing remains important during grinding and welding because sparks, hot slag, UV light, and sharp metal edges can injure you quickly.
The repair is not finished when the weld is smooth. It is finished when both sides of the metal are sealed against air, water, and road salt.
Frequently Asked Questions
How do you remove rust before welding?
Remove rust before welding by stripping the repair area to bright bare steel with a wire wheel, flap disc, abrasive pad, or spot blaster. Then cut out any thin, pitted, or rust-through metal. Degrease with a welding-safe cleaner, let the surface dry fully, and weld only on solid clean steel.
What dissolves rust without scrubbing?
Phosphoric-acid and oxalic-acid rust removers can loosen or convert light rust in pits, but they do not replace cutting out weak metal. Follow the product label, remove residue as directed, dry the panel completely, and keep chemical residue out of the weld zone.
How do you remove rust from auto body panels?
For auto body panels, start with mechanical cleaning. Use a wire brush for loose rust, a flap disc for scale, and a cutoff wheel or body saw for rust-through. Clean both sides when possible, repair only solid steel, and finish with epoxy primer, seam sealer, and backside protection.
How do you prep rust for Bondo?
Do not apply body filler over active rust. Grind or sand to clean metal, cut out rust-through, weld the patch, grind the weld smooth, and apply epoxy primer if your filler system allows filler over epoxy. Follow the filler and primer manufacturer’s instructions for sanding grit and recoat time.
Can you weld over rust converter?
No. Do not weld over rust converter. Rust converter is a coating, and coatings can contaminate the weld and create fumes. Use converter only after welding if the product is approved for that step, and keep the weld zone clean bare steel before welding.
Should you use weld-through primer before welding body panels?
Use weld-through primer only where the product instructions and repair method call for it, usually on hidden overlap areas that will be hard to coat later. Do not load the open weld seam with primer. For a butt-welded patch, keep the actual weld edge clean and bare.
Conclusion
Before you weld auto body panels, remove every trace of loose rust, paint, oil, and coating from the weld area. Clean both sides when possible, cut back to solid steel, and fit the patch so the weld is not forced to bridge a weak gap.
Use short tacks, move around the panel, and let the steel cool to prevent warping. After the weld is ground smooth, seal the repair with epoxy primer, seam sealer, and backside corrosion protection. Clean welding gets the patch attached; careful sealing keeps the rust from coming back.
Sources
- OSHA 1910.252 — General Requirements for Welding, Cutting, and Brazing — supports hot-work fire prevention, eye protection, ventilation, PPE, zinc/lead/cadmium coating precautions, and cleaning-compound cautions.
- CCOHS: Welding — Fumes and Gases — supports coating, solvent, zinc, paint, fume, ventilation, and respiratory-protection guidance.
- CCOHS: Welding — Personal Protective Equipment and Clothing — supports helmet, respirator, flame-resistant clothing, glove, boot, and skin-protection guidance.
- OSHA: Welding, Cutting, and Brazing Standards — supports use of current welding safety standards and compliance references.


