Your plasma cutter should not stall just because you switch to thicker plate. If the arc sputters, the air system may hold pressure at idle but lose flow under load. You can confirm the problem by checking hot flow at the cutter inlet, verifying pressure while cutting, and inspecting hoses, filters, regulators, and fittings for choke points.
What’s in This Article
- Signs Your Plasma Cutter Is Starved for Air
- PSI vs. Flow Rate: What Matters and Why
- Manufacturer Specs You Must Match
- Common Causes of Low Air Pressure
- How to Test Cold and Hot Flow Correctly
- Regulator, Hose, and Filter Setup Best Practices
- Troubleshooting Steps to Restore Proper Air Supply
- Preventive Maintenance to Protect Cut Quality and Consumables
- Frequently Asked Questions
- Conclusion
- References
Quick Answer
Your plasma cutter is likely starved for air if it sputters, stalls, struggles to pierce, or shows poor cut quality under load. Check pressure while air flows, not only at idle. Then confirm the required standard cubic feet per hour (SCFH), clean filters, fix leaks, and remove hose or fitting restrictions.
Key Takeaways
- Check plasma cutter air pressure while air flows because static pressure can hide supply problems.
- Match both pounds per square inch (PSI) and SCFH to the values in your operator manual.
- Inspect hoses, filters, dryers, regulators, and quick-connects when pressure drops during cutting.
- Use cold-flow and hot-flow tests to find restrictions before they damage consumables.
- Log pressure and flow readings so you can spot changes before cut quality drops.
Signs Your Plasma Cutter Is Starved for Air

When the machine stalls mid-cut or struggles to pierce, you may have an inadequate air supply. Watch the gauge at the plasma unit during the cut, not only at idle. If the pressure drops below your manual’s minimum, the torch may not get enough air to keep the arc stable.
You may also see hard starts, an inconsistent arc, heavy dross, poor pierces, or rough edges on material thicker than 1/4 inch. These symptoms can look like worn consumables, but air starvation often causes the same problems.
Set the pressure regulator with air flowing, and place the final regulator close enough to the cutter to limit pressure loss. Listen for the compressor cycling often or an audible pressure drop near the torch. Both can point to a restriction, leak, or compressor that cannot keep up.
Inspect the full air path: compressor outlet, hose runs, quick-connects, filters, dryers, and torch body. Clean or replace clogged filters, and drain water traps. Check for crushed hoses, leaks, loose fittings, or partly closed valves.
During a test cut, log the pressure drop. If it falls below spec, stop, correct the restriction, and retest before you keep cutting.
PSI vs. Flow Rate: What Matters and Why

PSI gets most of the attention, but flow rate matters just as much. PSI tells you pressure. Flow rate tells you how much air volume reaches the torch during purge and cutting.
You need both numbers to match the manual. Correct PSI without enough flow can starve the arc, causing sputtering, bevel, and unstable starts. Enough flow with low PSI may still fail to support proper swirl, cooling, and cut quality.
Correct PSI without enough flow starves the arc; low PSI with good flow hurts swirl and cooling.
Think in two conditions: cold flow and hot flow. Cold flow measures air with no arc. Hot flow measures air while the machine cuts under load.
Manufacturer values vary by model, amperage, torch, and consumable set. For example, some 85-amp systems use about 500 SCFH during cold flow and about 400 SCFH while cutting at full output.
If you can’t hold the required values, look for restrictions. Undersized hoses, clogged filters, waterlogged elements, small quick-connects, and tight line routing can all create pressure drop at the torch.
Install an inline flow meter near the machine inlet when you need a clear reading. Then adjust hose size, filter condition, and line routing until the cutter holds the target PSI and SCFH.
Manufacturer Specs You Must Match
Before you chase leaks or swap filters, check the manufacturer’s air specs at the machine inlet. Your plasma cutter manual lists the required pressure range and flow rate for each torch and output level. Set your air supply to those exact values.
Many shop plasma cutters need roughly 80 to 120 PSI at the inlet, but your manual controls the final target. Some units need at least 90 PSI at the inlet during flow. Always verify pressure while air moves through the system.
- Install a calibrated gauge at the inlet.
- Measure static PSI before you purge.
- Measure flowing PSI while you purge.
- Use a flowmeter to compare SCFH against the manual.
- Adjust regulators until readings meet spec under flow.
| Spec to Verify | Typical Target Example |
|---|---|
| Inlet air pressure, static | Often 80-120 PSI |
| Inlet air pressure, flowing | Manual minimum under flow |
| Cold flow rate, no arc | Manual SCFH value |
| Hot flow rate, cutting | Manual SCFH value at amperage |
If your readings don’t match, correct the setup before you cut. Guessing at air settings shortens consumable life and makes cut defects harder to diagnose.
Products Worth Considering
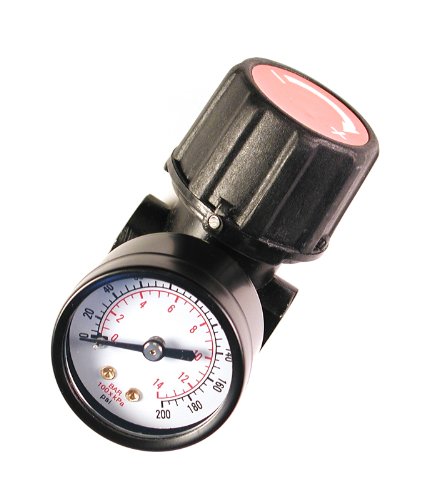
Air regulator for precisely regulating and maintaining constant air pressure

PLEASE NOTE: 3/8" NPT MEASURES 0.675" OUTSIDE THREAD DIAMETER IN INCHES. 3/8", Mid Flow Regulator For Pneumatic Air Tools On Compressed Air Lines.

【Industrial Performance】The air drying system features two rugged 3/4“ NPT air ports and 1/4” NPT gauge ports to handle high-pressure environments (up to 240 PSI) for a variety of industrial applications. Note: To prevent air leakage, please wrap the sealing tape around the threads appropriately before connecting the screws.
Common Causes of Low Air Pressure
You often see low pressure when undersized hoses or clogged filters throttle flow. Long hose runs make the problem worse because friction adds pressure loss.
Verify that your regulator can support the required cubic feet per minute (CFM). Then confirm the torch-side or inlet gauge reads within spec while air flows. If the readings disagree, suspect gauge error, a mis-set regulator, or a restriction.
Undersized Hoses and Filters
Small restrictions in the air path can starve a plasma cutter of flow and pressure. If you run undersized hoses, friction losses rise, flow drops, and the torch sees low dynamic pressure. The cut may show rough edges, dross, bevel, and fault codes.
Clogged air filters add more resistance. Match hose inside diameter to the manufacturer’s required SCFM and hose length. Keep filter elements clean and rated for the same flow.
| Symptom | Likely Cause | Action |
|---|---|---|
| Low cut quality | Hose too small | Upsize hose ID |
| System errors | Dirty air filters | Replace elements |
| Pressure drop at torch | Long small-ID run | Shorten or upsize hose |
| Unstable arc | Hidden restriction | Inspect fittings |
Use an inline flow meter to confirm actual SCFH and find restrictions. Regular checks help you avoid repeated air losses.
Regulator and Gauge Missetup
Restrictions do not cause every low air problem. Mis-set regulators and weak gauges can also reduce pressure at the torch. Set the tank regulator high enough to supply the machine, then verify the cutter sees the required inlet pressure during flow.
Don’t trust a static reading. Trigger the air test or purge function and watch the gauge under load.
Account for line losses. A long hose can drop pressure before air reaches the machine, so you may need a higher upstream setting. Keep the cutter inlet within the range listed in your manual.
If readings seem wrong, compare them with a known-good test gauge. Replace suspect gauges right away. Then confirm that the cutter’s internal regulator does not choke flow.
Validate the repair with a flow test. Trigger air, watch pressure stability, fine-tune the regulator, and lock the settings.
How to Test Cold and Hot Flow Correctly

Test cold flow with air on and the arc off. Then test hot flow while the torch cuts. This split helps you find problems that only show up under load.
Maintain the input pressure listed in your manual, and compare SCFH against the manufacturer’s target. Use an inline flow meter at the cutter inlet when you need exact numbers.
Pro tip: Record both cold-flow and hot-flow readings after each service so you can spot a restriction early.
Define Cold vs. Hot
Cold flow means the air rate with the plasma cutter running but no arc ignited. Hot flow means the air rate during an active cut. Cold testing gives you a baseline, while hot testing proves the system can feed the torch under load.
To test correctly, connect the air supply, purge the lines, and confirm clear flow to the inlet. Measure cold flow at the machine with the torch off-arc. Then start a cut and measure hot flow at the same inlet point.
Use a calibrated flowmeter in SCFH, placed where your manual recommends. Compare both readings to the manufacturer’s cold and hot targets to find restrictions or compressor shortfall.
Required PSI and SCFH
Set the required PSI and SCFH before you cut. Start with the regulator at the cutter’s spec. Then confirm pressure while air flows through the machine.
For many plasma cutters, the key pressure reading sits at the inlet during purge or cutting, not at the compressor tank. If PSI meets spec but SCFH falls short, you likely have a restriction, an undersized supply, or a compressor that cannot sustain flow.
Use this process:
- Verify regulator accuracy with a known-good gauge.
- Inspect filters, dryers, and lines for blockage.
- Check hose size and quick-connects for pressure drop.
- Measure cold flow with no arc.
- Measure hot flow during a real cut.
- Retest after each adjustment.
Using Inline Flow Meter
Two tests with an inline flow meter show whether your plasma cutter gets the air it needs. Install the meter downstream of the regulator and upstream of the machine inlet. Follow the flow arrow on the meter body.
Purge the line until pressure stabilizes. For the cold-flow test, open air with no arc and read SCFH. If the reading is low, inspect filters, regulators, hoses, quick-connects, and compressor capacity.
For the hot-flow test, watch SCFH while cutting at the intended amperage. If flow sags, look for restrictions, pressure drop under load, or undersized plumbing. Log your readings so you can compare them after future service.
Regulator, Hose, and Filter Setup Best Practices

Before you strike an arc, set up the air system to deliver stable pressure and flow from tank to torch. Start at the air compressor and set the tank regulator high enough to overcome normal line loss. Keep the cutter inlet within the pressure range in your manual.
Install a quality pressure regulator upstream of the machine to stabilize delivery. Lock it after you set it. Use large-diameter hose for long runs, and avoid narrow whip hoses that restrict flow.
Keep hose runs as straight as practical. Limit quick-connects because some fittings have small internal passages. A fitting can look full-size outside and still choke flow inside.
Place a particulate/moisture filter before the final regulator and service it on schedule. Drain bowls, replace elements, and verify seals. Add a fine coalescing filter near the cutter if moisture keeps showing up.
Add an inline flow meter after the final regulator when you need to confirm real flow. Label setpoints and record readings to keep performance consistent.
Warning: Wet or oily air can damage consumables and torch parts, so drain tanks and service filters before long cutting sessions.
Products Worth Considering

COMPLETE BUILT-IN AIR SYSTEM: Equipped with an integrated high-performance air pump, this plasma cutter eliminates the need for an external air compressor—simply plug into power and start cutting with no extra equipment or complicated setup required

High Pressure Tolerance – The air drying system features 1/2" NPT air ports and 1/4" NPT gauge port, capable of handling 0-240 PSI pressure range with 141 CFM (4000L/min) flow rate, ideal for industrial applications like paint spray and plasma cutters. Aluminum alloy body with corrosion-resistant metal bowls ensures endurance in harsh industrial environments

Troubleshooting Steps to Restore Proper Air Supply

Air problems can look electrical, so prove the air path from end to end first. Work from the compressor toward the torch. Confirm compressor output, then read pressure at the plasma cutter while purging.
You need the manual’s required pressure under flow, not only static pressure. If pressure sags, adjust the regulator or isolate leaks. Inspect pre-unit and back-mounted filters, and replace clogged elements that choke flow.
Trace each air line for kinks, crushed sections, water, oil, or hissing leaks. Open the machine only if you can do it safely and the manual allows it. Verify outgoing air lines from the solenoid to the torch, and clean or replace blocked hoses.
Use this order:
- Check pressure at the plasma cutter under flow.
- Confirm the compressor can supply the required CFM.
- Drain the tank, filters, and water traps.
- Replace clogged or wet filter elements.
- Inspect hoses, fittings, and quick-connects for restrictions.
- Check torch parts for blockage, wear, or poor seating.
- Retest pressure and flow while cutting.
| Step | Action |
|---|---|
| 1 | Gauge pressure at the plasma cutter under flow. |
| 2 | Check filters and replace clogged elements. |
| 3 | Inspect solenoid-to-torch lines and fix leaks or blocks. |
If you need to keep cutting while you diagnose the fault, swap in a known-good torch when your machine supports it. That helps you separate a torch problem from a supply problem.
Preventive Maintenance to Protect Cut Quality and Consumables

Even when the machine cuts well, schedule preventive checks to keep airflow clean and stable. Stable air protects consumables, improves pierces, and helps you avoid random cut defects.
Build a weekly routine for machines that see regular use. Verify the regulator setpoint and gauge accuracy while air flows. Log readings so you can spot drift.
Weekly: verify regulator and gauges under load, log drift, confirm torch flow, and fix restrictions.
Replace or clean intake and inline filters based on hours of use, not just the calendar. Inspect bowls for water or oil, drain them, and service dryers. Walk the air path from compressor to torch.
Inspect hoses for kinks, soft spots, leaks, or debris. Replace damaged sections and secure fittings. At the torch, clean the head, check seating, and inspect electrode and nozzle wear.
Replace consumables as a matched set when they reach the limit in your manual. This habit stabilizes the arc, preserves cut quality, and extends consumable life.
How to Tell Air Starvation From Worn Consumables
Air starvation and worn consumables can both cause misfires, bevel, dross, and rough edges. Start with the fastest check: verify pressure and flow under load. If the air readings stay within spec, inspect the electrode, nozzle, swirl ring, and shield.
A worn electrode often shows deep pitting, cracks, or an uneven tip. A damaged nozzle may have an enlarged or out-of-round orifice. If new consumables don’t fix the problem, return to the air path and test for hidden restrictions.
Frequently Asked Questions
How Does Air Pressure Affect Plasma Cutting?
Air pressure affects arc stability, cut quality, piercing, and torch cooling. You need dry, regulated air that meets the pressure and flow values in your manual. Low pressure or low flow can cause hard starts, dross, sputtering, and short consumable life.
What PSI Should I Run My Plasma Cutter At?
Run your plasma cutter at the PSI listed in the manufacturer manual. Many shop units operate within an 80 to 120 PSI inlet range, but the exact number depends on the machine and torch. Verify pressure while air flows because idle readings can look fine while cutting pressure drops.
How to Tell if a Plasma Electrode Is Bad?
You can identify a bad electrode by deep pitting, cracks, heavy dross buildup, misfires, unstable arc, slow cuts, and poor pierces. Check the wear limit in your manual. Replace the electrode and nozzle together when the manufacturer recommends a matched set.
Will a Plasma Cutter Work Without Air?
No. A plasma cutter needs air or another approved gas for arc formation, cooling, and dross control. Many machines use interlocks to stop firing when air pressure falls too low.
Can a Small Compressor Run a Plasma Cutter?
A small compressor can run some low-amp plasma cutters if it meets the required CFM and duty cycle. It may fail on thicker cuts because the tank pressure drops faster than the pump can recover. Compare the compressor’s delivered CFM at the required PSI with the cutter manual before you cut.
Conclusion
Treat air like fuel for your plasma cutter. If the torch can’t get enough clean, dry air under load, the arc will sputter and your consumables will wear faster. Verify PSI and SCFH while air flows, then fix restrictions before you blame the machine. Keep a simple log, and your plasma stays crisp, pierces clean, and runs with fewer surprises.
References
- Powermax85 Operator Manual — Hypertherm, manual reference
- Powermax65/85 Service Manual — Hypertherm, manual reference
- Plasma Arc Cutting — Occupational Safety and Health Administration, safety reference