You remove spot welds cleanly by matching the tool to the weld size, location, and access. Use a spot weld cutter with a center pin for most panels; it cuts the weld diameter without wandering. If the weld is stubborn, use a drill bit sized slightly larger than the weld, or a carbide burr in tight spaces. Mark the center, make a small divot, control depth, and inspect the panel after removal for cleaner results and more precise cuts.
Choose the Right Spot Weld Removal Method
When choosing a spot weld removal method, match the tool to the weld’s size, location, and access. You’ll remove spot welds more cleanly when you select spot weld cutters that closely match the weld diameter. Their centering pin resists wandering, so you can stay on target without forcing the tool.
Match the tool to the weld: the right cutter follows the diameter and keeps you centered.
A drill bit can work, but choose one 1/8 to 1/4 inch larger than the cutting spot to guarantee full release; otherwise, you may leave material behind. Use a metal punch to mark the center before drilling, especially on tight panels where alignment matters.
For faster work on stubborn joints, carbide burrs in an electric die grinder can strip the weld efficiently, but you must control depth to protect the parent sheet. Grinding or the star method can free hard spots, yet they demand disciplined handling.
Remember that maximum fillet weld size guidelines are crucial for maintaining the integrity of the surrounding material during removal.
Your goal is liberation with minimal collateral damage.
Products Worth Considering

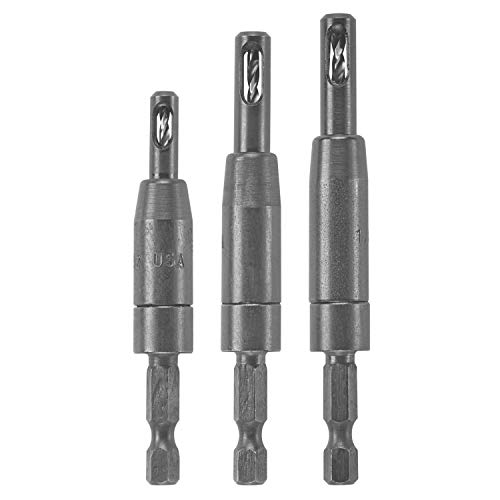
Spot Weld Cutter Kit: It is easy to replace when the cutter blades begin to dull. The spot weld removal tool kit includes 2 complete spot weld cutters, 11 replacement 3/8" double-sided cutter blades, 2 replacement center pins, and a storage case

Durable Material : The preferred material used was top-quality steel which has excellent thermal resistance.The cutting blade has a diameter of 3/8 inches, and the arbor is of standard 1/4 inch size.

18-Pack Comprehensive Kit: The spot weld removal tool kit includes 2 pcs spot Weld Drill, 8 pcs replacement cutting blades and 4 pcs pilot pin replacement. 3 pcs spot weld drill bits include 1/4in (6.5mm), 5/16in (8mm), 3/8in (10mm)—It is easy to replace when the cutter blades begin to dull.
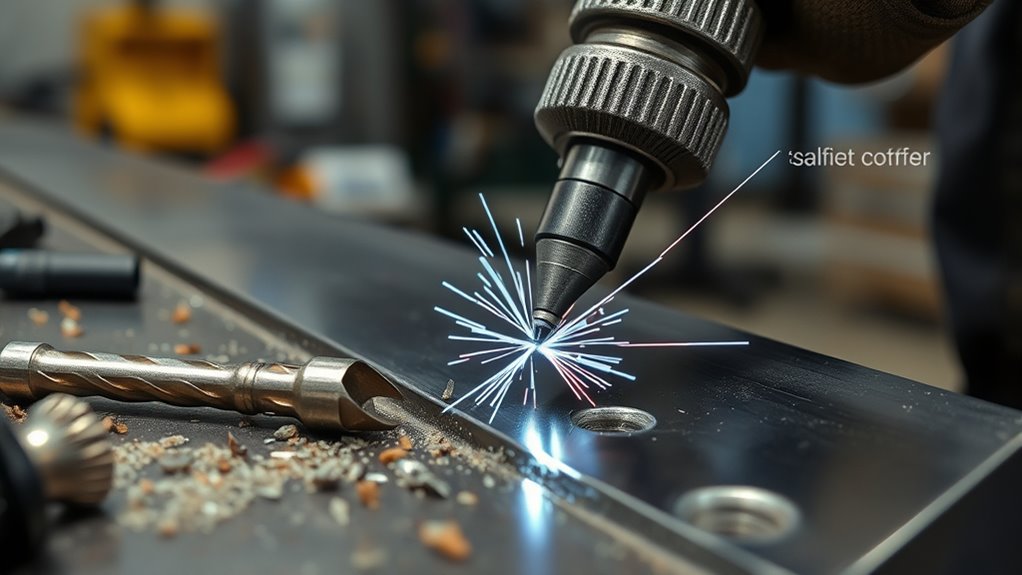
How Spot Weld Cutters Work
You use a spot weld cutter with a hole-saw-style cutting wheel sized slightly larger than the weld, so it separates the panels cleanly without excess metal loss.
The cutter’s centering pin keeps the tool from wandering, and you should create a small divot in the weld center to guide it accurately.
This design lets you cut directly over the weld with less risk of damaging surrounding metal than traditional removal methods.
Cutter Design and Function
A spot weld cutter works by combining a centered guide pin with a cutting wheel that resembles a hole saw, allowing the tool to stay aligned and cut just beyond the weld’s diameter without drifting.
You use the centering pin to control the spot weld cutter, and that guide keeps the cutting wheel stable for clean panel separation.
Because the wheel is sized slightly larger than the weld, it can isolate the joint while reducing damage to surrounding metal.
You can choose from multiple sizes to match different weld diameters, which improves accuracy and repeatability.
When you select the right cutter and apply it correctly, you gain professional-grade precision without excessive force.
That means you can free welded panels efficiently, preserve the base metal, and move repairs forward with less rework and more control.
Centering and Cutting Process
Centering starts with a small divot at the weld’s center, which gives the spot weld cutter’s guide pin a stable seat and keeps the tool from wandering. You then let the centering pin lock the tool in place while you align the cutting wheel over the weld.
Because the wheel is slightly larger than the spot weld, it can separate the panels without excessive spread. You should choose a spot weld cutter size that closely matches the weld diameter for ideal performance.
Apply steady pressure and maintain a controlled spinning motion to create a divot and drive the cutter through the metal cleanly. This method gives you precise control, limits collateral damage, and helps you remove welds efficiently without surrendering surrounding material to unnecessary abrasion.
Use Drill Bits for Tough Welds
For tough spot welds, a flat drill bit with a self-centering tip gives better control by resisting wander and keeping the cut centered on the weld. You should match the drill diameter to the job: choose one 1/8 to 1/4 inch larger than the weld to remove the nugget without chewing up the surrounding sheet.
Before you drill, use a metal punch to make a small divot; that mechanical index locks the bit in place and improves tracking. A purpose-built spot weld cutter outperforms a regular bit because it lasts longer and preserves both panels more reliably.
A center punch divot helps lock the bit in place, improving tracking and keeping the cut true.
- Check the weld diameter first.
- Apply soapy water as a lubricant.
- Replace dull bits before they slip.
These spot weld removal methods let you work with precision, reduce heat, and keep you in command of the panel separation process. Additionally, ensuring the zinc coating removal is complete before welding can enhance the quality of your work.
Products Worth Considering
CONVENIENCE: Change Bits Without Re-Chucking

⭐【Precise Centering – No Misalignment】Our self centering drill bit set guarantees perfect alignment every time. The spring self-centering guide structure ensures straight drilling and consistent hole positions.

Durable HSS Construction: Our spot weld cutter set is made of HSS for better durability and wear resistance. The double-sided blades ensure long-term use and consistent performance, making it the ideal tool of choice for metal cutting
When to Use a Carbide Burr
You should use a carbide burr when you need rapid spot weld material removal, especially with a 6 mm round burr in an electric die grinder.
It cuts faster than a drill bit, so you can strip welds efficiently without excessive heat buildup.
In tight spaces, you can control the burr precisely and work where larger tools won’t fit. Additionally, understanding underwater welding techniques can enhance your overall welding skills and efficiency in various applications.
Quick Material Removal
When speed matters, a carbide burr—especially a 6 mm round burr in an electric die grinder—offers fast, controlled spot weld removal that outperforms traditional drill bits in many cases. You get efficient spot weld cutting with carbide burrs, and the tool’s aggressive edge supports precision cutting without unnecessary distortion.
For quick material removal, keep your feed steady and let the burr do the work.
- Use consistent pressure to maintain cutting efficiency and reduce tool wear.
- Choose carbide burrs when you need rapid weld breakup and shorter cycle times.
- Rely on the electric die grinder for controlled removal that keeps your workflow independent and precise.
This method helps you finish projects faster while preserving the surrounding metal and your freedom to work on your own terms.
Tight Space Control
Carbide burrs become the better choice once the weld sits in a confined area where drill access is limited. You can’t always fit a spot weld cutter, but carbide burrs give you precision control in tight spaces. Use a solid carbide ball burr in a die grinder to remove spot welds where conventional drills won’t reach. Their cutting action lets you shape depth and location accurately, so you protect adjacent metal while working fast.
| Choice | Result |
|---|---|
| Spot weld cutter | Best in open access |
| Carbide burrs | Best in tight spaces |
| Steady hand | Cleaner cuts |
| Controlled feed | Less heat, less debris |
Keep your hand steady, stay controlled, and let the burr work efficiently. This method gives you technical freedom without sacrificing accuracy or surface integrity.
Mark and Center the Weld
Measure the spot weld’s diameter first so you can choose the right removal tool and size the cut correctly.
Then you can mark the spot weld with a fine scribe or paint pen, giving yourself a precise reference point for removal. Use a metal punch to create a small divot at the center; this locks the drill bit or cutter in place and prevents wandering.
The divot needs enough depth to capture a spot weld cutter’s centering pin, which keeps the cut stable and controlled.
- Measure the weld, then select a cutter 1/8 to 1/4 inch larger.
- Mark the exact center before punching, so you don’t chase the seam.
- Confirm the divot sits true in the center, because misalignment wastes material and time.
When you center each weld consistently, you work cleaner, faster, and with more freedom from unnecessary metal damage. Additionally, ensuring your metal is clean and free of contaminants will greatly enhance the effectiveness of the removal process.
Remove Spot Welds Without Panel Damage
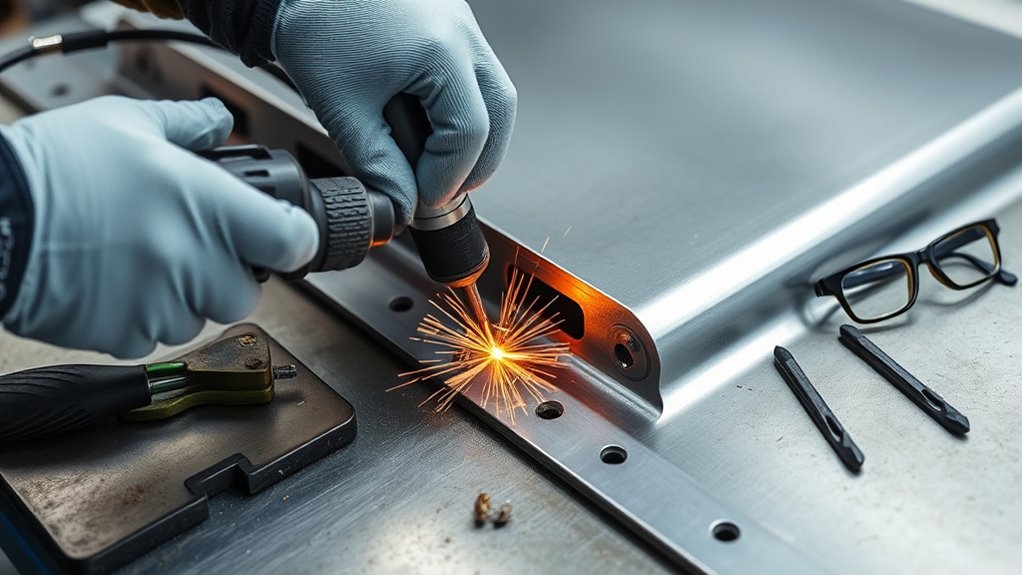
With the cutter centered on the divot, you can remove the spot weld cleanly by matching the tool to the weld diameter and keeping steady pressure throughout the cut. Use a spot weld cutter sized to the joint so you cut the weld nugget, not the surrounding sheet.
First, make the divot with a metal punch; that small recess keeps the bit from skating and protects the panel alignment. Feed the tool with controlled force, whether you’re using a carbide burr or electric die grinder, and watch the cut depth so you don’t gouge the base metal.
When you need to remove spot welds in sensitive zones, choose a less penetrating approach to preserve both panels. After each cut, vacuum to remove shavings and dust immediately.
Clean metal lets you inspect the separation point, verify full release, and keep contamination from spreading across the work area. Additionally, using the right welding rods can enhance your overall welding project quality and efficiency.
Match the Method to the Job
Choosing the right spot weld removal method depends on the panel, the weld size, and how much surrounding material you can afford to disturb. When you need to remove spot welds from thin sheet metal with control, a spot weld cutter is usually the best choice because its centering pin keeps the tool from wandering and helps you separate panels without cutting through both.
- Use a spot weld drill bit when you need accuracy and can size the bit 1/8 to 1/4 inch larger than the weld.
- Use a regular drill only when speed doesn’t matter because it’ll dull fast and costs you time.
- Use grinding or a plasma cutter only when the area can tolerate more heat or abrasion; a plasma cutter like the Powermax45 XP can cut removal time from minutes to seconds.
Additionally, ensure the surface preparation is adequate to maintain the integrity of the surrounding material during the process.
Match the welding technique to the job, and you keep more freedom in the repair.
Clean Up and Prep the Weld Area
Before you remove the first spot weld, clean the surrounding metal with an 80-grit or coarser disc to strip contaminants and expose a stable surface. This cleaning step is critical prep because weld removal depends on clean contact, predictable cutting, and accurate tool control.
After you expose bare metal, inspect the panel and apply a weld-through primer to both mating surfaces. That surface preparation protects against corrosion and supports a stronger repair when you weld it back together.
Next, use a center punch to make a shallow divot at each weld site. The punch gives your drill bit a fixed start point, so it won’t wander across the panel and damage the surrounding metal.
Once the welds are out, vacuum the area thoroughly to remove shavings and debris. A disciplined prep routine frees you from avoidable errors and keeps the work zone ready for precise, effective welding later. Additionally, ensure proper joint preparation as it significantly affects weld strength and quality.
Frequently Asked Questions
What Is the Easiest Way to Remove Spot Welds?
You’ll remove spot welds easiest with a spot weld cutter. Use spot welds techniques, follow removal safety tips, avoid common mistakes, prep metal, and keep tool maintenance sharp for clean, precise separation.
How to Remove Welding Spots?
You’ll pierce the weld’s iron knot, then drill its center with a spot weld cutter. Use spot weld techniques, safety precautions, and material compatibility checks; avoid common mistakes. Alternative methods include carbide burrs.
What Are the 10 Tools Used in Welding?
You’ll use a welding machine, electrodes, helmet, clamps, fixtures, grinders, wire brush, chipping hammer, measuring tools, and pliers. They support welding safety, metal preparation, heat treatment, welding techniques, and equipment maintenance.
What Is the Best Tool for Removing Welds?
You’ll get the best results with a spot weld cutter: swift, centered, and safe. In weld removal techniques, your spot welders comparison favors precision. Follow tool safety tips for DIY welding projects and metalworking essentials.
Conclusion
When you choose the right spot weld removal method, everything starts to line up. You mark the weld, center the cutter, and the panel comes free with less damage than you expected. Then, almost by coincidence, the repair fits cleaner, the cleanup goes faster, and the next step feels easier. You’ve matched the tool to the job, controlled the heat and pressure, and set up a precise, reliable repair that saves time and preserves metal.


