When I first started running beads with stick, one of the biggest headaches I had was figuring out the right amperage setting for different rods and metal thicknesses. Too low, and the arc would stick and sputter; too high, and I’d burn straight through my joint prep or blow out thin steel.
Every welder has been there—trying to balance filler rod size, base metal type, and weld position without wasting half a box of rods or spending hours grinding down ugly beads. That’s exactly where a stick welding amperage chart comes in handy.
It takes the guesswork out of dialing in your machine so you can focus on good arc control, strong penetration, and clean welds—whether you’re repairing farm equipment, working on stainless, or comparing how stick stacks up against MIG or TIG in the shop. Disclosure: This article uses affiliate links for some products; as an Amazon Associate, I may earn from qualifying purchases.
Getting amperage right isn’t just about convenience; it’s the difference between a weld that holds under stress and one that cracks or fails. In this guide, I’ll break down the amperage ranges that actually work in the real world—so you can weld smarter, safer, and with a lot less frustration.
Why Amperage Matters in Stick Welding
Stick welding, or Shielded Metal Arc Welding (SMAW), is all about balance. Too much amperage, and you’ll burn holes through your metal. Too little, and your weld will sit on top like a weak blob, lacking penetration. The right amperage ensures the electrode melts properly, the arc stays stable, and the weld fuses deeply into the base metal.
I learned this the hard way years ago when I cranked up my welder too high on thin steel and ended up with a mess of spatter and a hole to patch. Using an amperage chart helps you avoid those rookie mistakes, keeps your workpiece intact, and ensures your welds hold up under stress—whether it’s a gate repair or a structural beam.
Amperage also ties directly to safety. High amps generate more heat, sparks, and spatter, which can be hazardous in tight spaces or on thin materials. On the flip side, low amps can cause the rod to stick, leading to arc blow or even electrical hazards if you’re not careful. A chart gives you a starting point to dial in settings that keep you safe and your welds solid.
Understanding Stick Welding Electrodes
Before we get to the amperage chart, let’s talk rods. Stick welding electrodes come in different sizes, coatings, and classifications, each suited for specific metals and jobs. The American Welding Society (AWS) labels rods with codes like E6010, E7018, or E308L, which tell you about tensile strength, welding position, and coating type. For example, the “E” stands for electrode, the first two digits (like “60” in E6010) indicate tensile strength in thousands of psi, and the last digits describe the coating and current type.
Here’s a quick rundown of common rods:
E6010: Great for deep penetration on dirty or rusty steel. Ideal for pipe welding or farm repairs. Runs on DC+ and needs a steady hand.
E6011: Similar to 6010 but works on AC or DC, making it versatile for home welders with basic machines.
E6013: Beginner-friendly with a smooth arc and easy slag removal. Perfect for thin metals or general repairs.
E7018: A low-hydrogen rod for high-strength welds on clean steel. Common in structural work but needs dry storage to avoid cracking.
Each rod has a sweet spot for amperage based on its diameter (like 1/16”, 3/32”, or 1/8”) and the metal you’re welding. Picking the wrong rod or amperage can lead to poor fusion, slag inclusions, or even a cracked weld. I once used an E7018 on a rusty gate without proper cleaning—big mistake. The weld looked fine but failed under stress because of hidden contaminants.
How to Read a Stick Welding Amperage Chart
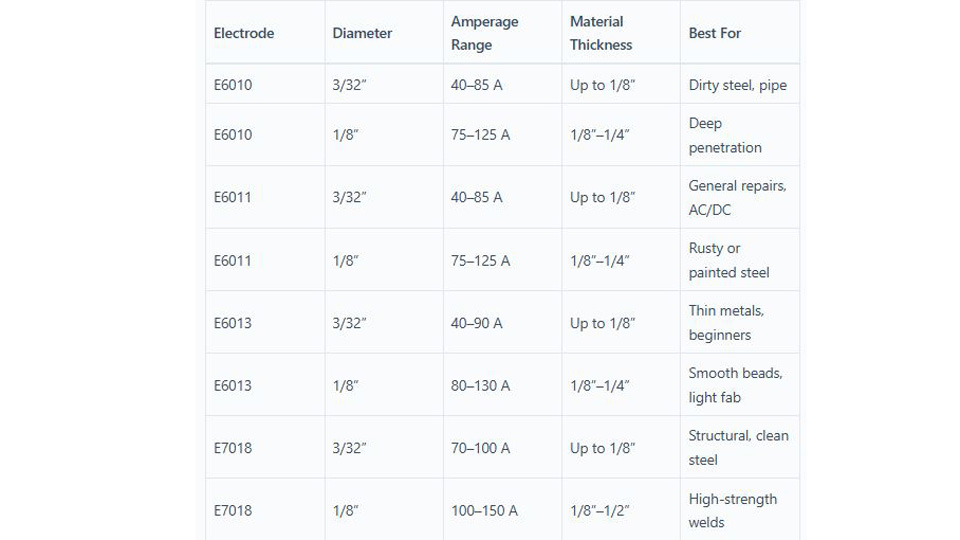
A stick welding amperage chart is like a roadmap for your welder’s settings. It lists recommended amperage ranges for different electrode sizes, types, and metal thicknesses. Most charts also factor in the welding position (flat, vertical, overhead) and material type (mild steel, stainless, cast iron). Here’s a sample chart I use in my shop, based on years of trial and error and manufacturer guidelines:
| Electrode | Diameter | Amperage Range | Material Thickness | Best For |
|---|---|---|---|---|
| E6010 | 3/32” | 40–85 A | Up to 1/8” | Dirty steel, pipe |
| E6010 | 1/8” | 75–125 A | 1/8”–1/4” | Deep penetration |
| E6011 | 3/32” | 40–85 A | Up to 1/8” | General repairs, AC/DC |
| E6011 | 1/8” | 75–125 A | 1/8”–1/4” | Rusty or painted steel |
| E6013 | 3/32” | 40–90 A | Up to 1/8” | Thin metals, beginners |
| E6013 | 1/8” | 80–130 A | 1/8”–1/4” | Smooth beads, light fab |
| E7018 | 3/32” | 70–100 A | Up to 1/8” | Structural, clean steel |
| E7018 | 1/8” | 100–150 A | 1/8”–1/2” | High-strength welds |
How to Use the Chart:
- Pick your rod: Match the electrode to your metal (e.g., E6013 for thin mild steel, E7018 for structural steel).
- Check rod diameter: Thicker rods need more amps. A 1/8” rod needs more juice than a 3/32”.
- Know your material thickness: Thin metals (under 1/8”) need lower amps to avoid burn-through.
- Consider welding position: Vertical or overhead welds often use 10–15% less amperage to control the puddle (stainless data sheets commonly note 10–20% reduction). (Washington Alloy 308L-16, accessed 2025-10-14)
- Start in the middle: Set your welder to the middle of the amperage range and adjust based on arc stability and bead appearance.
Always test on scrap metal first. I keep a pile of cutoffs in my shop to practice settings before hitting the real workpiece. If the arc is weak or the rod sticks, bump up the amps. If you’re getting excessive spatter or burning through, dial it down.
Choosing the Right Amperage for Your Project
Setting the right amperage depends on more than just the chart. You need to consider the metal type, joint design, and welding position. Here’s how I approach it in my shop:
Metal Type
Mild Steel: Most common for DIY and fabrication. E6011 or E6013 works well for general repairs, while E7018 is better for structural jobs. Stick to the chart’s ranges, but lean toward the lower end for thinner stock.
Stainless Steel: Use E308L or E309L rods. Stainless typically runs at lower amperage than mild steel due to lower thermal conductivity, so start at the low end of the rod’s range. For ~1/8” stainless, a 3/32” E308L commonly runs about 40–70 A—I start around 60 A and tune from there. (Lincoln Electric Excalibur E308L-16 typical operating procedures, 2012-01)
Cast Iron: Tricky to weld due to its brittleness. Prefer nickel-based SMAW rods such as ENi-CI (Ni-99) or ENiFe-CI (Ni-55) for repairs and joining cast iron to steel. E312 (stainless) is useful for some dissimilar joints but is not nickel-based. Keep heat input low and peen as needed to reduce cracking risk. (Lincoln Electric Tech-Rod 99 ENi-CI, 2015; ESAB OK NiFe-CI-A, c.2017)
Joint Design
A butt weld needs less amperage than a fillet weld, which requires about 10% more power for good fusion. For thick metals, I bevel the edges to create a V-groove, allowing better penetration with smaller rods and lower amps. This saved me when welding a 1/2” plate for a custom trailer hitch—multiple passes with a 1/8” E7018 at ~120 amps did the trick. For a model-specific walkthrough, see my step-by-step Lincoln stick setup.
Welding Position
Flat welds let you crank the amps higher because gravity helps the puddle fill the joint. For vertical or overhead welds, lower the amps by 10–15% to keep the molten metal from dripping. I once tried vertical welding with too much amperage, and the puddle sagged, leaving a messy bead. Dropping the amps and using a whipping motion fixed it.
Setting Up Your Stick Welder
Your welder’s setup is just as important as the amperage. Here’s my step-by-step process for getting ready:
Check your machine: Ensure it supports the current (AC, DC+, or DC-) for your rod. Most modern welders, like a Lincoln or Miller, handle both AC and DC. For E7018, I prefer DC+ for a stable arc.
Select polarity: E6010 and E7018 need DC+ (DCEP) for deep penetration. E6011 and E6013 can run on AC or DC, making them great for budget welders.
Clean the metal: Remove rust, paint, or oil with a wire brush or grinder. Clean metal means better welds and less chance of porosity.
Clamp the ground: Place the ground clamp close to the weld area for a strong circuit. A weak ground can cause an unstable arc.
Set initial amperage: Use the chart as a guide, starting in the middle of the range. For a 1/8” E6013 on 1/8” steel, I’d start at 100 amps.
Strike the arc: Tap or scratch the rod to start the arc, then hold a 1/8” gap and move steadily. If the rod sticks, break it free and increase amps slightly.
Common mistake: Don’t crank the amps too high thinking it’ll speed things up. I did this early on and ended up with a warped panel. Start low, test, and adjust.
Common Amperage Mistakes and Fixes
Even seasoned welders mess up sometimes. Here are mistakes I’ve made (or seen) and how to fix them:
Rod Sticking: Usually caused by low amperage or a damp rod. Increase amps by 5–10 or store rods in a dry oven (especially E7018). If rods have absorbed moisture, manufacturers specify redrying around 600°F (315°C) for ~1 hour, then storing at 250–300°F (120–150°C) to keep them dry. (Hobart 7018XLM datasheet, 2025-09; Lincoln Electric storage guidance, c.2023)
Burn-Through: Too many amps on thin metal. Drop the amperage or use a smaller rod (e.g., 3/32” instead of 1/8”).
Poor Penetration: Low amps or moving too fast. Bump up the amps or slow your travel speed for better fusion.
Excessive Spatter: High amps or wrong polarity. Lower the amps and check if your rod needs DC+ or AC.
Cracked Welds: Common with E7018 on dirty metal or high-hydrogen rods. Clean thoroughly and store rods properly.
I once had a rod stick repeatedly on a cold day. My E7018 rods had absorbed moisture from sitting in an unheated garage—redrying per manufacturer guidance (about 600°F for ~1 hour) solved it, and I’ve stored them in a 250–300°F rod oven ever since. (Hobart 7018XLM, 2025-09; Lincoln Electric storage guidance, c.2023)
Tips for Specific Welding Scenarios
Thin Metal (Under 1/8”)
Welding sheet metal with stick is tough but doable with small rods like 1/16” or 3/32” E6013 at 20–50 amps. Use a whipping motion to control heat and avoid burn-through. Test on scrap first—trust me, it saves frustration. For more, see how I stick weld thin sheet without burn-through.
Thick Metal (Over 1/4”)
For heavy stock, bevel the edges and use multiple passes with a 1/8” or 5/32” E7018 at 100–150 amps. Lay a root pass first, then fill with additional passes. This technique worked when I repaired a cracked backhoe bucket.
Dirty or Rusty Metal
E6010 or E6011 are your go-to rods for contaminated surfaces. Their aggressive arc cuts through rust or paint. Start at the higher end of the amperage range (e.g., 80–100 amps for 3/32”) and clean as much as possible first.
Vertical or Overhead Welding
Lower the amps by 10–15% and use a smaller rod (3/32” or 1/8”). A whipping or circular motion helps control the puddle. I practiced vertical welds on scrap for weeks before tackling an overhead repair on a steel frame—it’s all about muscle memory.
Safety Considerations
Welding is dangerous if you’re careless. Always wear a proper helmet (auto-darkening is a game-changer), leather gloves, and flame-resistant clothing. I’ve had sparks burn through cheap cotton shirts—lesson learned. Keep a fire extinguisher nearby, especially in shops with flammable materials. Ventilation is critical; use local exhaust/fume extraction and, when needed, appropriate respiratory protection. If you must weld galvanized steel, control fumes aggressively—zinc oxide can cause metal fume fever. (OSHA FS-3647, 2013; NIOSH Pocket Guide: Zinc Oxide, accessed 2025-10-14)
Check your cables and electrode holder for wear. A frayed cable caused an arc flash in my shop once, and it was a wake-up call to inspect gear regularly. Ground your workpiece properly to avoid shocks, and never weld in wet conditions.
Pros and Cons of Stick Welding
Pros:
- Versatile: Works on rusty or dirty metal, outdoors, and in tight spaces.
- Affordable: Basic stick welders are cheaper than MIG or TIG setups.
- Portable: No gas tanks needed, perfect for field repairs.
- All-position welding: With the right rod, you can weld flat, vertical, or overhead.
Cons:
- Slower than MIG: Constant rod changes and slag removal take time.
- Not ideal for thin metal: High heat can cause burn-through.
- Learning curve: Striking and maintaining an arc takes practice.
- Messy: Spatter and slag cleanup can be a hassle.
Conclusion
Mastering stick welding amperage is about understanding your rods, metal, and machine. A good amperage chart is your starting point, but real-world experience—testing on scrap, adjusting for position, and learning from mistakes—makes you a better welder. Whether you’re a DIYer fixing a fence, a student practicing in class, or a pro building a skyscraper, getting the amperage right means stronger welds, less rework, and safer work. You’re now equipped to pick the right rod, dial in your welder, and tackle any project with confidence.
FAQ
What’s the best stick welding rod for beginners?
E6013 is the easiest for new welders. It has a smooth arc, works on AC or DC, and produces minimal slag. Start with a 3/32” rod at 40–90 amps for thin mild steel and practice on scrap to get the feel.
How do I know if my amperage is too high or too low?
If your welds are lumpy or lack penetration, your amps are too low. If you’re burning holes or getting excessive spatter, they’re too high. Start in the middle of the chart’s range and adjust by 5–10 amps based on the bead appearance.
Can I use the same amperage for all welding positions?
No, vertical and overhead welds need 10–15% lower amps to control the puddle and prevent dripping. Flat welds can handle higher amps for better penetration. Always test your settings first.
How do I avoid sticking the electrode?
Low amperage or damp rods cause sticking. Increase amps slightly and ensure rods are stored in a dry, sealed container or rod oven. If moisture is suspected with low-hydrogen rods (e.g., 7018), re-dry according to the manufacturer’s instructions (~600°F for 1 hour) and then store at 250–300°F. (Hobart 7018XLM, 2025-09; Lincoln Electric storage guidance, c.2023)
What’s the difference between AC and DC for stick welding?
DC+ (DCEP) offers a stable arc and deep penetration, making it ideal for use with E6010 or E7018. AC works for E6011 and E6013 and is common in budget welders but can be less consistent. Check your rod’s requirements before setting up.