How to Notch Tubing for Roll Cage and Chassis Welding
What’s in This Article
- How to Notch Tubes: The Basics
- Before You Begin
- Step-by-Step Guide to Cutting and Preparing Tubes
- Choosing Between Tube Notchers and Hand Notching
- Techniques for Notching Kicker Tubes
- Establishing Accurate Baselines and Reference Lines
- How to Ensure Your Fitment Is Right Before Welding
- Tube Notching Techniques for Better Accuracy
- Frequently Asked Questions
- Conclusion
A poor tube notch can leave gaps, weak contact, and a harder weld to control. A clean notch helps the tube sit tight against the mating tube before you tack it in place. This guide shows you how to mark, cut, test, and clean tubing for roll cage and chassis welding with more control.
Quick Answer
To notch tubing, mark a baseline and face line first, then cut the notch to match the mating tube. Start with a tube notcher for repeat cuts or use hand notching for custom angles. Clean the cut edge, test the fit, and remove gaps before you tack weld the joint.
Key Takeaways
- Mark a baseline and face line before you make any cut.
- Use a tube notcher for repeat work and hand notching for custom fitment.
- Test the tube against the mating tube before you weld.
- Clean burrs and rough edges so the joint sits tight.
- Use proper safety gear and get expert help for critical roll cage work.
How to Notch Tubes: The Basics

Notching tubes helps you create tight, secure joints in welding projects like roll cages and chassis. You can use coping or saddling methods to shape one tube so it fits against another tube.
Start by marking a clear face line. This line helps you align your cut and reduce gaps at the joint. Many fabricators use the 1/3 tube diameter method as a starting point for throat depth, but the final depth depends on tube size, angle, and fit.
After cutting, clean rough edges with flap discs or a file. Smooth edges give you a better mating surface before final assembly. A clean joint also makes tack welding easier.
Inspect the fit before you weld. Check your reference lines, tube angle, and contact points. This careful setup helps you build a stronger and safer welded joint.
Also remember that maximum fillet weld size depends on the thinner piece in the joint, so joint fitment matters before you add weld metal.
Before You Begin
Estimated total time: Plan on about 30 to 60 minutes per tube joint while you learn the process. Complex angles, thicker tubing, and hand notching can take longer.
Gather your tools before you mark the tube. You may need:
- Tube notcher, hole saw, angle grinder, band saw, or hacksaw
- Marker, scribe, tape measure, angle finder, and square
- Clamps or a vise to hold the tube still
- Flap disc, file, or deburring tool for cleanup
- Safety glasses, gloves, hearing protection, and a respirator when needed
Warning: Roll cages and chassis parts affect safety, so follow the rulebook for your vehicle class and consult a qualified fabricator when needed.
Step-by-Step Guide to Cutting and Preparing Tubes
Use a simple process each time you cut. Good habits help you repeat accurate results across the whole cage or chassis.
- Mark the baseline and face line. Use these marks to guide tube placement, cut direction, and alignment.
- Secure the tube. Clamp the tube in a vise or fixture so it can’t rotate while you cut.
- Make the first cut. Align the saw, notcher, or grinder with the face line and cut slowly.
- Set the throat depth. Use the 1/3 tube diameter method as a starting point, then adjust for the actual joint angle.
- Clean the cut edge. Remove burrs with a flap disc, file, or deburring tool.
- Test the fit. Place the tube against the mating tube and check for gaps.
- Adjust before welding. Remove small high spots until the joint sits tight and stable.
Before you weld, inspect the fit from several angles. Make sure all reference lines remain visible and useful. Correct polarity settings also help you create stronger welds after the tubes fit properly.
Products Worth Considering

Durable Construction: High-quality lead construction ensures durability and maintains shape after repeated strikes, making these jigs perfect for tough conditions and reliable performance every time you fish

Durable Construction: High-quality lead construction ensures durability and maintains shape after repeated strikes, making these jigs perfect for tough conditions and reliable performance every time you fish

LEVEL-HEAD INNER TUBE JIG/7"/1.5 OZ-#3/0 HK/2 PACK/UNPAINTED
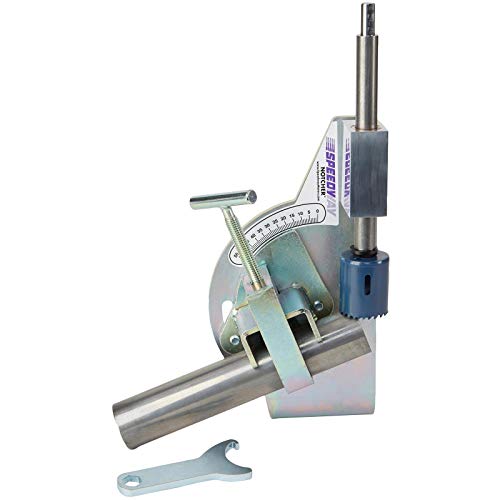
Choosing Between Tube Notchers and Hand Notching
Your best method depends on the project. A tube notcher works well for repeated cuts and steady angles. Hand notching gives you more control when the joint has a custom angle or an odd shape.
Both methods can work well when you measure, clamp, cut, and test fit with care. Strong flux core welding habits can also improve your overall fabrication work.
Products Worth Considering
Precision Fabrication Tool: Ideal for building roll cages, chassis, crossmembers, bumpers, and custom headers with accurate tube coping and repeatable fitment.

Precision pipe notcher – Attaches to a drill press to create accurate round cuts in tubing and pipe.

Fits: 1", 1-1/4", 1-1/2", and 2" I.D. Pipe – Ensure you choose the correct size for your project.
Tube Notcher Advantages
A tube notcher helps you make consistent cuts across several tubes. This can save time on larger projects, especially when many joints share the same tube size and angle.
Use a tube notcher when you need repeatable fitment. It can also help you reduce guesswork during cage or chassis layout.
Still, you need to check the fit after each cut. Tube movement, hole saw wear, and angle changes can affect the final joint.
Hand Notching Benefits
Hand notching gives you more freedom on custom work. You can remove metal slowly and shape the notch to fit a complex tube angle.
This method works well for custom roll cages and chassis joints where a fixed notcher setup does not match the shape. It also helps you build skill because you learn how each cut changes the fit.
Hand notching can take more patience. Use small cuts, test often, and avoid removing too much material at once.
Techniques for Notching Kicker Tubes
Kicker tubes often meet the main structure at an angle. That angle makes careful marking more important because a small error can create a large gap at the joint.
Mark the throat line clearly before you cut. Then cut, test fit, and adjust the tube until it sits tight against the mating tube. Clean cuts can also help limit excess grinding and support better control when you weld. Learn more about reducing heat in thin material with this guide on heat input.
Kicker Tube Angles
To notch kicker tubes well, mark a visual throat line that matches the planned angle. Align that mark with the lower tube or main tube before you cut.
Use the 1/3 tube diameter method only as a starting point. Then refine the notch based on the actual tube angle and how the joint contacts the mating tube.
Clamp the tube securely during cutting. Stable clamping helps reduce twisting, slipping, and misaligned cuts.
Throat Line Marking
A clear throat line helps you control notch depth and shape. Align the throat line with the kicker tube angle before you make the first cut.
Mark the face line so the tube lines up with the lower tube during assembly. Then check both marks before cutting.
Some kicker tubes need undercutting around bends. Remove small amounts of metal and test the joint often, so you don’t weaken the fit by overcutting.
Establishing Accurate Baselines and Reference Lines
Accurate baselines and reference lines help you notch and weld with more control. A baseline gives you a fixed measurement point for tube placement, while a face line shows how the tube should sit in the joint.
Use reference lines to reduce misalignment. Keep these marks visible while you cut, clean, and test fit the tube. Proper cutting techniques can also improve the accuracy and quality of your notched tubes.
| Step | Action | Importance |
|---|---|---|
| 1 | Establish baseline | Keeps measurements consistent |
| 2 | Mark reference lines | Guides the cutting process |
| 3 | Set throat depth | Helps create a tight fit |
| 4 | Check alignment | Reduces misalignment |
| 5 | Maintain baseline | Improves final fitment |
How to Ensure Your Fitment Is Right Before Welding

Good fitment matters before welding because small gaps can make the joint harder to control. A tight joint helps you tack the tube in place without pulling it out of line.
Use these checks before you weld:
- Check the baselines. Confirm that your baseline and face line still match the planned tube position.
- Stabilize with clamps. Hold the tubes securely so they can’t move during test fitting.
- Inspect for gaps. Look for high spots, open edges, and areas that need more cleanup.
- Test the snap fit. A close fit should sit stable before you force it into place.
Finally, perform a thorough check of all reference lines and adjustments. Proper ground clamp attachment also helps reduce welding problems that can affect the final assembly.
Tube Notching Techniques for Better Accuracy
Better tube notching comes from repeatable habits. Start each joint with clear marks, a stable setup, and a slow first cut.
Compare manual and power tools based on your project. A notcher may suit repeat cuts, while a grinder or file may suit final fitment work.
For kicker tubes, mark throat lines visually and allow for bends before you remove metal. Clean mild steel before welding, since proper cleaning helps you get better welding results.
Pro tip: Cut slightly outside your final line, then grind to the line after you test the fit.
Practice on scrap tube before you cut the final piece. Repetition helps you judge angles faster and avoid removing too much material.
Frequently Asked Questions
What Materials Are Best for Constructing a Roll Cage?
Many roll cages use drawn over mandrel (DOM) steel or chromoly tubing, depending on the rulebook and vehicle use. Always follow the safety rules for your racing class or build type before you choose tubing.
How Do I Choose the Right Tube Diameter?
Choose tube diameter based on the vehicle, rulebook, load path, and chassis design. Don’t guess on critical safety parts, because tube size and wall thickness both affect strength.
Can I Notch Tubes Without Specialized Tools?
Yes, you can notch tubes with tools like a hacksaw, grinder, file, or hole saw. Work slowly, mark clearly, and test the fit often so you don’t remove too much metal.
What Safety Gear Should I Wear While Notching?
Wear safety glasses, gloves, hearing protection, and sturdy clothing while notching. Use a respirator or dust mask when grinding creates dust or fumes, and keep sparks away from flammable material.
How Do Temperature and Humidity Affect the Notching Process?
Temperature and humidity can affect comfort, tool control, and surface condition. Moisture can cause surface rust or condensation, so keep tubing dry before you weld.
How Tight Should a Tube Notch Fit Before Welding?
The notch should sit close enough that the tube holds its position without large gaps. A small cleanup gap may still weld fine, but wide gaps can make heat control and strength harder to manage.
Should I Tack Weld Before Final Welding?
Yes, tack welding helps hold the tube in place while you check the full assembly. Place tacks after the fit looks correct, then recheck alignment before final welding.
Safety Disclaimer: This article is for informational purposes only and does not replace professional fabrication, welding, or motorsport safety advice. Always follow the correct rulebook, use proper safety gear, and consult a qualified fabricator before building roll cages or chassis parts.
Conclusion
Accurate tube notching starts with clear marks, careful cuts, and patient test fitting. Measure twice, cut once, and clean the joint before you tack it in place.
Choose a tube notcher for repeat cuts and hand notching for custom angles. Practice on scrap first, then move to your final tubes when your fitment looks clean.
With steady habits and proper safety checks, you’ll build tighter joints and improve each welding project.


