To use welding magnets for panel alignment, start by selecting the right magnet for your project, like Adjust-O magnets for 90 or 45-degree angles. Clean the surfaces to guarantee a strong grip and position the magnets securely. Before welding, check your alignment and adjust as needed. Don’t forget to remove the magnets post-tack to avoid interference. Maintaining your magnets and understanding common mistakes can enhance your setup. You’ll find additional tips for optimizing their use.
How Welding Magnets Improve Panel Alignment
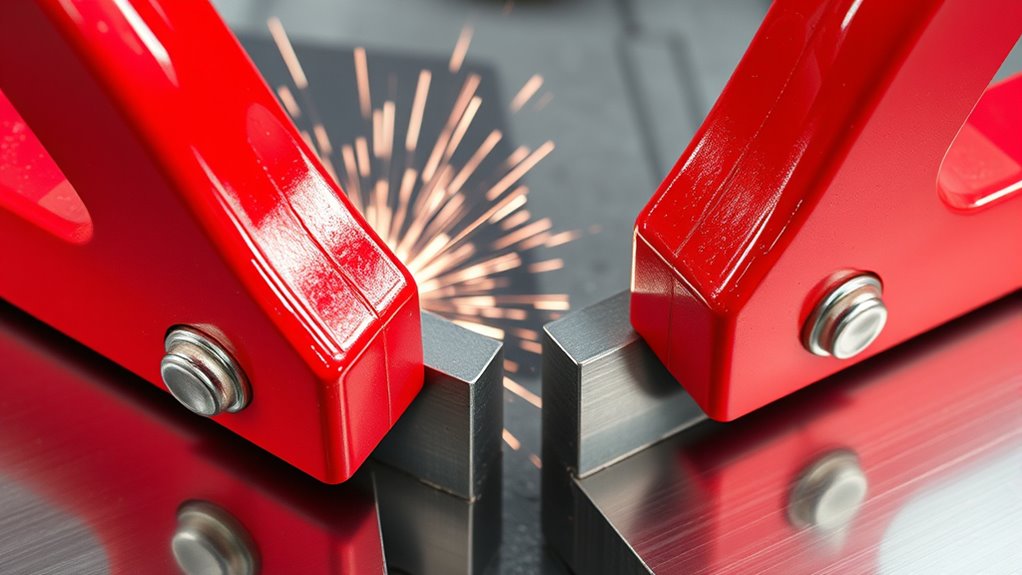
Welding magnets are essential tools for achieving precise panel alignment in fabrication. These magnets provide a strong magnetic force, typically up to 150 pounds, ensuring your ferromagnetic panels stay securely in place.
By utilizing 90 or 45-degree edges, welding magnets simplify the setup for tack welding, allowing you to position panels accurately without hassle.
Utilizing 90 or 45-degree edges, welding magnets streamline tack welding setup, ensuring precise panel positioning with ease.
The dual switch feature on adjust-o magnets enhances usability, letting you quickly secure or release panels as needed. For heavy automotive panels, using sheet metal magnets with replaceable rubber pads increases friction, ensuring stability during the welding process.
Proper use of welding magnets not only reduces setup time but also improves the accuracy of welded joints. This leads to a higher quality finished product, liberating you from the frustrations of misalignment and rework. Additionally, it’s crucial to always prioritize safety gear to protect yourself while working with these tools.
Embrace the efficiency welding magnets offer, and elevate your fabrication skills.
Select the Best Welding Magnet for Your Project
When selecting a welding magnet, consider both the type and your project requirements.
Different magnets, such as Adjust-O magnets for quick setups or sheet metal magnets for larger panels, serve specific needs.
Make certain the chosen magnet can handle the required angles and withstand high heat to maintain its effectiveness during welding. Additionally, choosing the right magnet can greatly influence cut quality and overall project efficiency.
Products Worth Considering

POWERFUL HOLDING FORCE: Featuring robust magnets embedded in the welding holder, these durable magnets boasts a strong magnetic holding force of up to 77lbs/35kg, ensuring reliable performance.
Used as a welding holder in the line of hardware processing and construction industry.

Powerful welding magnet:The welding fixture has a powerful magnet embedded in it that holds ferrous objects tightly, and the magnet can withstand up to 48 lbs/22kg.
Types of Welding Magnets
Selecting the right welding magnet can greatly enhance your project’s efficiency and accuracy. Understanding the types of welding magnets available helps you make informed choices. Here are some options to examine:
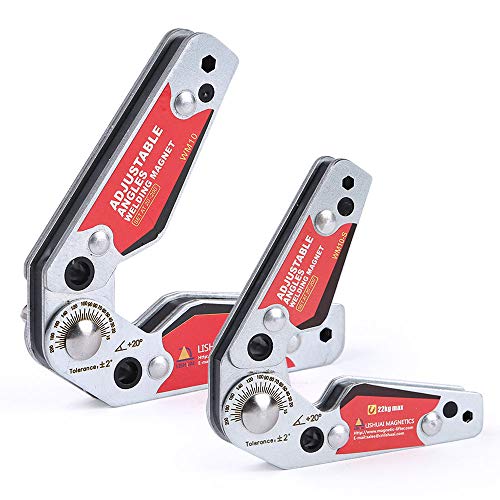
- Adjust-O Magnets: Perfect for tack welding at 90 or 45 degrees, with a holding force of 150 pounds.
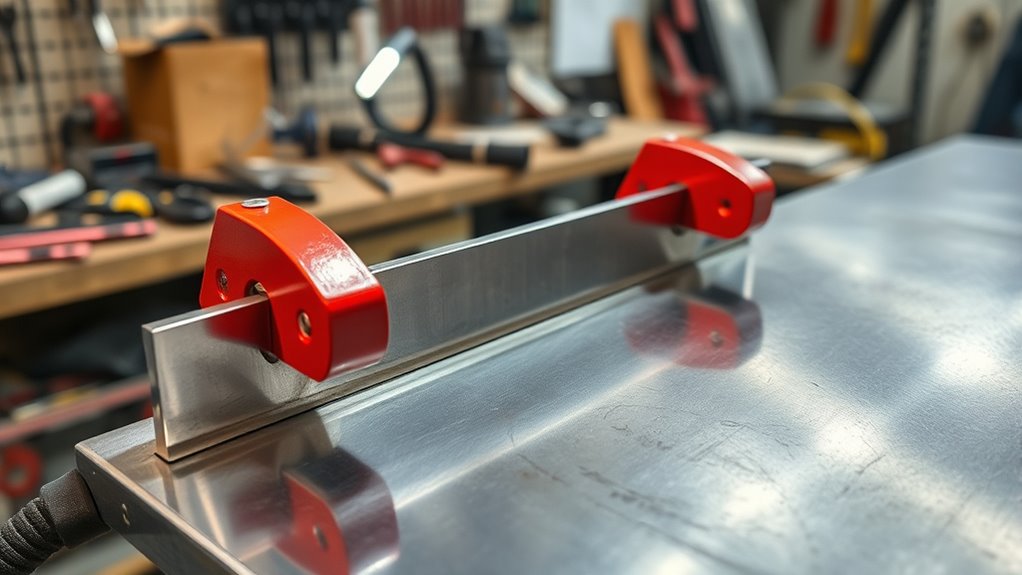
- Sheet Metal Magnets: Made with rare earth metals and replaceable rubber pads, they provide superior grip for automotive panels.
- Standard 4-in-1 Clamps: Versatile tools that secure sheet metal, convert to pipe clamps, and function as spreaders.
- Specialized Clamps: Such as the Ground Hog Clamp, which also creates electrical contact for arc welding.
- Material and Weight Considerations: Select magnets optimized for your specific application to guarantee effective alignment.
Consider Project Requirements
To guarantee ideal results in your welding projects, it’s essential to take into account your specific requirements before choosing a magnet.
For precise alignment at 90 or 45-degree angles, Adjust-O Magnets provide 150 pounds of magnetic force, securing pieces firmly.
If you’re working with sheet metal or automotive panels, opt for Sheet Metal Magnets with plastic handles and replaceable rubber pads for superior grip.
For versatility, the 4-in-1 Clamp allows you to attach sheet metal securely while converting to a pipe clamp or spreader.
Always verify magnets can withstand welding heat; avoid those that might lose magnetic strength.
For larger projects, consider using multiple welding clamps and magnets to maintain stability and accuracy throughout the process.
How to Prepare Panels for Optimal Magnet Alignment
Preparing panels for ideal magnet alignment is essential for achieving precise welds. Follow these steps to guarantee your surfaces are ready for effective use of welding magnets:
- Verify surfaces are clean and free from debris; grinding dust and rust can hinder the magnet’s grip.
- Use masking tape on magnets to prevent scratches on painted or polished panel surfaces.
- Maintain a distance of a few inches between magnets and high-heat areas during alignment to protect their magnetic strength.
- Utilize adjust-o magnets that can lock pieces at 90 or 45-degree angles for maximum alignment.
- Remove magnets before completing the weld to avoid compromising weld integrity due to residual magnetic properties.
- Ensure proper grip technique is followed when using magnets to maintain control and alignment during welding.
Guide to Using Magnets for Tack Welding
Once your panels are properly aligned and ready, using welding magnets for tack welding becomes straightforward.
Begin by selecting adjust-o magnets to align metal pieces at 90 or 45-degree angles. These magnets provide a secure hold with 150 pounds of magnetic force, guaranteeing precise positioning. Before attaching the magnets, make certain the surfaces are clean and free of debris to maximize grip.
Select adjust-o magnets to ensure precise alignment of metal pieces, providing a secure hold of 150 pounds for optimal tack welding.
For added convenience, utilize sheet metal magnets with plastic handles, allowing you to handle automotive panels easily during the tack welding process.
Keep in mind to remove the magnets before completing the weld. This prevents any interference and preserves the strength of the magnets. Additionally, ensure you’re wearing flame-resistant clothing to protect against sparks and heat during the welding process.
For enhanced versatility, consider using a standard 4-in-1 clamp to secure sheet metal, converting it into a pipe clamp as needed.
This approach assures a more efficient and effective tack welding experience with welding magnets.
Products Worth Considering

Always stay cool, no spark, safe and reliable.

POWERFUL HOLDING FORCE: Featuring robust magnets embedded in the welding holder, these durable magnets boasts a strong magnetic holding force of up to 110lbs/50kg, ensuring reliable performance.

Efficient Welding Tools: MAG-MATE's On/Off rare earth magnetic welding accessories revolutionize welding, ensuring swift and effortless work. Boost your welding efficiency with our powerful magnets – your path to seamless welding success!
Common Mistakes With Welding Magnets
While using welding magnets can streamline your tack welding process, several common mistakes can undermine their effectiveness. To avoid pitfalls, keep these key points in mind:
- Neglecting to clean welding magnets before use can lead to debris interference, causing misalignment.
- Ignoring high heat effects can reduce magnet strength, compromising support during welding tasks.
- Forgetting to use tape to cover magnets may scratch painted or polished surfaces due to trapped debris.
- Overlooking proper removal of magnets after tack welding might compromise their magnetic properties for future use.
- Misunderstanding alignment angles can lead to incorrect positioning of metal pieces, affecting weld integrity. Additionally, ensure that you are consistently using personal protective equipment to safeguard against potential hazards during the welding process.
How to Keep Your Welding Magnets in Great Shape
To maximize the lifespan and effectiveness of your welding magnets, proper maintenance is key. First, always cover your welding magnets with plastic when not in use. This prevents contamination from grinding dust and metal shavings that could interfere with weld joint setups.
Maintain a distance of a few inches from high heat sources during welding to preserve their magnetic properties and strength. Using powerful holding force ensures that your projects remain stable and aligned.
Use masking tape on the magnets to protect painted or polished surfaces from scratches and cushion them when stored together. Regularly check for debris accumulation, as dust and shavings can diminish their holding effectiveness.
To further protect your welding magnets, store them in a drawer or dedicated container. This minimizes exposure to contaminants and prevents loss of magnetic strength over time.
Frequently Asked Questions
Can Welding Magnets Be Used on Non-Ferrous Metals?
Welding magnets can’t hold non-ferrous metals effectively since they rely on magnetic properties. For non-ferrous applications, consider alternative tools like clamps or jigs that provide the necessary alignment and stability during your welding process.
What Is the Weight Limit for Welding Magnets?
Welding magnets typically have a weight limit between 10 to 300 pounds, depending on magnet strength. Always check manufacturer specifications to verify safety and effectiveness, especially when handling heavier materials during your projects.
How Do Temperature Changes Affect Welding Magnets?
Temperature changes can considerably impact magnet performance. If you expose welding magnets to extreme heat or cold, their holding strength may weaken, affecting alignment. Always monitor conditions to guarantee ideal performance during your welding projects.
Are There Safety Concerns When Using Welding Magnets?
Are you aware that strong magnets can pose risks? When using welding magnets, guarantee they’re properly rated for your project. Magnet strength can pinch fingers or attract metal debris, so always prioritize safety and wear protective gear.
Can Welding Magnets Damage Painted Surfaces?
Yes, welding magnets can damage painted surfaces if not used properly. To guarantee surface protection, use a protective layer like cloth or tape between the magnet and paint, preventing scratches and preserving your panel’s finish.
Conclusion
In the end, you might think that using welding magnets is just about sticking metal together, but it’s actually about precision and finesse. By mastering their alignment capabilities, you’re elevating your project’s quality while saving time. Ironically, it’s the simplest tools that often yield the best results. So, don’t overlook those magnets; treat them well, and they’ll guarantee your panels align perfectly every time. After all, a well-aligned panel is a happy panel.


