A good auto body weld gives you full fusion, even penetration, and a smooth bead without burn-through. You need clean, bare steel, tight panel fit-up, and firm clamping before you strike an arc. Set your heat and wire speed for thin sheet metal, then keep a steady gun angle, short stickout, and proper travel speed. Check the weld for uniform ripples, clean fusion, and correct plug size so you can judge each repair with more confidence.
Quick Answer
A good auto body weld looks clean, even, and fully fused into the base metal. You should see steady bead shape, proper penetration, no burn-through, and no visible gaps, cracks, porosity, or undercut.
Key Takeaways
- Clean bare steel gives the weld the best chance to fuse correctly.
- Tight panel fit-up helps reduce gaps, burn-through, and weak spots.
- Low heat, short stickout, and steady travel speed help control thin sheet metal.
- Good welds show smooth bead shape, even edges, and no visible defects.
- Final inspection helps you catch weak welds before the repair goes back into service.
What Makes a Good Auto Body Weld?
A good auto body weld starts with consistent penetration. The joint should fuse through both base metals without undercut, gaps, or excess buildup.
When you use gas metal arc welding, match your technique to the panel thickness and shape. Heat control decides whether you get a strong repair or warped sheet metal.
Watch the weld bead closely. A smooth, even profile and steady edge tie-in show that the arc delivered balanced heat.
Joint preparation matters because clean edges and tight fit-up help the base metal bond without contamination. Keep voltage and amperage in range so you reduce burn-through and keep the panel stable.
Proper metal preparation also helps keep dirt, paint, rust, and oil out of the weld. After welding, inspect with gauges and visual checks to confirm the repair follows the vehicle maker’s repair guidance when available.
That’s how you keep the work safer, stronger, and easier to trust.
Prep Steel for Better Welding Results
Before you strike an arc, prep the steel so the weld can hold. Strip away rust, paint, seam sealer, and oil until you reach clean bare metal.
Good joint preparation means fitting parts tightly and beveling thicker edges when the joint needs deeper fusion. Check the steel gauge first because 16, 18, 20, and 22 gauge panels handle heat differently.
Know whether you’re working with mild steel, high-strength steel, or ultra-high-strength steel. Each type may need a different repair method, so check the vehicle maker’s repair information before welding structural areas.
Clamp the work securely and keep the ground connection solid. A steady ground helps the arc stay stable and keeps the panel from moving while you weld.
Pay attention to wire diameter too. The wire should suit the joint, metal thickness, and machine settings.
Understanding maximum fillet weld size can also help when you move from thin body panels to thicker repair parts.
Set Heat and Wire Speed for Sheet Metal
Set your heat and wire speed to match the panel, because sheet metal burns through fast when the settings run too hot. Many thin automotive steel jobs need low heat, controlled wire feed, and short weld bursts.
Your exact settings depend on the welder, wire size, shielding gas, and metal thickness. Use the machine chart as a starting point, then test on scrap steel that matches the repair panel.
- Start with clean scrap from the same metal thickness.
- Set the machine near the chart recommendation.
- Run short test welds and check the bead shape.
- Adjust wire speed and voltage until the arc sounds steady.
Use test welds before you touch the car. That lets you fine-tune wire speed, voltage, and amperage without risking the real part.
For sheet metal, precision beats force. When you set the machine correctly, the arc stays stable, the bead ties in, and you get a strong joint without burn-through.
Understanding welding process selection can also help you choose the best method for automotive repairs.
Warning: Never weld near fuel, batteries, upholstery, seam sealer, or hidden wiring without removing fire risks first.
Products Worth Considering

Highly Durable Design: The shell of stud welder kit is made of high-quality ABS body, has good stability under high temperature conditions, withstand temperature of 93-118℃, and the movement is pure copper electrode. This welder stud kit is wear-resistant, strong and sturdy.
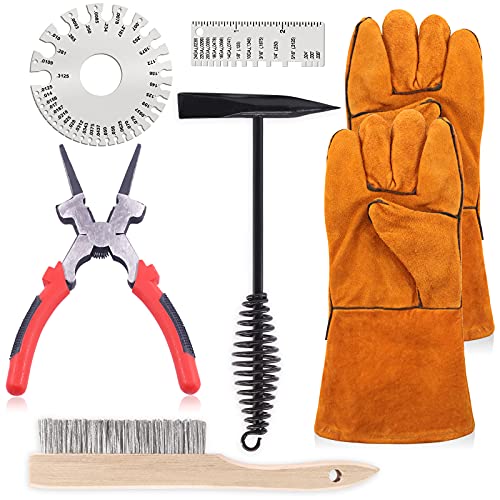
【What You Get】The professional welding slag removal tool contains 1 pcs 8’’ Welding Pliers, 1 pcs 10’’ Welding Chipping Hammer, 1 pair welding gloves, 1 pcs stainless steel wire brush, 1 pcs round dual sided wire gauge, 1 pcs metal sheet thickness gauge, totally 6 pcs. everything you need to get the job done. Ideal for Splatter Removal, Cleaning and Removing Rust, Hammering, Tip Removal/Install, Wire Cutting, Nozzle Removal/Install, Wire Draw Out, and More.

SET OF 4: 20 cleaning needles + 10 nylon brushes + 26 cleaning wires. Brush diameters: 2mm, 3mm, 4mm, 5mm, 7 mm. Wire sizes diameters: 0.3, 0.4, 0.5, 0.6, 0.7, 0.8, 0.9, 1.0, 1.1, 1.2, 1.3, 1.4, 1.5mm.
Control Gun Angle, Stickout, and Travel Speed
Keep your gun angle, stickout, and travel speed under control. These three variables decide how cleanly the weld ties into the panel.
You’ll get better fusion when you hold a 90-degree gun angle on flat and T-joints, then lean 5 to 15 degrees in the travel direction. Keep stickout at about 1/4 to 3/8 inch so the arc stays stable and the welding process remains predictable.
Proper shielding gas flow also helps protect the weld from contamination.
| Variable | Target | Result |
|---|---|---|
| Gun angle | 90° + 5–15° travel | Proper penetration |
| Stickout | 1/4–3/8 in. | Stable arc |
| Travel speed | Match material | Clean bead |
| Thin material | Faster, push technique | Less burn-through |
| Thicker material | Slower, pull technique | Better fusion |
For thin material, move faster and push the puddle. For thicker material, slow down and pull for deeper penetration.
Match travel speed to wire feed speed so you prevent undercut and spatter. When you control gun angle, stickout, and travel speed, you weld with more precision.
Products Worth Considering

A brand new 150Amp 10ft Replacement Mig gun for YESWELDER MIG-205DS Welder.

Gel eliminates erratic operation with a film that will not clog orifices and threads on MIG nozzles and contact tips

Package Including 10pcs x 0.035" Contact Tip, 2pcs x Gas Nozzle, 2pcs x Gas Diffuser.
Common Defects That Ruin Auto Body Welds
Several weld defects can make an auto body repair weak. Look for them before you grind, seal, paint, or cover the repair area.
- Burn-through: The panel gets too hot and opens a hole.
- Cold lap: The weld sits on top without proper fusion.
- Porosity: Small holes form from contamination or poor shielding gas coverage.
- Undercut: The weld edge cuts into the base metal and weakens it.
- Excess buildup: Too much weld metal adds heat and grinding work.
Fix the cause before you continue welding. More weld metal rarely solves a setup problem.
How To Inspect Auto Body Welds on Repairs?
Inspect the weld by checking for consistent penetration, a uniform bead, and no gaps or undercut. These signs help you judge whether the repair has enough strength.
Put on your welding helmet or safety glasses, then inspect the weld with bright light and a clean surface. You should see smooth fusion, stable edges, and no porosity or excess spatter.
Flip the panel and check the backside ripple pattern when you can access it. That pattern helps show whether proper heat application reached through the joint and bonded both metals.
Measure plug welds against the vehicle maker’s repair specifications, since required size can change by location and model. Common plug weld sizes include 6mm, 8mm, and 10mm, but you should not guess on structural repairs.
A good weld looks controlled, not heavy-handed. It should give the panel strength without hiding weak fusion under a large bead.
Correct welding current also helps prevent cold lap and poor bonding.
- A uniform bead builds confidence.
- Clean ripples suggest stronger fusion.
- Missing fusion can reduce safety.
- Correct size helps the repair meet the required standard.
Pro tip: Make one test weld, cut it apart, and check fusion before you weld the repair panel.
Frequently Asked Questions
What Kind of Welding Is Best for an Auto Body?
MIG welding works well for many auto body repairs because it offers speed, control, and good access on sheet metal. TIG can help on thin or detailed work, while spot welding suits some factory-style seams.
What Are Signs of a Good Weld?
A good weld has a smooth bead, even edges, and proper fusion into the base metal. You should not see cracks, holes, heavy spatter, undercut, or areas where the bead sits on top.
What Is the Golden Rule in Welding?
The main rule is to get proper fusion without overheating the work. You improve weld quality with clean metal, good fit-up, correct heat, and steady technique.
Can You Weld Over Paint or Rust?
You should not weld over paint, rust, oil, or seam sealer. These materials can contaminate the weld, create porosity, and release harmful fumes.
Why Do Welders Need Ventilation and Protection?
Welding can create fumes, bright arc light, sparks, and heat. You need ventilation, eye protection, gloves, fire-safe clothing, and a clear work area to reduce risk.
Safety Disclaimer: This article is for informational purposes only and does not replace professional welding, collision repair, or safety training. Always follow the vehicle maker’s repair procedures and use proper personal protective equipment before welding.
Conclusion
A good auto body weld comes from clean metal, controlled heat, tight fit-up, and steady technique. Before you weld a real repair, test your settings on matching scrap and inspect the result closely.
Check each bead for uniformity and penetration before you grind or cover it. A clean weld does more than join metal, it helps restore strength and trust in the repair.


