Use a 4.5-inch angle grinder with a coarse flap disc or 60-80 grit disc, and clean the weld first so grit doesn’t load up. Keep the tool moving with light pressure, working in short passes and using the disc edge to knock down high spots without thinning the panel. Check flatness often with a straightedge, then finish with finer grit. If you want tighter control, there’s more to cover next.
How to Smooth a Weld Without Over-Grinding
Start by using a 2–3 mm thick cutting disk and hold it perpendicular to the weld so you can control depth and avoid thinning the parent metal. This keeps your cut honest and limits heat, so you don’t warp the panel while you work.
Take down the bead with a coarse sanding disc, such as 60 or 80 grit, then move to 120 grit or finer as the surface levels out. Check the flatness with a metal ruler often; you’re looking for a clean connection, not a hollowed seam.
Use light, even pressure and keep the grinder moving so you don’t gouge one spot. Finish with flap discs for final smoothing, but don’t lean on them—let the abrasive do the work. Each pass should free the weld from excess metal without surrendering the surrounding bodywork. Additionally, using a .035-inch flux core welding wire can enhance the overall quality of your welds due to its low splatter characteristics.
Products Worth Considering

[What You Get] - Package content comes with 2 pieces of C1100 copper round plates, with 2"(50.8mm) in diameter and 0.12"(3mm) in thickness.

🛠️ 【Perfect Compatibility】: Designed to seamlessly fit all 3-inch (75mm) angle grinders with a 3/8-inch (9.5mm) arbor, these cutting discs are the ideal size for your grinding needs.With their slim 0.045'' design, these cutting discs offer fast, burr-free cutting performance that ensures minimal material loss.

Implant-Grade G23 Titanium – Silver sunburst disc labret stud made from solid G23 titanium, nickel-free and lead-free for women and unisex with sensitive ears.
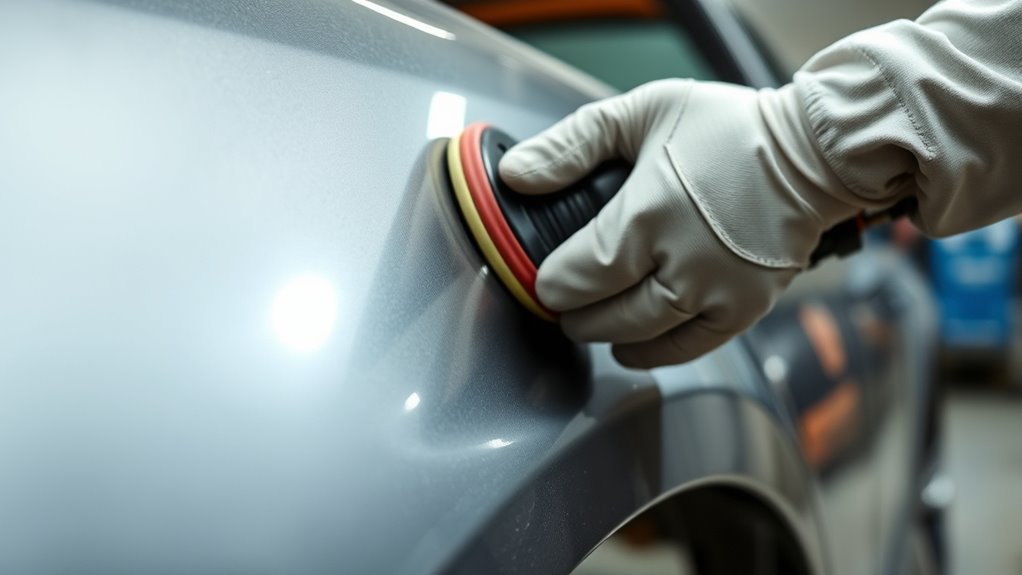
Choose the Right Grinder and Discs
You’ll get the best control with a 4.5-inch angle grinder for general smoothing tasks, since it’s versatile and easy to handle on auto body panels.
Use 2-3mm cutting discs for initial grinding to limit heat input, then switch to flap discs for finishing so you can flatten the weld without removing too much material.
For tight spots, an air-operated die grinder with roloc discs gives you precise control, and keeping the grinder at a low angle helps prevent bounce and uneven pressure. Additionally, selecting the right angle grinder wheels ensures optimal performance and safety throughout the process.
Products Worth Considering
26pcs Angle Grinder Disc 4-1/2 inch & 3 Different Types : ✅ The 26 packs angle grinder wheels 4-1/2 inch including 20 Packs 4.5"x1/4"x7/8" Cut off Wheels, 3 Packs 4.5"x7/8" 60 Grit Flap Discs, 3 Packs 4.5"x1/25"x7/8" Grinding Wheels, with each type of disk collectively wrapped with those of its kind. This kit has everything you need to prep steel.

Widely Compatible: All Wood carving disc shaft hole are 7/8 inch, and come with 3 conversion rings to reduce shaft diameter from 7/8" to 5/8". The woodworking kit fits most standard 4 or 4 1/2 inch angle grinders with 5/8" or 7/8" shafts

Complete Grinder Wheel Set: This 4-1/2" Angle Grinder Wheel Set Includes 25pcs Cut Off Wheels 4 1/2 Inch, 3pcs 4 1/2 Grinding Wheels, 3pcs 4 1/2 flap discs 4 1/2 For Angle Grinderp Disc, Provides everything you need for metal polishing and cutting. Supplied in a sturdy carrying case for easy transport.
Grinder Size Matters
Grinder choice shapes the finish: a 4.5-inch angle grinder works well for most auto body welds, while 2- to 3-inch grinders handle tight areas with better access and control. Your grinder size determines how freely you move and how much metal you remove.
Stay with a low angle to keep the disc from bouncing and to limit heat in thin panels.
- 4.5-inch angle grinder: fast, versatile, stable
- 2- to 3-inch grinder: precise in seams and corners
- Air die grinder: detailed control with minimal cut
Use the smallest tool that still lets you work cleanly, so you keep authority over the weld and avoid unnecessary grinding.
Inspect the wheel often; fresh discs cut harder, so ease up before the metal thins.
Pick The Right Discs
A good disc does more for weld smoothing than brute force ever will. Start with a flap disc to blend the bead with controlled cut and finish.
When you need initial reduction, use a 2-3mm cutting disk; it sheds less heat and helps keep thin sheet metal straight.
For tight seams, switch to an air-operated die grinder with roloc type discs so you can work precisely without nicking surrounding metal.
Then move to sanding pads on a variable-speed grinder, holding a low angle and using light pressure to avoid thinning the weld.
Finish with 120-grit or finer sanding discs for a clean, polished surface. Choose each abrasive for control, not aggression, and you’ll free the panel from over-grinding while keeping the repair strong.
Clean the Weld Before You Grind
Before you grind, clean the weld area thoroughly so the abrasive can cut metal instead of pushing around dirt, rust, or grease. Use a knot wire brush or light sanding to remove mill scale and expose a sound surface.
When you clean the weld, wipe the panel with solvent or degreaser so oil can’t load the grinding disc or smear across the repair.
- Remove rust, scale, and loose slag.
- Degrease the weld and adjacent metal.
- Inspect for porosity or pinholes before grinding.
Keep the surrounding metal clean too, because stray debris can scratch the finish and contaminate the cut. A properly prepared joint lets the disc work efficiently, reduces heat, and helps you avoid warping thin auto body steel.
It also gives you a clearer view of defects, so you can correct them before metal removal starts. Additionally, maintaining consistent standoff distance ensures better control, precision, and freedom from rework. Clean first, and you keep control, precision, and freedom from rework.
Knock Down High Spots With Light Passes
Set the flap disc at a low angle and use light pressure to knock down the highest spots without digging into the panel. You’re not trying to erase the weld in one shot; you’re sanding only the proud material so you keep control.
Run the grinder in quick passes and keep it moving so heat doesn’t build up and warp the sheet metal. Work one small section at a time, finish a single high spot, then move on.
Keep the grinder moving in quick passes to avoid heat buildup and protect the panel’s shape.
Start with a coarser flap disc if the bead is stubborn, then switch to a finer grit once the surface settles down. Check your progress often with a straightedge or metal ruler so you can see where the metal is still high.
That feedback helps you stay flat and precise. When you pace the work this way, you free the panel from excess metal without surrendering its shape. Remember, maintaining proper MIG welding settings is crucial for achieving a strong and smooth weld joint.
Use Cross-Hatching to Level the Weld
Once the high spots are knocked down, switch to cross-hatching to bring the weld flush with the panel. You move the grinder in a crisscross pattern, cutting evenly from multiple angles so you level the bead without over-thinning the sheet.
Keep the angle grinder light in your hands; let the abrasive kiss the surface, not gouge it. That controlled approach spreads heat better, which helps you avoid warping and protects the surrounding metal. Additionally, wearing proper protective clothing is essential to safeguard against sparks and heat during this process.
- Check seam alignment often to confirm the surface stays even.
- Change direction in short passes to control material removal.
- Blend the weld into the panel so it disappears under paint.
When you stay deliberate, cross-hatching gives you a cleaner shift and a smooth finish that frees the panel from heavy filler work. You’re not chasing perfection with force; you’re shaping metal with precision, preserving strength while making the repair look factory-straight.
Sand the Weld for Final Smoothing
Start sanding the weld with 80-grit discs to strip away the remaining high spots, keeping your grinder at a low angle and using light pressure so you don’t thin the surrounding metal. Work the seam in short passes, then stop and feel for flatness with your hand. If the bead still stands proud, keep sanding until the weld blends with the panel, but don’t chase every mark. Once the surface is close, switch to a flap disc on a sanding pad for a controlled finish that cuts smoothly and leaves a uniform surface. Move to 120-grit for the final cleanup, refining the texture without creating ripples or waviness. Check the weld line and adjacent metal often so you stay level and keep the repair honest. Your goal is a clean, even connection that frees the panel from excess material while preserving its shape. Use deliberate strokes, keep your pressure consistent, and let each grit do its work. Additionally, always ensure the correct wheel speed rating to prevent damage to the surrounding metal during grinding.
Prevent Heat, Warping, and Thin Spots
You’ll control heat buildup by using a 2–3 mm cutting disc and keeping a light, steady touch so you remove only the weld high spots. Hold the grinder perpendicular to the seam, work in short 5 mm sections, and shift your angle often to prevent warping and deep cuts. Check the surface with a metal ruler as you go so you don’t thin the parent metal or create low spots. Additionally, ensuring that all zinc residues are removed before welding can further prevent contamination and enhance the integrity of your welds.
Control Heat Buildup
Control heat buildup by using a 2-3mm thick cutting disk for the initial grind, since it limits heat input and helps protect thin sheet metal from warping.
You’ll control heat buildup better when you keep a low angle, use light pressure, and stay in small 5mm sections. Keep the grinder moving; don’t dwell in one spot. That steady motion spreads heat and gives you good control over material removal.
- Start with short passes
- Inspect the weld and surrounding metal often
- Stop if the panel starts to discolor
These habits help you stay precise, avoid distortion, and keep the panel free. You don’t need brute force; you need control, rhythm, and discipline.
Avoid Thin Spotting
Thin spots form when you grind too aggressively, so keep the same disciplined approach and use a 2-3mm cutting disk for the first pass to limit heat and protect the panel.
Hold a low angle and work with the edge of the disc, not the face, so you remove metal without gouging the weld. Grind in short, controlled bursts, about 5mm at a time, and move the grinder often to avoid cutting tracks.
Check thickness as you go; if the seam starts to fade, stop and reassess. This measured pace lets you avoid thin spotting, control warping, and keep the surrounding sheet metal strong.
Precision gives you freedom, because you shape the weld instead of surrendering the panel to heat and over-thinning.
Handle Tight Corners and Overlap Seams
Tight corners call for precision tools, not brute force: use a die grinder with roloc-style discs or a 1mm cutting disc at a steep angle to remove weld buildup without chewing into the base metal. In cramped body lines, you’ll control heat and material loss better, and that keeps the panel free.
- Use a flap disc to feather the weld in confined areas.
- Keep the grinder moving so you don’t dig a groove.
- Check the surface often with your hand for high spots.
On overlap seams, run your weld consistently across the joint so you don’t force extra cleanup later. That pass helps preserve strength and leaves a smoother connection between panels. Additionally, ensure you have a clean surface before welding, as clean metal significantly enhances weld quality.
While you grind, keep checking alignment and flatness with a metal ruler; if the seam starts to warp, stop and correct it before you push further. You’re not chasing perfection through aggression—you’re freeing the panel through control, restraint, and exacting cuts.
Use Filler for Minor Imperfections
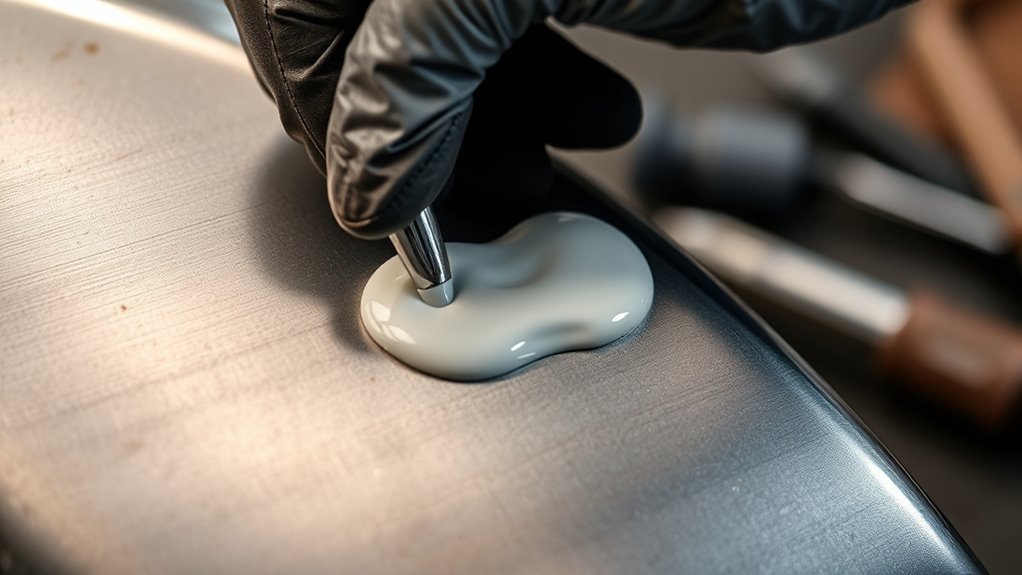
Once the weld is cleaned and the remaining flaws are only minor, body filler can smooth the surface without forcing you to over-grind the metal. You’ll want the panel clean, dry, and keyed for adhesion before you mix the filler. Apply it sparingly; thin coats preserve weld strength and keep you from building weak, heavy areas. A flap disk can level the filler efficiently while limiting heat, so you protect nearby metal from warping. After cure, sand in stages: start coarse, then step finer until the repair blends. Remember, proper fillet weld sizing is crucial for maintaining structural integrity during repairs.
| Step | Tool | Purpose |
|---|---|---|
| Prep | Clean rag | Remove contamination |
| Apply | Body filler | Fill shallow defects |
| Level | Flap disk | Smooth with less heat |
| Cure | Time | Let filler harden |
| Finish | Sandpaper | Refine the surface |
That approach gives you control, cuts over-grinding, and keeps the repair clean.
Frequently Asked Questions
How to Smooth Out a Weld?
Use welding techniques to knock the bead down with a thin cut-off disc, then a flap disc. You’ll refine surface preparation with 80- to 120-grit, checking flatness often and lightly hammering the panel.
What to Use to Smooth Welds?
You’ll use welding tools like flap discs, 2-3mm cutting disks, and air die grinders with Roloc discs. Apply smoothing techniques by grinding perpendicular, then stepping from coarse to fine grits for control.
Can JB Weld Be Sanded Smooth?
Yes—you can sand JB Weld smooth once it’s fully cured, usually 15–24 hours. Like shaping stone, you’ll use 80–120 grit first, then finer grits; proper surface preparation preserves its adhesive properties and your freedom to finish cleanly.
Why Are My Welds Not Smooth?
Your welds aren’t smooth because weld quality suffers from poor settings, too much filler, or weak surface preparation. Check wire feed, amperage, contamination, and bead length; then use controlled passes to build flatter, cleaner metal.
Conclusion
By choosing the right disc, cleaning the weld, and using light cross-hatched passes, you keep control and avoid grinding through the panel. Finish with sanding, then check for heat, warping, and thin spots before you move on. In tight seams, work patiently and use filler only for minor flaws. If you rush, you’ll turn a solid repair into a mess fit for a blacksmith’s forge. Stay deliberate, and you’ll leave the panel smooth and sound.


