Start by inspecting the firewall, then cut away rust until you reach solid steel and clean the edges well. Trace and shape a patch that fits tight, leaving it slightly oversized for final trimming. Weld it in with small MIG tacks, spacing them to control heat and prevent warping, then grind the seam smooth. Seal both sides with seam sealer and epoxy to keep moisture out, and check fit and alignment before you finish—there’s more detail ahead.
Prep the Firewall for Welding
Before you weld a firewall patch, inspect the area carefully for rust so you can spot any damage that needs repair first.
Clean the panel until you reach solid steel. Use a wire brush or grinder to strip paint, debris, and loose corrosion; good metal prep helps your welds hold and keeps contamination out of the seam.
Clean to solid steel before welding; proper prep removes contamination and helps your seam hold strong.
Treat remaining rust with phosphoric acid, then let the surface dry fully before you continue. Make sure you can reach both sides of the firewall so you can seal the repair properly; you may need to remove nearby components to work safely.
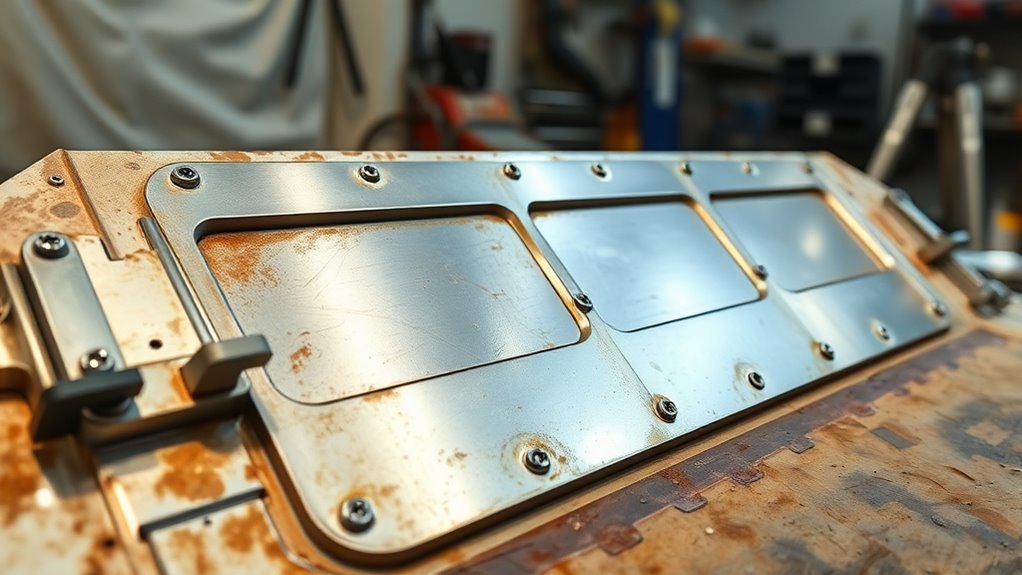
Then lay masking tape over the opening and trace a tight pattern for the patch. This gives you a snug fit and supports clean butt welds later.
Work methodically, protect surrounding wiring and trim, and keep the area organized so your repair stays precise, durable, and free. Additionally, removing loose rust is crucial to avoid porosity from rust that can weaken weld integrity.
Cut Out Rust and Trace the Patch
With the firewall cleaned and marked, trace the damaged area with masking tape so you’ve got a clear outline for the cut. Inspect seams, flanges, and hidden pockets where rust can hide and spread.
When you’re ready, use a cut-off wheel or a small reciprocating saw to remove the rotten metal, following the tape line and keeping the cut controlled. Wear eye protection, gloves, and a respirator; sparks and dust don’t care about your schedule. Cut only as much as you need, preserving sound metal around the opening.
If you plan plug welding later, you can use a plug cutter to create clean holes in the overlap zones. Keep the opening slightly undersized only if you need final trimming during butt welding. Stop often, check your line, and prevent heat buildup that can warp the firewall. Remember to clean the base metal thoroughly, as proper cleaning is crucial to enhance weld quality.
The goal is a precise removal that frees the panel without wasting usable steel.
Shape the Patch for a Tight Fit
Use the opening as your guide and make the patch slightly oversized at first so you can trim it to a tight fit later. Measure the damaged firewall carefully, then transfer that shape to masking tape so your patch follows every contour.
Cut the blank with a plasma cutter or reciprocating saw, keeping your lines deliberate and controlled. If the original panel has beads or formed ribs, use a bead roller to copy them; that helps the patch fit and keeps the firewall’s structure honest.
Cut deliberately, then recreate any beads or ribs so the patch fits cleanly and preserves the firewall’s strength.
Work slowly, trim a little at a time, and protect your hands from sharp edges. Test-fit the patch often, checking alignment from both sides and watching for daylight at the seams.
Your goal is a snug fit that respects the vehicle’s structure and gives you freedom from weak, sloppy repairs. Keep adjusting until the patch sits flush, then you’re ready for the next step. Additionally, ensure you use dedicated stainless tools to prevent contamination during the welding process.
Weld Firewall Patches Cleanly
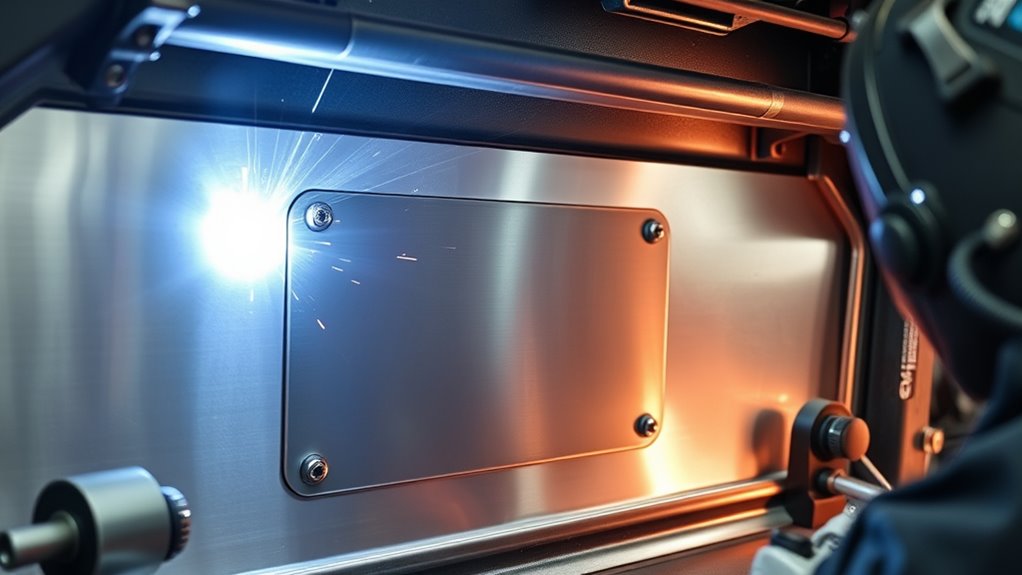
Once the patch fits flush, move on to welding it in as a butt joint so you keep the seam strong and reduce moisture pockets that can trap rust.
Before you strike an arc, clean the firewall and treat any exposed rust with phosphoric acid so the metal bonds better.
Use your MIG welder with settings that give solid penetration without dumping excess heat, then place small tack welds around the perimeter to lock the patch in position.
Keep the joint aligned, and use butt welding to avoid overlaps that can corrode later. Additionally, ensure proper surface preparation to enhance weld strength and quality.
After the seam is fully welded, let it cool, then grind it smooth until the change feels even.
Finish by applying seam seal on both sides of the patch to block moisture and add rustproofing.
Wear gloves, eye protection, and a respirator when grinding or handling chemicals, and work with the confidence that a clean repair helps you reclaim the firewall.
Products Worth Considering
MULTI PROCESS: Experience the convenience of a high-quality, budget-friendly 3-in-1 welding machine that masterfully handles Gasless Flux Core MIG/Stick/Lift TIG(additional 10-25 lift TIG torch required). This unit caters to a wide range of welding applications and meets your various welding needs.

3 IN 1 MULTI-PROCESS WELDER: The FEMEROL MIG140R mig welder delivers a reliable 140A output, enabling seamless welding of materials up to 1/8 inch in thickness. With its versatile Flux Core MIG, Lift TIG, and Stick welding capabilities, this machine is designed to handle a wide range of tasks, from home repairs to professional projects.

3-In-1 Multi Process Welder: This 3 in 1 multi-process welder seamlessly combines MIG, Stick, and Lift TIG capabilities into a single, powerful unit. Perfect for a wide range of materials and projects—from quick repairs with Flux-Cored MIG, sturdy fabrication using Stick, to precise, clean joins with Lift TIG (TIG torch sold separately). It's the ultimate 3-in-one solution that grows with your skills, eliminating the need for multiple dedicated machines
Prevent Warping While You Weld
Set your welder hot enough to get solid penetration without lingering heat that can warp the firewall. Tack the patch in place first, then space your welds evenly and let each section cool before you move on. Use a backing bar or a heat sink, and keep damp cloths nearby if you need extra control over heat buildup. Regularly check for damaged cables to ensure safety and maintain optimal performance while welding.
Products Worth Considering

High-quality: ARCCAPTAIN's ER70S-6 mig welding wire .030" meets industry standards(Net Weight: 10lbs), ensuring consistent performance, superior strength. With its smooth feeding and stable welding parameters, you can achieve optimal penetration, high deposition rates, and exceptional overall welding performance.

High-quality: ARCCAPTAIN's ER70S-6 mig welding wire .035" meets industry standards(Net Weight: 10lbs), ensuring consistent performance, superior strength. With its smooth feeding and stable welding parameters, you can achieve optimal penetration, high deposition rates, and exceptional overall welding performance.

【4-in-1 Multifunctionality & Superior Welding Performance】The BESTMIG MIG145 supports dual voltage of 110/220V and combines Gas/Gasless MIG,Stick and Lift TIG in one unit.Compatible with solid steel wire and stainless steel wire from .030"~0.03" diameter (MIG welding,“GMAW”), with .030"~.040" flux-cored wire and with .030"~.040" Silicon. Offering a 30% increase in work efficiency compared to traditional MIG welders.Featuring a smooth arc, excellent penetration, and minimal spatter, easily handles stainless steel, carbon steel, and mild steel up to 3mm (2/5") thick, meeting diverse welding needs.
Heat Control
Heat control is critical when welding firewall patches, because too much concentrated heat can quickly warp thin sheet metal. You need steady travel speed to spread heat evenly across the seam, and you should run your MIG welder at a lower amperage to limit input on delicate firewall steel.
Preheat the surrounding area slightly if the panel is especially cold, so the temperature shift doesn’t shock the metal. Keep your arc short and controlled, and watch for discoloration that signals excess heat.
Give the panel time to cool before adding more weld, because trapped heat builds distortion fast. By managing heat control with discipline, you protect panel shape, preserve strength, and keep your repair clean, safe, and ready for the road.
Tack And Cool
Start by tack welding the firewall patch in small, evenly spaced spots to lock it in place without flooding the panel with heat.
Keep your tack welding brief, then let the metal cool before adding the next spot. That pause protects the firewall from warping and lets you work with control, not force.
Place a copper backing plate behind the seam to pull heat away and support the joint.
Check your MIG settings for the panel thickness; too much heat will distort thin sheet metal fast.
Work around the patch in a balanced pattern so heat spreads evenly, and the weld stays true.
Seal and Rustproof the Repair
After the weld cools, seal both sides of the patch with seam sealer to block moisture and slow rust from starting. Then coat the repaired area with epoxy paint for a durable corrosion barrier, and make sure you’ve neutralized any nearby rust before you finish. Inspect the joints closely for gaps, pinholes, or hidden rust, since trapped moisture will undo your repair. Additionally, ensure that you are wearing flame-resistant clothing to protect yourself from burns during the welding process.
Seam Seal Both Sides
Seal both sides of the firewall patch with a high-quality automotive seam sealer to keep moisture out and prevent rust from forming in the joint. Apply it after welding and before painting so it bonds cleanly to bare metal. Work the seam sealer into every edge, then inspect for gaps or voids that could admit water and corrosion. A proper bead gives you durable rustproofing and helps the repair last.
| Check | What to do |
|---|---|
| Joint edge | Fill completely |
| Bead surface | Smooth and continuous |
| Hidden side | Seal every opening |
Stay sharp with PPE, and don’t leave exposed metal. If you want extra rustproofing, cover the cured seam with epoxy paint later, but keep this step focused on sealing first.
Epoxy Coat The Repair
Brush on a quality epoxy coat over the repaired firewall to lock out moisture and give the weld a durable rustproof barrier.
Before you start, scrub the area until it’s clean, dry, and free of debris so the epoxy bonds well to the new metal and surrounding panel. Use a high-quality epoxy coat rated for metal surfaces; it boosts corrosion resistance and helps the repair last.
Apply it evenly with a brush or spray, covering all welded edges and overlaps without heavy buildup. Follow the manufacturer’s cure time exactly, because rushed handling can weaken the seal.
Once cured, the coating helps defend your firewall from moisture and road grime, giving you a safer, longer-lasting repair you can trust.
Inspect Hidden Rust Again
With the epoxy cured, inspect the repair again for any hidden rust before you seal it up. Use a wire brush to clean the perimeter and expose any pitted metal around the patch.
If you find active rust, stop and treat it with phosphoric acid so you neutralize it before it spreads. Then inspect the welded seams on both sides of the firewall and make sure the patch sits tight with no gaps.
Apply seam sealer to both faces of the repair to block moisture intrusion. After that, coat the area with epoxy paint for another layer of rustproofing and environmental defense.
Keep checking the patched section during future maintenance, and address any rust immediately so your firewall stays strong and your work stays free.
Check Brackets and Alignment Before Final Welds
Before you make the final welds, secure every mounting bracket in position so the patch can’t shift and throw off the fit. Use clamps or temporary screws to lock the panel while you check brackets, alignment against the surrounding firewall structure.
Verify that inner fenders, cowl pieces, and any nearby tabs still sit flush and don’t bind. Measure the patch twice, then confirm angles and edge gaps so the finished weld won’t force other parts out of place.
Verify inner fenders, cowl pieces, and nearby tabs sit flush before final welds lock anything out of place.
Look closely for uneven seams, light gaps, or twist in the panel; those signs mean you need to adjust now, not after heat locks everything down. Work methodically, keep clear of hot metal, and trust your measurements over guesswork.
When the patch lines up cleanly and every adjacent component fits, you’re ready to commit to the final welds with confidence and keep the firewall strong, safe, and free. Additionally, ensure that the weld size adheres to the maximum fillet weld size guidelines to maintain structural integrity and prevent potential issues.
Frequently Asked Questions
What Is the Golden Rule in Welding?
The golden rule in welding is you keep your surface clean and prepared. You’ll control heat, practice welding safety, and test settings on scrap so your welds stay strong, precise, and free from contamination.
What Is the Hardest Material to TIG Weld?
Titanium’s usually the hardest material you’ll TIG weld; its high reactivity demands strict tungsten properties control and advanced welding techniques. You’ll also need inert shielding, low heat, and disciplined cleanliness to avoid contamination and failure.
Is It Better to TIG or MIG Weld Body Panels?
You’ll usually choose TIG for thin body panels, because TIG advantages include precision and less distortion; MIG disadvantages are more heat and spatter. Match welding techniques to panel thickness, and you’ll keep control and safety.
How to Seal Firewall Holes?
Use firewall materials like fitted steel patches or adhesive plugs, then apply sealing techniques: phosphoric acid, weld or bond the repair, seam-seal both sides, and finish with Bondo. You’ll block moisture and rust safely.
Conclusion
If you’ve made it this far, you already know a firewall patch isn’t a place for heroic improvisation. Clean metal, a tight fit, controlled welds, and rustproofing beat “good enough” every time. Check your brackets and alignment before you pat yourself on the back. After all, the engine bay doesn’t care about confidence—it cares about heat, leaks, and whether your repair survives the next storm of road grime and bad decisions.


