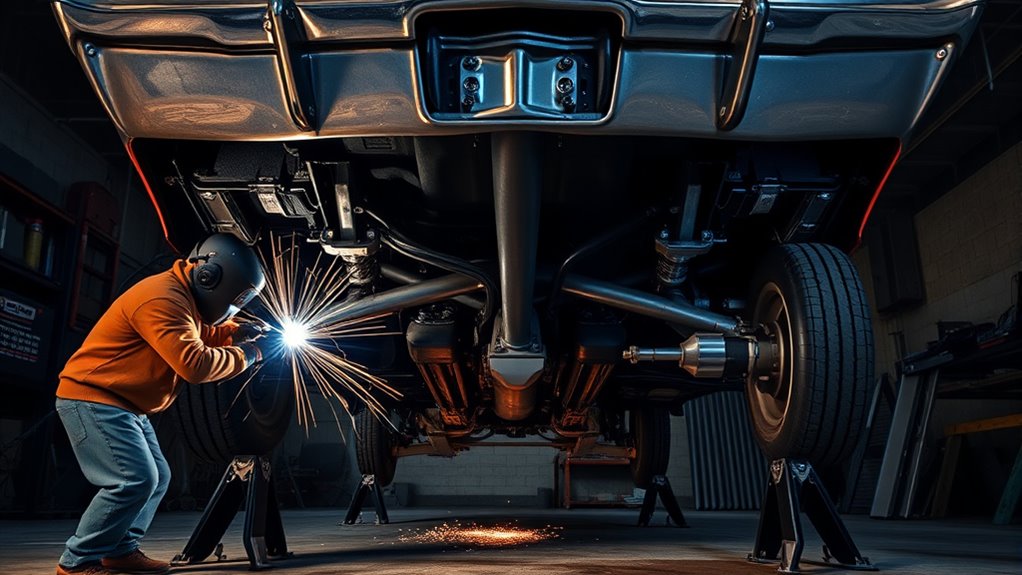
Weld frame connectors only after the car is safely supported, the interior is protected, and every weld area is cleaned to bare steel. On a classic unibody muscle car, a properly fitted connector ties the front and rear subframes together so the shell feels tighter under launch, cornering, and braking. The work is not just “add metal and weld.” You need careful fitment, short controlled welds, fire protection, and corrosion sealing.
Quick Answer
To weld frame connectors, strip nearby interior parts, disconnect and shield wiring and lines, support the car level at ride height unless the kit says otherwise, clean the weld zones to bare metal, trial-fit the connectors, tack them in place, MIG weld in short passes, then inspect, prime, topcoat, and fire-watch the area.
Key Takeaways
- Weld-in frame connectors work best when the chassis is level, stable, and supported the way the kit instructions require.
- Clean steel matters. Remove paint, rust, undercoating, seam sealer, solvent residue, and coatings from weld zones before welding.
- Use short welds and cooling pauses to reduce heat distortion, especially around thin floorpan areas.
- Protect brake lines, fuel lines, wiring, carpet, and insulation before you strike an arc.
- After welding, clean, inspect, prime, topcoat, and keep a fire watch for at least 30 minutes.
At a Glance
| Time Required | 4 to 8 hours for a clean car; longer if rust repair, line relocation, or coating removal is needed |
| Difficulty | Advanced DIY or professional welding job |
| Tools Needed | MIG welder, grinder, clamps, jack stands or drive-on lift, welding PPE, fire blankets, extinguisher, wire brush, primer, and chassis topcoat |
| Cost | Varies by connector kit, rust repair, supplies, and shop labor; get quotes if you are not welding it yourself |
Warning: Welding under a car is hot work. Remove or shield combustibles, protect fuel and brake lines, keep a suitable extinguisher ready, and do not weld near vapors, leaking fuel, solvent residue, or hidden insulation. OSHA guidance for welding and cutting requires fire hazards to be moved or guarded when possible and fire extinguishing equipment to be ready for instant use. See the OSHA welding, cutting, and brazing requirements before you work.
Why Weld Frame Connectors?
Welding frame connectors gives a classic muscle car a stronger link between the front and rear subframes. That extra tie-in can reduce body flex, improve steering feel, and make the car more predictable when you launch hard, brake hard, or corner with more power than the stock shell was built to handle.
Most classic unibody cars depend on the floorpan, rockers, torque boxes, and subframe sections to carry load. Over time, rust, power upgrades, sticky tires, and aggressive driving can make flex more obvious. Frame connectors help spread those loads through a stronger path.
A good connector installation is only as strong as the metal it is welded to. Rust, poor fitment, and contaminated weld zones can ruin the benefit.
Welded connectors usually feel more permanent than bolt-in connectors because the joint does not depend only on fasteners. That said, weld-in parts are harder to reverse, and a poor weld can damage the vehicle. If the car has serious rust, collision damage, or unknown structural repairs, fix those problems before installing connectors.
This guide focuses on weld-in frame connectors for classic mild-steel muscle-car chassis work. It is not a substitute for OEM collision repair procedures on modern vehicles with high-strength steel, crumple zones, sensors, or controlled repair methods.
Before You Start: Check the Car and the Kit
Start by reading the connector kit instructions from end to end. Some kits weld only to the front and rear subframes. Others also require floorpan welding, plug welds, reinforcing plates, seat-brace work, or trimming. Your exact connector design controls the final weld locations.
Inspect the car before you unpack the welder. Look for rust, crushed rails, weak torque boxes, previous patch panels, bent floor areas, loose seat mounts, brake-line routing, fuel-line routing, and exhaust clearance. Frame connectors should not be used to hide a weak shell. If the floor or rail metal flakes, cracks, or flexes when pushed, repair it first.
Note: The common “keep the gap under 1/8 inch” rule is a fitment target, not a universal law. Follow your kit instructions first. The goal is tight, clean contact without forcing the connector into a stressed position.
Tools and Materials for Frame Connector Welding
You need more than a welder and a pair of stands. Gather every tool, safety item, and coating product before the car is apart. Stopping midway to search for a fire blanket or primer is how small jobs turn into risky jobs.
| Item | Use | Notes |
|---|---|---|
| MIG welder | Tack and weld the connectors | Set it using the welder chart and test on similar steel first |
| Disk grinder or sander | Remove paint, rust, seam sealer, and undercoating | Clean wider than the weld bead area |
| C-clamps, locking pliers, pole jacks | Hold connectors tight during fitment | Do not force a twisted connector into place |
| Welding helmet, gloves, jacket, eye protection | Protects from arc light, sparks, spatter, and grinding debris | OSHA requires helmets or hand shields for arc welding, except submerged arc welding |
| Fire blankets and extinguisher | Protect carpet, wiring, lines, and hidden cavities | Keep extinguishing equipment within reach, not across the shop |
| Weld-through primer, epoxy primer, chassis paint | Protect bare steel before and after welding | Use each coating only as directed by its product label |
Essential Welding Equipment
A MIG welder is the common choice for mild-steel weld-in frame connectors because it gives good speed, control, and access for underbody work. Use the correct wire, shielding gas, and machine settings for the steel thickness you are welding.
Before welding the car, make a test weld on scrap steel that matches the connector and floor or rail thickness as closely as possible. Check bead shape, penetration, and burn-through risk. If you cannot make a clean test weld in a comfortable position, do not start overhead or under-car welding on the vehicle.
Clean the metal with a grinder or sander until the arc will bite into bare steel. OSHA’s welding fume guidance says welding surfaces should be cleaned of coatings that could create toxic exposure, such as solvent residue and paint. Read the OSHA welding fume fact sheet for fume and ventilation guidance.
Connector Kit Components
Your connector kit may include left and right subframe connectors, reinforcing plates, spacer tubes, nuts, bolts, seat-brace pieces, or weld plates. Lay out every part on the floor and compare it with the instructions before the car is disassembled.
Check that the left and right connectors are marked correctly. Look at bends, notches, plate angles, hole locations, and end shapes. A connector that is swapped side to side may look close but fight the floorpan when you clamp it.
Do not weld anything until the connector sits naturally against its mounting areas. Grinding or trimming small areas is normal on many older cars, but heavy forcing usually points to rust damage, body sag, collision repair, or the wrong kit.
Safety And Prep Supplies
Before you strike an arc, gather a welding helmet, welding gloves, fire-resistant clothing, safety glasses, hearing protection, a fire extinguisher, fire blankets, a wire brush, solvent for final wipe-down, and clean rags. Avoid synthetic clothing because spatter can melt it into skin.
Keep water or a hose nearby if your shop setup allows it, but do not rely on water alone. Use a proper extinguisher and know how to use it. Have another person nearby if possible, especially when welding around floor cavities where sparks can travel out of sight.
Prep the Car for Welding
Good welding starts before the welder is turned on. Get the car clean, stable, and open enough that you can see what heat and sparks might reach.
Clear Interior And Wiring
Remove the carpet, seats, insulation, loose trim, paper, rags, and anything flammable near the weld zones. Do not assume the underside is the only danger. Heat can travel through the floor and ignite carpet padding, seam sealer, sound deadener, or hidden insulation.
Disconnect the battery. Move wiring away from the weld area whenever possible. If wiring, modules, brake lines, fuel lines, or cables cannot be moved, shield them with fire blankets or metal heat shields. If a fuel or brake line sits too close to the weld zone, relocate it before welding.
Remove paint, undercoating, seam sealer, rust, and zinc coating from the exact weld areas. Properly removing zinc coating helps reduce contamination and fume risk when welding coated steel.
Support And Level Chassis
Support the car exactly as the connector kit requires. Many weld-in connector jobs are done with the suspension loaded at ride height on a drive-on lift, ramps, or stands under the axle and front suspension points. Some kits may specify a different support method, so follow the instructions.
The main goal is to avoid welding the shell while it is twisted. Check door gaps before and after support. Make sure the car is level side to side. If the body sags when lifted from the wrong points, the connectors can lock that twist into the car.
| Check | What You Want |
|---|---|
| Chassis support | Stable, level, and loaded as the kit instructions require |
| Door gaps | No new binding after support |
| Connector fit | Tight contact, ideally no more than about 1/8 inch gap unless the kit says otherwise |
| Line clearance | Fuel, brake, wiring, and parking-brake cables protected or relocated |
Pro Tip: Take photos before you remove anything. Photos help you route lines, seat hardware, wiring, carpet, and insulation back correctly after the welding and coating work is finished.
Strip the Interior and Protect the Lines
Strip the carpet and pull the seats and any loose interior parts so you can reach the floorpan and subframe areas without fire hazards in the way. Remove all interior components that block access, then vacuum and wipe the work zone clean.
You want bare metal where you will weld because paint, seam sealer, undercoating, zinc, and upholstery fibers can contaminate the weld or create hazardous fumes. Inspect the brake and fuel lines along the chassis, then secure, reroute, or shield them so heat and sparks cannot damage them.
If a line sits too close to the weld zone, relocate it before you strike an arc. Keep a fire extinguisher and a water hose within arm’s reach, not across the shop. Also make sure you have ventilation in the work area so fumes are pulled away from your breathing zone.
This prep work is not busywork. It protects the car, prevents hidden fires, and gives you the clean access needed for precise fabrication.
Fit and Mark the Frame Connectors
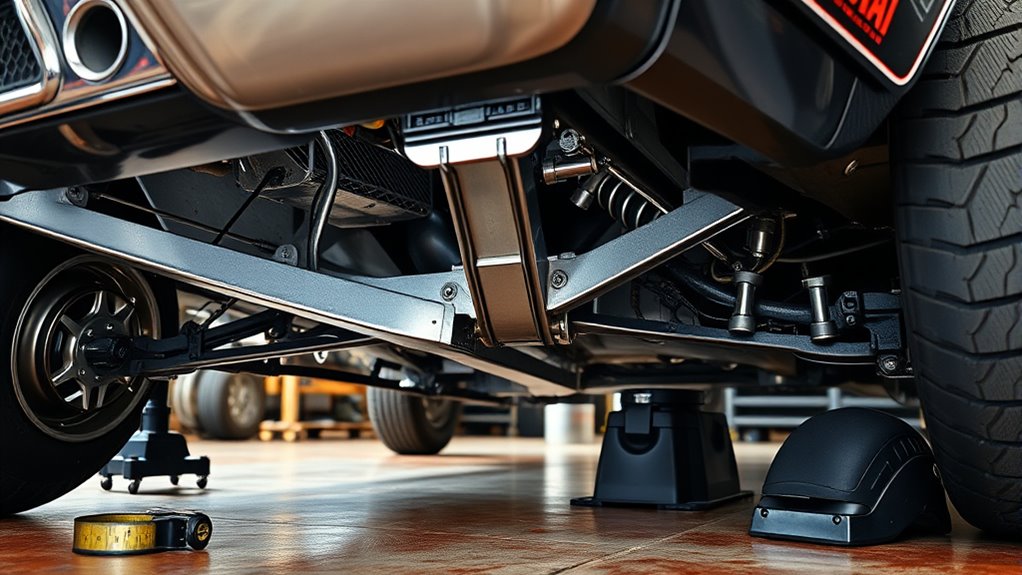
Now trial-fit the frame connectors against the floorpan and subframe so you can verify alignment before any welding starts. Position each piece, then use C-clamps, locking pliers, or pole jacks to hold it while you check the fit.
The connector should sit square against the contact points without twisting. Keep the gap tight, ideally no more than about 1/8 inch unless the kit instructions allow more. If the fit is off, adjust the angle, clean the metal more, or trim only where the instructions allow.
Once the fit looks right, mark the weld locations directly on the floorpan, rails, and connector plates. Score the surface so your layout stays visible after handling. Then remove paint, undercoating, rust, and other coatings from every marked area.
Always ensure that the proper grinder flanges are used when grinding weld areas so the wheel stays supported and controlled.
Work methodically on both sides. Measure from fixed chassis points and compare the left and right connectors. Do not use the first side as the only reference if the car has old crash damage or rust repair.
Weld the Frame Connectors In Place
With the frame connectors fitted, marked, and the weld areas cleaned to bare metal, you can start welding them in place.
Keep the car solidly supported and confirm that the connectors still meet the front and rear subframes without a large gap. Clamp the connector so it cannot walk as the first tacks shrink.
- Test first: Weld scrap of similar thickness and adjust voltage, wire speed, gas flow, and travel speed before welding the car.
- Tack both ends: Place tack welds at both ends and at several key contact points. Recheck alignment before adding more heat.
- Alternate sides: Move around the connector instead of running one long weld in one area.
- Use short passes: Weld in short controlled sections and let the metal cool between passes.
- Inspect as you go: Look for burn-through, lack of fusion, porosity, missed edges, or movement.
- Finish only where required: Some kits call for full seam welds; others call for stitch welds or plug welds. Follow the kit instructions.
Do not chase a pretty bead at the cost of too much heat. Thin floorpan metal can warp or burn through quickly. If you blow a hole, stop, let the metal cool, clean the area, and repair it in short pulses instead of making the hole larger.
After tacking, inspect the perimeter and re-weld weak spots or missed sections as needed. Once the welding is complete, let the metal cool naturally. Do not spray hot welds with water unless you are responding to a fire risk.
Also make sure you maintain proper wire feed speed and travel speed so the weld ties into the connector and the car structure without excessive spatter or undercut.
Check Alignment and Fix Fitment Issues
Before final welding, trial fit the subframe connectors against the floorpan and factory rails so you can correct fitment problems early. A small gap can often be fixed with better cleaning, clamp pressure, or light trimming. A large gap usually means the connector is mispositioned, the car is not supported correctly, or the structure is damaged.
Use C-clamps to hold the connectors tight while you inspect the gap. If the subframe connectors sit high, low, or twisted, grind, trim, or reshape only the areas allowed by the kit maker. Do not cut away structural metal just to make a connector fit.
Check the floorpan and frame rails for bends, dents, rust, or previous damage. Fix those problems first so your alignment is not fighting hidden distortion.
| Problem | Likely Cause | Fix |
|---|---|---|
| Connector rocks or twists | Wrong side, body twist, rust repair, or coating buildup | Recheck side, support, and metal prep before trimming |
| Large gap at rail | Misalignment, bent rail, or incorrect support point | Correct the structure or support setup before welding |
| Burn-through | Too much heat, thin floor metal, or slow travel | Cool the area, lower heat, use shorter welds, and repair carefully |
| Porosity | Contamination, poor gas coverage, or dirty metal | Grind out the defect, clean the area, check gas flow, and re-weld |
| Line interference | Brake, fuel, or parking-brake line too close | Reroute or shield the line before final welding |
Mark every contact point before you remove the parts, then confirm the connectors sit square and centered. If brake or fuel lines interfere, reroute them now so nothing binds during final installation.
This careful setup gives you clean fitment, solid geometry, and a safer weld. Clean surfaces are also critical if you are working with thin material, so review clean surface prep for thin metal welding before you weld floorpan areas.
Seal and Protect the Welds
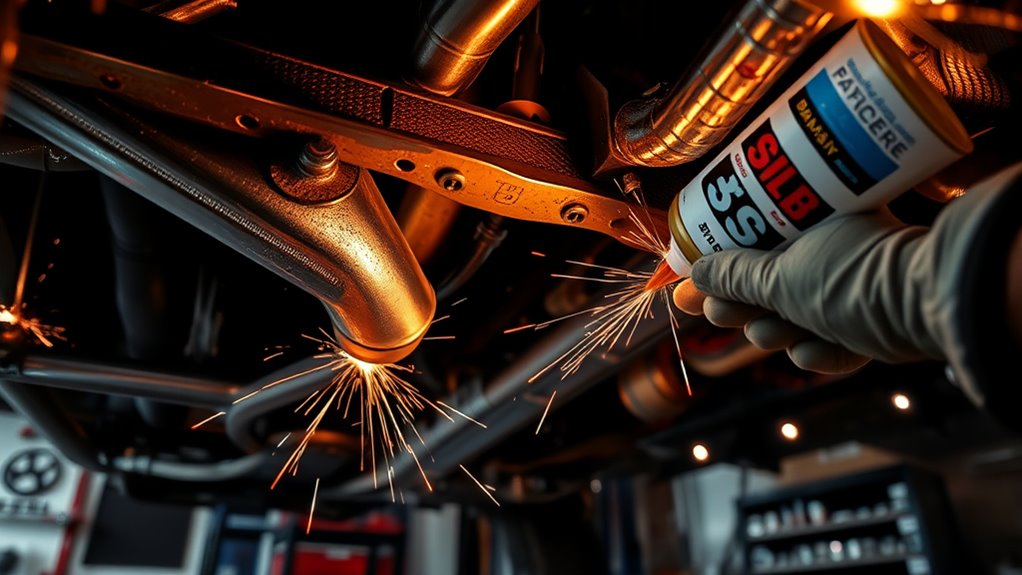
Once the welds have cooled completely, clean them thoroughly to remove slag, spatter, soot, and contamination that could trap moisture. You need dry, clean metal before primer and topcoat.
Brush and solvent-clean every bead, seam, and heat-affected edge, then let the area air out. Apply weld-through primer, epoxy primer, seam sealer, cavity wax, chassis paint, or underbody coating only where each product is appropriate. Follow the label for dry time, recoat time, and temperature.
Do not coat hot metal. Coating too soon can trap moisture or solvent and weaken the finish. After primer cures, apply a durable topcoat to seal the welds against road spray, debris, and humidity.
Additionally, wear proper protective clothing during arc welding to reduce the risk of burns, sparks, and UV exposure.
Inspect the protected welds regularly for chips, scratches, or lifted coating edges, especially after hard driving. If you find damage, clean the spot, recoat it, and restore the barrier.
Post-Weld Inspection and Fire Watch
When the welding is done, do not reinstall the interior right away. Keep the car open and inspect both sides of the floor, the underside, and nearby cavities. Look for smoke, hot seam sealer, melted insulation, damaged wiring, bubbled coating, leaking lines, and missed weld areas.
Maintain a fire watch for at least 30 minutes after welding or cutting. Check the cabin, floorpan, rocker area, brake and fuel line routing, and any nearby cavities where sparks may have landed. OSHA states that fire watch should continue for at least a half hour after welding or cutting operations when required, to detect and extinguish possible smoldering fires.
After everything is cool and coated, reinstall the interior parts you removed. Confirm the seats, belts, wiring, brake lines, fuel lines, and parking brake operate correctly. Before hard driving, take a short test drive and listen for new rattles, contact points, or exhaust interference.
When to Hire a Professional
Hire a professional welder or chassis shop if the car has heavy rust, collision damage, thin floor metal, unknown previous repairs, fuel-line interference, poor access, or if you are not confident welding overhead or out of position. A frame connector is a structural part. A weak weld can crack, trap rust, or create a fire hazard during installation.
You should also get professional help if your car is a late-model vehicle with high-strength steel, crash sensors, airbags, hybrid or EV wiring, or OEM-controlled structural repair requirements. This guide is for classic muscle-car connector installation, not modern collision repair.
Frequently Asked Questions
What type of welding is best for frame connectors?
MIG welding is usually the most practical choice for mild-steel weld-in frame connector kits because it is fast, controllable, and well suited to shop fabrication. TIG can work for precise areas, but it is slower and needs cleaner access. Follow the kit instructions and use a qualified welder if you are unsure.
Should you weld a car frame together?
You should weld structural areas only when the repair or modification is appropriate for the vehicle and the welder can make sound welds. Weld-in connectors on classic mild-steel unibody cars are common, but collision-damaged frames, modern high-strength steel, and rusted rails need professional evaluation.
How much does it cost to get frame connectors welded?
The cost depends on the connector kit, shop rate, rust repair, coating work, and how much interior removal is needed. A clean car with a simple kit costs less than a rusty car that needs line relocation or floor repair. Get a written quote from a chassis or welding shop.
Can a car subframe be welded?
Some subframe and connector work can be welded, but the answer depends on the vehicle, material, damage, and repair procedure. Classic mild-steel connector installations are different from welding a cracked modern subframe or crash structure. When in doubt, follow OEM repair information or hire a qualified professional.
Do frame connectors need to be welded with the car on its tires?
Many weld-in connector jobs are done with the suspension loaded at ride height, often on a drive-on lift or ramps, so the shell is not hanging twisted. Always follow your specific kit instructions because some designs may require a different support method.
Conclusion
Welding frame connectors into a classic muscle car can make the chassis feel tighter and more predictable, but the result depends on clean metal, accurate fitment, safe support, and solid welds. Do not rush the prep work. Strip the interior near the weld zones, protect fuel and brake lines, clean to bare steel, test your welder settings, and use short controlled welds.
After welding, inspect the joints, keep a fire watch, and seal every bare area with the right primer and topcoat. Done carefully, weld-in frame connectors can strengthen the car for street or track use. Done carelessly, they can create rust, distortion, weak welds, or fire risk.
Sources
- OSHA 29 CFR 1910.252, Welding, Cutting, and Brazing General Requirements — fire prevention, extinguishers, fire watch, eye protection, and hot-work precautions.
- OSHA Fact Sheet 3647, Controlling Hazardous Fume and Gases during Welding — welding fume hazards, cleaning coatings, ventilation, and respiratory protection considerations.
- OSHA Welding, Cutting, and Brazing Overview — OSHA standards and hazard resources for welding operations.
- OSHA 29 CFR 1910.133, Eye and Face Protection — eye and face protection requirements for hazardous work.


