Welding torque boxes on a classic car is a structural repair, not just a patch panel job. The goal is to tie the floor, frame rail, rocker area, and suspension load path back together without twisting the body or trapping rust inside the repair. Work slowly, support the car at ride height, keep the metal clean, and use short welds so the heat does not pull the floor out of shape.
Quick Answer
To weld torque boxes on a classic car, trial-fit each box, support the vehicle level at ride height, strip all weld areas to bare steel, clamp or screw the parts in place, tack the corners, verify alignment, then use controlled MIG plug welds and stitch welds. Finish by inspecting, grinding only where needed, sealing, priming, and coating the repair.
Key Takeaways
- Trial-fit the torque boxes several times before welding, especially if you are using reproduction panels or parts from a different model year.
- Support the car level at ride height so the shell is not twisted while the new structure is welded in.
- Use short MIG tacks, plug welds, and stitch welds to control heat and reduce warping.
- Remove paint, rust, zinc coating, seam sealer, and undercoating from every weld zone before striking an arc.
- Inspect the welds before sealing, then use seam sealer, primer, and corrosion protection so the repair does not rust from the inside out.
At a Glance
| Time Required | One full day for clean installation; longer if rust repair, floor repair, or panel trimming is needed. |
| Difficulty | Advanced DIY or professional-level structural welding. |
| Tools Needed | MIG welder, clamps, sheet metal screws or clecos, drill, grinder, wire wheel, square, tape measure, jack stands or ramps, welding PPE, extinguisher, seam sealer, primer, and rust coating. |
| Cost | Varies by vehicle and rust level; budget for torque boxes, welding consumables, grinding discs, cleaner, primer, seam sealer, and corrosion protection. |
Warning: Torque boxes are part of the car’s load path. If the frame rails, rockers, floor pans, spring mounts, or suspension pickup points are badly rusted or collision-damaged, have the chassis measured and repaired by a qualified shop before welding. Never weld near fuel vapors, live electrical power, hidden undercoating, or unshielded brake and fuel lines.
Check Torque Box Fitment
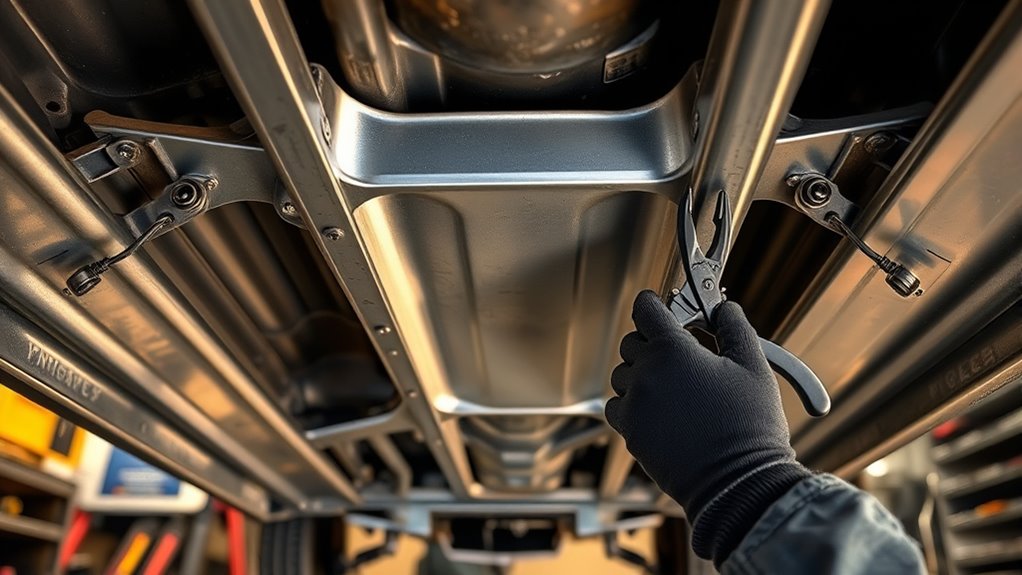
Before you weld anything, trial-fit the torque boxes to confirm they match the car’s structure and line up with the rails, floor, rocker area, and body mount points. Do not assume reproduction panels will drop in perfectly. Small stamping differences can create gaps that turn into weak welds or distorted panels.
Hold the torque boxes in position with sheet metal screws, clecos, or clamps so you can remove, trim, and refit them without damage. Mark the reference edges with a paint marker, then check for interference at the floor pan, frame rail, seat support, rocker flange, and any nearby brake or fuel line routing.
If you are adapting torque boxes from another year or model, expect differences in flange shape, hole placement, and contour. Do not force the panel into place. Trim high spots, correct bent flanges, and close gaps before welding.
Refit torque boxes several times before welding. A 1/8-inch gap at the trial-fit stage can become a warped floor or weak joint after heat is added.
When the torque boxes sit square, mount securely, confirm alignment again, and only then move toward welding. If the panel has zinc coating near the weld zone, grind the coating back from the weld area and use strong ventilation. For more detail on removing zinc safely, see this guide to removing zinc coating before welding.
Pro Tip: Before final welding, mark the original spot-weld locations and transfer them to the new torque box. Those marks help you plan plug welds where the factory structure was originally attached.
Prep the Car for Safe Welding
Clear the workspace first. Remove the seats, carpet, insulation, kick panels, trim, and any sound deadener near the torque box area. Sparks can travel through gaps in the floor and ignite materials on the opposite side, so inspect both the cabin side and underside before welding.
Disconnect the battery ground cable. If the car has an ECU, aftermarket ignition box, voltage regulator, alarm module, or sensitive electronics, protect or disconnect them according to the equipment maker’s guidance. Keep welding ground close to the work area so current does not travel through bearings, cables, or small electrical grounds.
Support the car level at ride height. Use ramps, tires, or jack stands under suspension load points so the shell sits naturally. Chock the wheels, confirm the car is stable, and never rely on a hydraulic jack alone. If the body is hanging from the wrong points, the floor and rail can move before the torque boxes are locked in.
Clean the old torque box area, adjacent sheet metal, frame rail, and surrounding floor to bare steel. Strip paint, rust, scale, undercoating, seam sealer, adhesive, and weld-through primer from the exact weld zone. Use automotive wax-and-grease remover or a water-based degreaser approved for metal prep, then dry every surface completely before welding.
Wear a welding helmet, gloves, eye protection, hearing protection, and flame-resistant welding clothing. Also use local ventilation or fume extraction when welding in tight cabin or underbody areas. OSHA requires ventilation controls for welding fumes, and NIOSH warns that welding fumes can contain metals that affect the lungs and nervous system.
| Prep Task | Why It Matters | What to Check |
|---|---|---|
| Strip the interior | Prevents hidden fires and gives access | Carpet, padding, sound deadener, trim, and insulation removed |
| Disconnect power | Protects electrical parts | Battery ground off and sensitive modules protected |
| Clean to bare steel | Prevents contaminated welds | No paint, rust, seam sealer, zinc, grease, or scale in the weld zone |
| Shield the area | Controls sparks and radiant heat | Fire blanket, metal shield, extinguisher, and fire watch ready |
Note: Keep a fire extinguisher within reach and inspect the work area after welding. OSHA guidance calls for fire-watch practices when welding could ignite nearby combustibles, including a watch period after the work is finished.
Choose the Right Welding Method and Pattern
For most classic-car torque box installations, a properly set up MIG welder is the practical choice because it works well on automotive sheet steel and boxed reinforcement panels. TIG can work if you have access and skill, but it is slower. Stick welding is usually too hot and hard to control on thin floor and torque box flanges.
Use plug welds, also called rosette welds, where the torque box replaces factory spot-welded areas. Drill clean holes in the top panel, clamp the panels tight, and fill each hole so the weld fuses into the backing steel. Use short stitch welds on seams where continuous welding would add too much heat.
Before welding on the car, make test welds on scrap steel of similar thickness. Adjust wire speed, voltage, gas flow, and travel speed until the weld is flat, fused, and not burned through. If the test weld is sitting on top of the metal, the torque box weld will not be strong enough.
When deciding weld size, match the weld to the thinner piece of steel rather than trying to build a tall bead. Oversized welds add heat without adding useful strength. This is especially important on old floor pans and thin reproduction panels. For more background, see this guide on fillet weld size and plate thickness.
Tack the Torque Boxes in Place
With the workspace cleaned and the chassis supported, position the torque box pieces and hold them together with sheet metal screws, clecos, or clamps. Keep the clamping pressure firm enough to close gaps, but do not pull the panel so hard that it distorts the floor.
Check every edge against the frame rail, floor pan, rocker, and mount area. Measure diagonally where possible and compare both sides of the car. If the car has subframe connectors, seat braces, or previous repairs, confirm they are not forcing the torque box out of position.
Start with short tacks at the corners, then add tacks across the panel in a balanced pattern. Do not weld one side completely before touching the other side. Move around the torque box so the heat spreads evenly and the panel stays in place.
After the first tacks are in, pause and recheck fitment. Look for panel lift, open gaps, or a flange that has moved. Remove temporary screws only when the torque box is secure enough to stay aligned and you can reach the remaining weld areas.
When the torque boxes sit true, you have created the foundation for the final welds. Good joint fit-up matters because tight panels weld cleaner, use less heat, and resist distortion better than panels with wide gaps.
Fully Weld the Torque Boxes
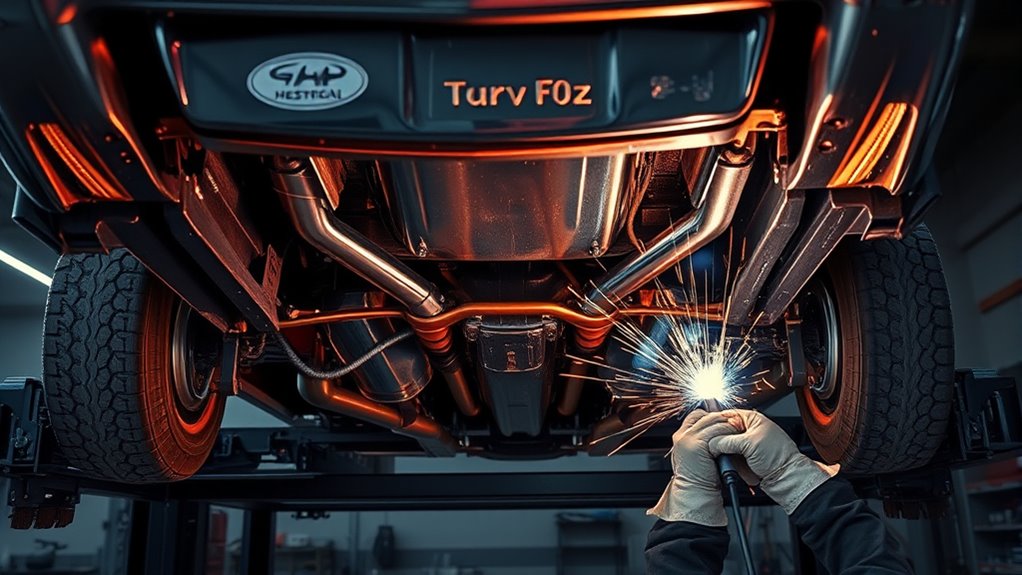
Now lay down the final welds to lock the torque boxes into the chassis. Keep checking alignment as you go. If a panel shifts, stop and correct it before the weld sequence makes the error permanent.
Start with plug welds where the torque box overlaps the floor, rail, or reinforcement panel. Hold the gun steady, start in the center of the hole, tie into the backing metal, and spiral outward until the hole is filled. The finished plug weld should be fused around the edge, not just capped on top.
For seam areas, use short stitch welds every few inches along both sides, then weld the ends where the structure needs full closure. Let each section cool before welding nearby. Compressed air can cool the area, but do not quench hot welds with water because fast cooling can affect the weld and trap moisture.
Clean to bare steel, clamp the panels tight, and weld in short sections. Heat control is what keeps the torque box strong and the floor flat.
Keep the car stable and supported at ride height during the process so the shell does not flex while the repair is being locked in. Work methodically, alternate sides, and stop if the panel becomes too hot to touch near the weld area.
Do not grind structural welds just to make them look pretty. Grind only high spots that interfere with fitment, then leave enough weld reinforcement to preserve strength.
Seal the Seams and Reinstall Everything
Once the torque boxes are fully welded and the seams have cooled, inspect each joint before sealing. Look for pinholes, missed plug welds, undercut, cracks, burn-through, cold lap, and any seam that did not fuse to both panels.
If you find a defect, grind only the bad area, clean it again, and reweld before coating. Sealer and paint should protect a finished weld, not hide a weak one.
Then seal the seams with quality seam sealer at every joint to block water, road spray, and moisture from entering the overlap. Work the sealer into gaps around the torque boxes, especially on the underside and along floor seams where water can sit.
Next, apply epoxy primer, weld-safe primer where appropriate, paint, cavity wax, or a rust inhibitor to exposed welds and seams for corrosion protection. Let each coating cure fully before reinstalling insulation, carpet, seats, and trim.
Fit the floor pans and interior pieces snugly against the new structure. If a panel sits proud or binds, correct the interference instead of forcing the part into place. Check seat mounts, belts, brake lines, parking brake cables, and fuel lines before the car returns to the road.
Good sealing and careful reassembly protect the welds from rust and keep the repair clean. Use proper ventilation when coatings, solvents, or sealers are being used in the cabin or underbody area.
Troubleshooting Common Torque Box Welding Problems
| Problem | Likely Cause | Fix |
|---|---|---|
| Torque box will not sit flat | Rust scale, bent flange, poor reproduction stamping, or hidden interference | Remove the part, mark high spots, trim carefully, and refit before welding. |
| Plug welds sit on top | Low heat, dirty metal, poor clamp pressure, or wrong gun angle | Clean again, clamp tighter, adjust the welder on scrap, and reweld the failed plug. |
| Floor starts to warp | Too much continuous welding or poor heat spacing | Stop, let it cool, then use shorter welds and alternate locations. |
| Weld pops or smokes heavily | Paint, seam sealer, zinc, undercoating, or grease still in the weld zone | Stop welding, remove contamination, improve ventilation, and restart with clean steel. |
| Interior parts do not refit | Panel shifted, weld bead is too high, or replacement box differs from original shape | Check alignment, correct interference, and grind only the areas that block fitment. |
Frequently Asked Questions
What kind of welding is used for torque boxes?
MIG welding is the most common choice for classic-car torque boxes because it works well on sheet steel, plug welds, and short stitch welds. TIG can work in skilled hands, but it is slower and harder to access in tight underbody areas. Stick welding is usually too hot for thin floor and torque box flanges.
How does a torque box work?
A torque box spreads suspension and drivetrain loads through the floor, rocker, frame rail, and nearby reinforcement panels. Instead of letting one thin sheet-metal area flex, the box helps transfer twisting force through a stronger section of the body shell.
Can a car chassis be welded?
Yes, a classic car chassis or unibody structure can be welded when the metal is sound, the body is supported correctly, and the repair follows proper welding and safety practices. If the repair involves suspension pickup points, severe rust, or collision damage, have the car inspected by a qualified frame or restoration shop.
Should torque boxes be welded with the car on jack stands?
They can be, but the stands must support the car safely and keep the body level at ride height. For many classic cars, that means supporting suspension load points rather than letting the shell hang in a twisted position. Never work under a car supported only by a jack.
Do you need weld-through primer on torque boxes?
Weld-through primer can help protect overlapping areas that will be hidden after assembly, but it should not replace clean bare steel in the actual weld zone. Follow the primer maker’s instructions, keep the weld area clean, and coat the finished repair with primer, seam sealer, and cavity protection afterward.
Should you grind torque box welds smooth?
Only grind welds where they interfere with fitment, sealing, or reassembly. Grinding every weld flat can remove useful reinforcement. If you must grind, remove only the high spot, then inspect the weld again before sealing and painting.
Conclusion
When you weld torque boxes on a classic car, you are restoring a key part of the chassis load path. The repair works only when the boxes fit tightly, the car is supported level, the weld zones are clean, and the heat is controlled. Trial-fit first, tack carefully, use plug welds and short stitch welds, inspect every joint, and seal the seams against moisture. Done correctly, the repair helps the body resist flex, keeps the suspension loads better controlled, and gives the car a stronger foundation for the rest of the build.
Sources
- OSHA 1910.252, Welding, Cutting, and Brazing General Requirements — fire prevention, fire watch, PPE, ventilation, and welding safety requirements.
- OSHA Fact Sheet: Controlling Hazardous Fume and Gases during Welding — fume-control guidance for welding work.
- CDC/NIOSH: Welding Fumes and Manganese — welding fume exposure and health-risk context.
- OSHA Personal Protective Equipment Overview — general PPE requirements and hazard-control context.
- OSHA Eye and Face Protection — eye and face protection guidance for hazardous work.


