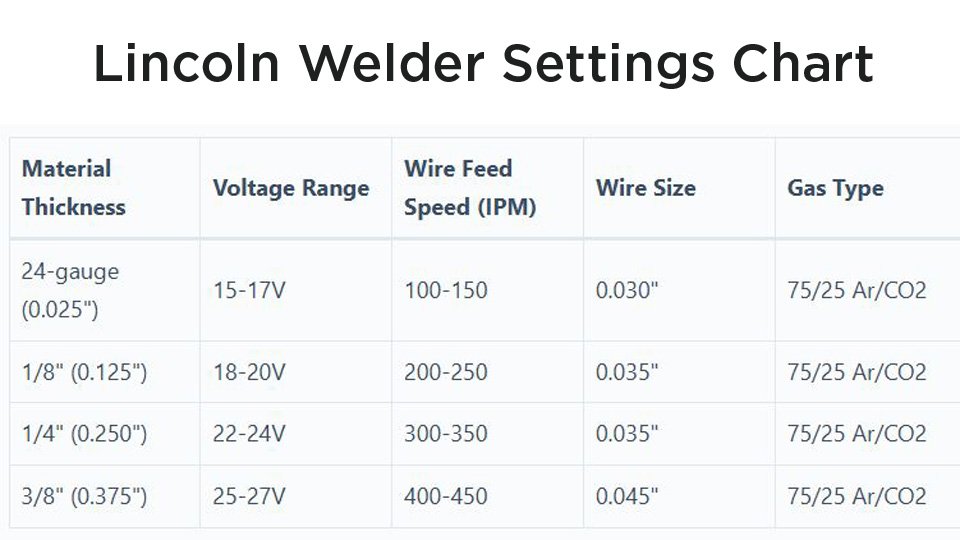
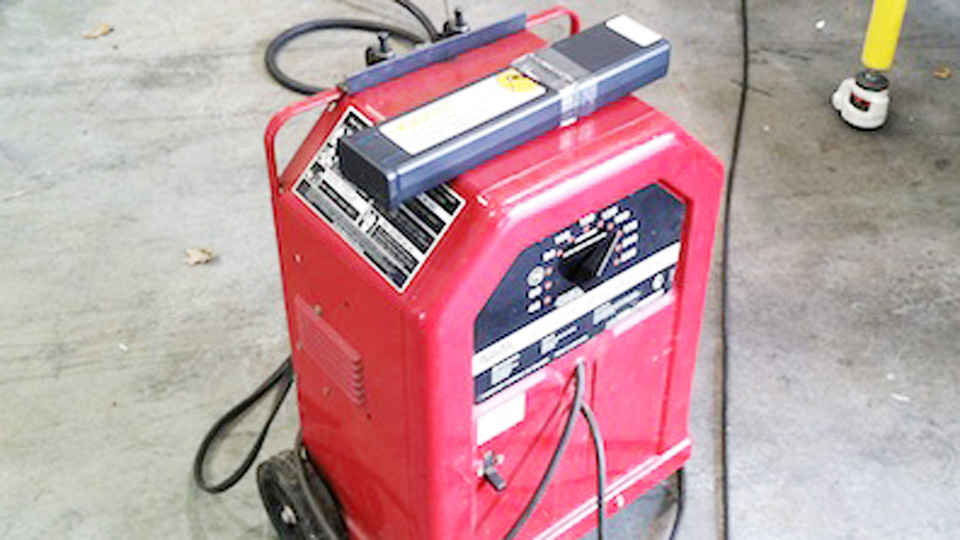
To use a Lincoln MIG welder, set the machine to DC electrode positive for solid wire, load ER70S-6 wire (0.025 in for sheet metal, 0.030–0.035 in for thicker stock), connect 75/25 argon/CO2 shielding gas at 15–20 CFH, and clamp the work lead to bare, clean metal. Then set voltage and wire feed speed from the chart inside the machine door, strike a test bead on scrap, and adjust until the arc sounds like frying bacon. Hold about 3/8 in of stickout and angle the gun 10–15 degrees in the direction of travel. That sequence is the same on every Lincoln MIG machine, from a 120V POWER MIG 140C up to a dual-voltage POWER MIG 215 MPi.
The parts that trip people up are polarity, gas flow, and stickout — none of which the machine warns you about. Below I walk through the full setup step by step, then wire and gas selection for steel, stainless and aluminum, how to dial in voltage and wire feed speed, joint prep, gun technique, and the fixes for porosity, spatter, burn-through and wire-feed jams.
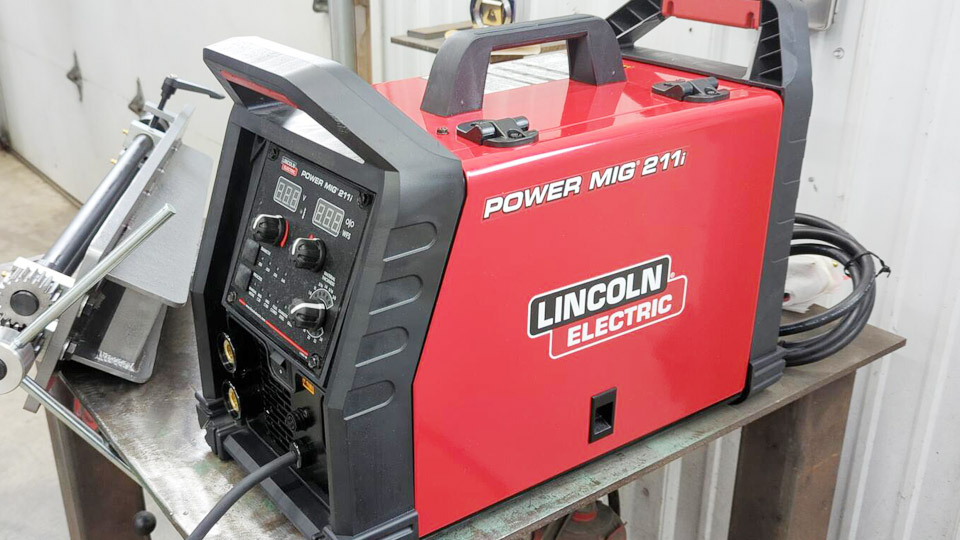
Image by eddieabbondanz
By Alfred Chase [VERIFY: add real credentials — years in the trade and any AWS certification] · Last updated: [VERIFY: set this to the date you save this revision]
How to Use a Lincoln MIG Welder: The 7-Step Setup
Run these seven steps in order every time you set up. Skipping step 4 or 6 is behind most of the bad welds I get asked about.
- Gear up and clear the area. Auto-darkening helmet, flame-resistant jacket, gloves, boots. Remove anything flammable within 35 feet and keep an extinguisher in reach.
- Match input power to the machine. Check the nameplate: 120V-only machines need a dedicated 20-amp circuit; dual-voltage machines can step up to 230V for thicker stock.
- Load the wire and set drive-roll tension. Thread through the rollers into the gun, snug but not pinched. Over-tightening flattens the wire and causes feed stutter.
- Set polarity. DC electrode positive (DCEP) for solid MIG wire. Self-shielded flux-cored runs DC electrode negative (DCEN) — a five-minute job to swap, and a two-hour cleanup if you forget.
- Connect gas and set flow. 15–20 CFH for indoor short-circuit work. Leak-check every joint with soapy water.
- Clamp the work lead to bare metal. Grind off rust or paint at the clamp point. A poor ground is the most common cause of an erratic arc.
- Set voltage and wire feed speed, then test on scrap. Start from the chart inside the door, lay a bead, and adjust until the arc hums steadily instead of popping.
What Thickness Can Your Lincoln Actually Weld?
Miller publishes a rule of thumb that works across every MIG machine: each 0.001 in of material thickness needs roughly 1 amp of output. That single number tells you in advance whether a job is realistic on your machine, and it also sets the sensible amperage window for each wire diameter.
| Wire diameter | Usable amp range | Single-pass thickness (1 A per 0.001 in) | Typical job |
|---|---|---|---|
| 0.023 in | 30–130 A | up to about 0.130 in | Auto body panels, sheet metal |
| 0.030 in | 40–145 A | up to about 0.145 in | General light fabrication |
| 0.035 in | 50–180 A | up to about 0.180 in | Frames, brackets, trailer work |
Read practically: a 140-amp machine tops out around 0.140 in — roughly 1/8 in steel — in a single pass. Anything thicker needs a bevel and multiple passes, or a bigger machine.
Why Choose a Lincoln MIG Welder?
Lincoln MIG welders are a staple in shops across the USA for a reason. Their machines, like the POWER MIG series, are built tough, with dual voltage inputs on the larger models and intuitive controls that suit everyone from DIYers to industrial fabricators.
I’ve run a POWER MIG 210 MP for everything from thin sheet metal to heavy plate. Worth knowing before you go shopping: Lincoln has retired that model — the POWER MIG 210 MP (K3963-1) is fully replaced by the POWER MIG 215 MPi (K4876-1) — but the setup logic in this guide is identical on either machine, and on the smaller 140-class units. These welders shine in automotive repair, construction, and small-scale manufacturing, offering a balance of portability and power.
What makes Lincoln stand out? Digital displays for voltage and wire speed on the multi-process models take the guesswork out of settings. They’re also versatile enough to handle MIG, stick, and TIG on some models, so you’re not locked into one process.
For students or hobbyists, that means you can grow your skills without needing a new machine. For pros, it’s about efficiency and consistent welds that meet the industry standards published by the American Welding Society.
One tip I learned early: always check the machine’s duty cycle. A buddy of mine burned out a cheaper welder by pushing it too hard. A POWER MIG 140C, for example, is rated around 20% at 90 amps — six minutes of arc time in any ten-minute window before it needs to cool. Knowing that number prevents overheating and keeps your welds clean. [VERIFY: confirm the rated duty cycle for your exact model against its spec sheet]
What Safety Gear and Setup Do You Need Before Welding?
A MIG arc puts out enough ultraviolet light to sunburn exposed skin in minutes, and the sparks carry far enough to find a rag across the shop. Before you plug in your Lincoln MIG welder, set the workspace up properly. I learned this the hard way when a stray spark caught a rag in my shop — thankfully, I had a fire extinguisher handy.
Start with personal protective equipment. An auto-darkening helmet is non-negotiable, and the shade should match your amperage rather than being guessed. ANSI Z49.1:2021, Safety in Welding, Cutting, and Allied Processes — published by the American Welding Society and free to download — sets these bands for MIG and flux-cored welding:
| Arc current | Minimum protective shade | Suggested shade |
|---|---|---|
| 60–160 A | 10 | 11 |
| 160–250 A | 10 | 12 |
| 250–500 A | 10 | 14 |
Add flame-resistant gloves, a welding jacket, and steel-toe boots. For fumes, especially with galvanized steel, use a respirator or make sure your shop has strong ventilation — industrial fans or a fume extractor. Galvanized coatings need extra care; see our guide to MIG welding galvanized steel safely.
Your workspace needs attention too. Clear away flammable materials like wood, paper, or solvents. I keep a fire extinguisher and a bucket of sand nearby. Ground your welder properly to avoid electric shocks, and inspect cables for frays. ANSI Z49.1 covers all of this — ventilation, fire watch, PPE and lens shades — and I’ve seen how consistently these precautions prevent accidents in busy shops.
Common mistake? Skimping on ventilation. Fumes from welding, especially on coated metals, can make you dizzy or worse. Open doors, use fans, or invest in a fume extractor if you’re welding indoors regularly.
Products Worth Considering

True Color Clear View: A 3.64" x 1.67" viewing area with 1/1/1/1 optical clarity delivers a true color view for improved visibility and reduced eye strain.

【FASTER AUTO-DARKENING】Features high-end auto-darkening lenses with 4 premium arc sensors, switching from light to dark in 1/25000 sec. Easily adjust the shade and sensitivity of the lenses for different working environments, perfect for TIG/MIG/ARC welding. Dark state level: 4/9-13.

AUTO DARKENING FILTER - This welding helmet comes with high-end auto-darkening lens and 4 premium arc sensors which let you adapt to different working environments by adjusting the lens's shade and sensitivity while you are operating ARC/MIG/TIG Welding. DIN4 on light state, DIN5-9/9-13 on dark state.
How Do You Set Up a Lincoln MIG Welder Step by Step?
Setting up a Lincoln MIG welder takes about ten minutes, but small mistakes ruin welds. Here it is broken down, assuming a model like the POWER MIG 140C, 210 MP or 215 MPi.
First, check what input power your machine actually accepts. The POWER MIG 140C is 120V only — 30 to 140 amps of output — so it’s a sheet-metal and light-fabrication machine, full stop. Dual-input models like the 210 MP and 215 MPi run on 120V or 230V; use 120V for thin stock and step up to 230V when you need real amperage for thicker plate. Plug in and set the machine on a stable surface.
What Circuit Does a Lincoln MIG Welder Need?
A 120V machine wants a dedicated 20-amp circuit with nothing else on it. Sharing a circuit with shop lights or a compressor causes voltage sag and an arc that pops for no apparent reason. Avoid extension cords where you can; if you must use one, keep it short and heavy-gauge, because voltage drop over a long thin cord shows up directly in your bead. For 230V machines, read the input amperage off the nameplate before wiring a receptacle. [VERIFY: confirm breaker sizing and receptacle type against your machine’s nameplate and local electrical code before wiring anything]
Next, install the wire spool. Lincoln welders typically use 0.025″ or 0.035″ solid wire for steel. For aluminum, you’ll need a spool gun and 0.035″ aluminum wire. Thread the wire through the drive rollers and into the gun, ensuring it’s snug but not pinched. I once spent an hour troubleshooting a “bad weld” only to realize the wire wasn’t feeding smoothly — check the tension on the drive rollers.
Set your polarity now, not later. Solid MIG wire runs DC electrode positive (DCEP). Self-shielded flux-cored wire runs DC electrode negative (DCEN), which means physically swapping the leads inside the machine. This is the single most common setup error I see.
Choose your shielding gas. For steel, a 75/25 argon/CO2 mix is standard for clean welds with minimal spatter. Pure CO2 works but creates more spatter. For aluminum, use 100% argon. Connect the cylinder securely, set the regulator to 15–20 CFH for indoor short-circuit work, and check for leaks with soapy water. Push to 25–30 CFH for larger nozzles, spray transfer, or any draft — and if you’re genuinely fighting wind, no flow rate saves you; switch to self-shielded flux-cored.
Finally, attach the ground clamp to your workpiece or a clean metal table. A weak ground causes erratic arcs, so scrape off rust or paint first. Power on the machine, set initial voltage and wire speed, and you’re ready to test the arc.
Keep a spare contact tip and nozzle handy. Spatter builds up fast, and a clogged tip can ruin your day.
Which Wire and Gas Should You Use for Each Metal?
Wire and gas selection depends entirely on what you’re welding, and getting it wrong wastes more time than any other decision in MIG. Here’s what each metal needs.
For mild steel, ER70S-6 wire (0.025″ or 0.035″) is my go-to. It’s forgiving, handles mill scale reasonably well, and gives smooth beads. For thinner steel (under 1/8″), use 0.025″ wire to avoid burn-through. For thicker plate, 0.035″ offers better penetration. I’ve welded everything from car panels to trailer frames with ER70S-6 and a 75/25 argon/CO2 mix.
For stainless steel, ER308L or ER316L wire works best, paired with a tri-mix gas (helium/argon/CO2). Stainless is trickier; too much heat warps it, so start with lower settings and practice on scrap. I once botched a stainless exhaust repair by rushing — slow and steady wins here. Our detailed walkthrough on MIG welding 304 stainless steel covers wire, gas and settings in depth.
Aluminum welding needs a spool gun for precise wire feeding. Use ER4043 or ER5356 wire with 100% argon. Clean the aluminum thoroughly with a dedicated stainless steel brush to remove the oxide layer — skipping this step is a common rookie mistake that leads to porous welds.
Flux-cored wire (like Lincoln’s InnerShield) is an option for outdoor work since it doesn’t need shielding gas. It’s great for windy job sites but produces more spatter and slag. I use it for quick repairs on farm equipment when dragging a gas cylinder isn’t practical — and our flux-core MIG welding settings chart has the starting parameters.
Here’s a quick comparison table for clarity:
| Material | Wire Type | Gas Type | Best For |
|---|---|---|---|
| Mild Steel | ER70S-6 | 75/25 Argon/CO2 | General fabrication, auto |
| Stainless Steel | ER308L/ER316L | Tri-mix (He/Ar/CO2) | Exhausts, food-grade welds |
| Aluminum | ER4043/ER5356 | 100% Argon | Marine, aerospace, art |
| Flux-Cored | InnerShield | None | Outdoor, dirty metal |
Don’t mix wire and gas types without checking compatibility. Using CO2 with aluminum wire, for instance, will give you a mess of a weld.
Products Worth Considering

High-quality:Tooliom's .030" ER70S-6 MIG Welding Wire (10lb spool) meets all industry standards for consistent strength and performance. Enjoy smooth feeding, stable arcs, optimal penetration, and high deposition rates—everything you need for exceptional welds

E71T-GS FLUX CORE WIRE: This self-shielding, AWS E71T-GS flux-cored wire excels due to its advanced core design, delivering exceptional arc stabilization and high feedability for effortless welding. The core also incorporates powerful deoxidizing agents, ensuring clean, reliable welds even when welding through light rust or mill scale.

High-quality: ARCCAPTAIN's ER70S-6 mig welding wire .030" meets industry standards(Net Weight: 10lbs), ensuring consistent performance, superior strength. With its smooth feeding and stable welding parameters, you can achieve optimal penetration, high deposition rates, and exceptional overall welding performance.
How Do You Dial In Voltage and Wire Feed Speed?
Voltage controls bead shape and arc length; wire feed speed controls amperage, which controls penetration. Too much voltage and you’ll burn through; too little and the bead sits on top without fusing. Lincoln machines include a chart inside the door with recommended settings for wire size and material thickness — start there, every time.
For mild steel, begin with the chart’s suggested voltage and wire speed for your thickness. Welding 1/8″ steel with 0.035″ ER70S-6 wire might start around 18–20 volts and a wire speed of 200–250 inches per minute (IPM). [VERIFY: cross-check against the chart inside your machine’s door — Lincoln’s published values vary by model.] Use the 1-amp-per-0.001-in rule as a sanity check: 1/8 in is 0.125 in, so you’re aiming for roughly 125 amps.
Strike a test bead on scrap metal. If it’s too “cold” (bead sits on top, no penetration), increase voltage slightly. If it’s too “hot” (burn-through or excessive spatter), lower it.
Why Does My Lincoln Show Letters Instead of Volts?
Lincoln’s compact 140- and 180-class machines label the voltage taps with letters (A through J) rather than numbers. Those letters are not volts — they’re discrete transformer taps, and the chart inside the door maps a letter plus a wire-speed number to a wire size and material thickness. Use that pairing rather than trying to convert to voltage, because a letter that’s correct on one model isn’t the same tap on another. [VERIFY: confirm the letter-to-tap mapping for your exact model in its operator’s manual before relying on any third-party conversion table.]
Short-Circuit vs Spray Transfer: Which Are You Using?
Almost all work on a compact Lincoln happens in short-circuit transfer: the wire touches the puddle and shorts hundreds of times per second, which keeps heat input low and works in every position. Spray transfer needs a high-argon mix plus much higher voltage and current, lays metal down fast on thick plate, and only works flat or horizontal. A 140-amp machine will never reach spray — that isn’t a fault, it’s the design.
For aluminum, use a spool gun and start with higher voltage (20–24 volts) and faster wire speed (300–400 IPM), since aluminum pulls heat away far faster than steel. Stainless steel needs lower voltage to avoid warping — try 16–18 volts for thin sheets. [VERIFY: confirm both ranges against your machine’s chart and wire diameter.]
A trick I learned: listen to the arc. A smooth, bacon-sizzle sound means you’re in the sweet spot. Crackling or popping? Adjust voltage or wire speed until it hums. Also keep your stickout (distance from contact tip to workpiece) at about 3/8″ for consistent results — anything past 1/2″ and the shielding gas starts losing the puddle.
Common error: ignoring polarity. MIG welding with solid wire requires DC electrode positive (DCEP), but check your machine’s manual. I once set up a flux-cored job with the wrong polarity and spent an hour cleaning up spatter.
How Should You Prep the Metal Before Welding?
Prep decides how the weld turns out before you ever pull the trigger. Contaminated or misaligned metal produces weak, porous welds no setting can rescue. Here’s the routine.
Clean the metal thoroughly. For steel, grind off rust, paint, or oil with a wire wheel or flap disc. For aluminum, use a dedicated stainless steel brush to remove the oxide layer. I keep separate brushes for each metal to avoid cross-contamination. A clean surface means better arc stability and stronger welds.
For joints, bevel edges on thicker material (over 1/4″) to improve penetration. A 30-degree bevel works well for V-groove welds. Clamp or tack weld pieces to keep them aligned — movement during welding ruins your bead.
If you’re welding thin metal, watch your heat. I burned through a car fender once because I didn’t drop the voltage far enough for 20-gauge sheet. Use stitch welding — short bursts with pauses — to control heat input on thin stock.
Degrease with acetone or alcohol before welding. Even fingerprints can cause porosity in aluminum or stainless welds.
Do You Push or Pull When MIG Welding?
Push for a flatter, wider bead with better gas coverage; drag for deeper penetration on steel. Aluminum is the exception with no wiggle room — always push. Technique is where welds go from functional to clean, and gun angle is most of it.
Hold the gun at a 10–15 degree angle from vertical. For steel, I prefer pushing for a flatter bead and better visibility of the joint ahead. Keep a consistent stickout (3/8″) and move steadily — too slow and you’ll pile up metal; too fast and you’ll get a weak, stringy weld.
Aluminum allows no choice here. Miller specifies a 10–15 degree push travel angle with the nozzle pointed in the direction of travel and warns against pulling or using a drag angle, and Lincoln Electric recommends a push angle for bead shape because it lays the gas blanket out ahead of the puddle. Drag on aluminum and you pull the argon off the weld pool, which gives you soot and porosity.
Practice the “C” or “e” motion for wider beads on fillet welds. It weaves the arc slightly, filling the joint evenly. I spent hours practicing this on scrap to get the rhythm down. For vertical welds, use a slight uphill push to control the puddle.
Common mistake: rushing the weld. I’ve seen students whip the gun so fast the bead sits on top of the joint instead of fusing into it. Slow down, watch the puddle, and let the arc do the work.
How Do You Fix Common MIG Welding Problems?
Even with a Lincoln MIG welder, things go wrong. Here are the four faults I hit most often and what actually fixes them.
Porous welds: tiny holes in the bead usually mean contamination or bad gas flow. Check your gas regulator (15–20 CFH indoors), look for a leaking hose, and clean the metal again. I once chased porosity for an afternoon before finding a cracked gas hose. Our breakdown of why MIG welds get porosity walks through every cause in order.
Excessive spatter: too much voltage, wrong polarity, or a dirty contact tip. Lower the voltage first, then confirm polarity matches your wire type. Anti-spatter spray helps, but it won’t rescue bad settings.
Burn-through: back off voltage and wire feed speed together — wire feed speed sets your amperage, so turning it up adds heat rather than removing it. Increase travel speed, drop to 0.023–0.025″ wire, and use stitch welding. A copper backing bar behind the joint pulls heat out fast on sheet metal.
Wire feeding issues: if the wire stutters or jams, check drive roller tension, look for a clogged contact tip, and inspect the liner. Over-tight rollers flatten the wire and make the problem worse. I carry a small wire cutter to trim kinked wire on the spot.
Advanced Tips for Specific Applications
Once you’ve got the basics, you can tackle specialized jobs. Here’s what changes for the four most common Lincoln MIG applications.
Automotive repairs — best for thin sheet: use 0.023–0.025″ wire and low voltage to avoid burn-through, and stitch weld to control heat. I fixed a rusty truck bed with short, overlapping beads and plenty of patience.
Aluminum fabrication — best with a spool gun: use 100% argon, push the gun, and clean the metal obsessively. For marine projects, ER5356 resists corrosion better than ER4043.
Heavy fabrication — best for 1/4″ and up: bevel the joint, increase voltage and wire speed, and run multiple passes. I welded a trailer hitch with three passes, grinding between each for a smooth finish.
Outdoor welding — best with self-shielded flux-cored: no gas means no wind worries, but clean the slag thoroughly between passes. I used InnerShield wire to repair a gate in a windy field and it held fine.
How Do You Maintain a Lincoln MIG Welder?
Your Lincoln MIG welder is an investment, so treat it right. After every session, clean the nozzle and contact tip to remove spatter. I use a wire brush and nozzle dip to keep things smooth. Check the drive rollers for wear and replace them if they’re grooved.
Store the machine in a dry, dust-free spot. I learned this after leaving my welder in a damp garage — corrosion on the wire spool was a pain to fix. Change the liner in the gun every few months if you weld regularly; a worn liner causes feeding issues.
Finally, inspect gas hoses and regulators for leaks. A small leak wastes expensive gas and ruins welds. I check mine monthly with soapy water.
Conclusion: Weld with Confidence
Using a Lincoln MIG welder comes down to a repeatable sequence: right polarity, right wire, right gas, clean metal, settings verified on scrap. From setting up your machine to choosing wire and mastering gun angle, you’re now equipped to tackle projects without guessing.
Whether you’re a DIYer fixing a lawnmower, a student learning the trade, or a pro on production work, these steps produce strong, clean welds. The key is practice, patience, and attention to detail.
Next step: grab a piece of scrap in the same thickness as your project, run three test beads at the chart settings, and adjust from there. If you’re running gasless wire, start with our flux-core MIG welding settings chart instead.
Lincoln MIG Welder FAQs
What’s the best shielding gas for MIG welding with a Lincoln welder?
For mild steel, a 75/25 argon/CO2 mix gives clean welds with minimal spatter. For aluminum, use 100% argon with a spool gun. Stainless steel works best with a tri-mix (helium/argon/CO2). Always match the gas to your wire and material, and set flow to 15–20 CFH indoors.
What is the proper setting for a MIG welder?
Start from the chart inside your machine’s door for your wire size and material thickness, then verify with the rule of thumb that each 0.001 in of thickness needs about 1 amp of output. Lay a test bead on scrap: if it sits on top without penetrating, raise voltage; if it burns through or spatters heavily, lower it.
What should a MIG welder be set at for 1/4 inch steel?
At roughly 1 amp per 0.001 in, 1/4 inch steel needs about 250 amps for a single pass — beyond every 140- and 180-class Lincoln. On a compact machine, bevel the joint to about 30 degrees and run multiple passes with 0.035 in wire instead of trying to reach it in one.
Do you push or pull when MIG welding?
On steel, pushing gives a flatter, wider bead and better visibility, while dragging gives deeper penetration. On aluminum you must push: Miller specifies a 10–15 degree push angle and warns against dragging, because pulling drags the argon shield off the puddle and causes soot and porosity.
Can I weld aluminum with a Lincoln MIG welder?
Yes, but you’ll need a spool gun for reliable wire feeding. Use ER4043 or ER5356 wire with 100% argon, clean the oxide layer off with a dedicated stainless brush, and push the gun rather than dragging it.
How do I avoid burn-through on thin metal?
Lower voltage and wire feed speed together — wire feed speed sets amperage, so raising it adds heat instead of reducing it. Move faster, drop to 0.023–0.025 in wire, use stitch welding, and put a copper backing bar behind the joint to pull heat away.
What’s the difference between MIG and flux-cored welding?
MIG uses solid wire with a shielding gas for clean welds indoors and runs DC electrode positive. Self-shielded flux-cored uses tubular wire with flux inside, needs no gas, runs DC electrode negative, and suits outdoor or dirty metal work at the cost of more spatter and slag.
How often should I clean my Lincoln MIG welder?
Clean the nozzle and contact tip after every session to remove spatter. Check drive rollers and the gun liner monthly, replace the liner every few months with regular use, and leak-test gas hoses monthly with soapy water.