One hard hammer strike can turn a simple dent into stretched sheet metal that’s harder to fix. Use a hammer and dolly to control auto body metal from both sides, but match the tools to the panel shape before you strike. This guide shows you how to lift lows, level highs, avoid oil canning, and finish the repair with less filler.
What’s in This Article
- What a Hammer and Dolly Does
- Pick the Right Hammer and Dolly
- What You’ll Need Before You Start
- Fix the Rear Panel First
- Use Hammer on Dolly for High Spots
- Use Hammer Off Dolly for Low Spots
- Shape Quarter Panels Without Stretching
- Square the Deck Lid Opening
- Finish the Metal With Light Filler
- Avoid Common Hammer and Dolly Mistakes
- Frequently Asked Questions
- Conclusion
Quick Answer
Place the dolly behind the damaged panel, then use light hammer strikes to move the metal a little at a time. Use hammer on dolly for small high spots and hammer off dolly for low spots or broader bends. Check the panel often so you don’t stretch the metal or create new distortion.
Key Takeaways
- Match the hammer face and dolly shape to the panel contour before you strike.
- Use light, controlled blows instead of heavy hits that stretch the sheet metal.
- Work on dolly to bring down high spots and off dolly to raise low areas.
- Recheck the panel by sight and touch after each short repair pass.
- Finish with thin filler only after the metal sits stable and close to shape.
What a Hammer and Dolly Does
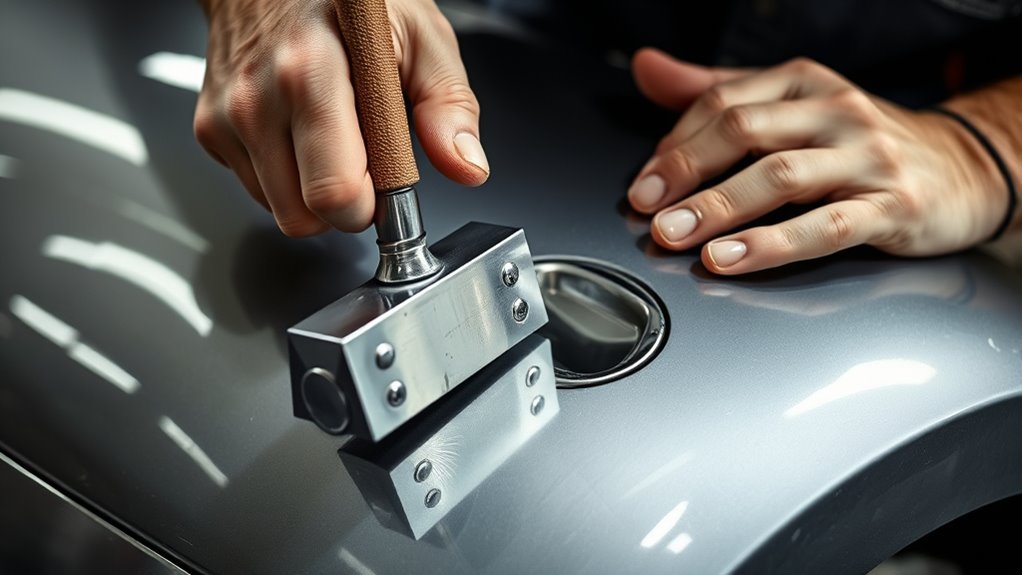
A hammer and dolly help you reshape and smooth damaged auto body panels. You use the hammer on the outside of the panel and the dolly behind it to control force from both sides.
With the dolly behind the metal, you can support the strike and correct small, sharp high spots with care. When you work off dolly, you can move broader lows and bends without driving the spot too hard.
This control helps you avoid overworking the sheet. It also lowers the risk of oil canning, where the panel pops or flexes because the metal has stretched too much.
Your goal is a stable surface that needs less filler and primer. Proper fillet weld sizing can also limit distortion when welding work forms part of the repair.
Done well, this tool pair gives you clean control, faster correction, and fewer warped panels.
Pick the Right Hammer and Dolly
You should match the hammer to the job. Use a flat face for broad shaping, a rounded face for curves, and a light or heavy hammer based on the force you need.
Pick a dolly that fits the repair area. Use flat dollies for broad panels and rounded or shaped dollies for tighter contours.
Keep the dolly firmly behind the metal while you work. This helps you support the panel and avoid bending or warping. If you plan to weld after shaping, remove zinc residues from galvanized surfaces before welding.
Products Worth Considering

This Body Hammer Set uses high quality fiberglass shaft, covering all body repair and panel beating requirements. High quality fiberglass shaft panel percussion hammer. Long lasting quality.

COMPREHENSIVE KIT - Includes bumping, pick, and reverse curve hammers plus four specialized dollies, providing professional-grade tools for both major collision repair and precision dent removal on vehicles

Auto Body Repair Kits contain all the tools necessary for automobile fender, bumper, and large or small body car dent repairs.
Hammer Types Matter
The right hammer and dolly set the quality of the repair. A lighter hammer works best for small, sharp spots, while a heavier hammer moves larger bends and broader damage.
You control the metal when you match tool weight to the damage.
- Use a light hammer for tight correction.
- Use a heavier hammer for wide metal movement.
- Back each strike with a dolly when you need firm support.
- Switch to hammer on dolly for high spots and hammer off dolly for low spots.
Keep your dolly aligned with the panel contour so you can support the surface cleanly. The right tool pair helps you flatten, shape, and refine without stretching the metal.
Good tool choice saves time, cuts rework, and gives you a cleaner repair.
Dolly Shape Fit
The hammer sets the force, but the dolly must match the panel shape. Use flat dollies on flat panels, round dollies on curves, and spoon or heel dollies in tight spaces.
For small, sharp dents, choose a flat dolly face that supports the damaged area. For larger bends and smooth shifts, use a round surface that follows the panel curve.
Keep the dolly firmly against the metal so the hammer moves the damage instead of stretching the sheet. Check the fit before every strike, and clean the face often so dirt does not mark the panel.
Use safe hand placement, steady contact, and firm backing. This precision helps you avoid rework.
What You’ll Need Before You Start
Set up the repair before you pick up the hammer. Clean metal, good light, and the right safety gear help you read the panel and avoid avoidable damage.
- Body hammer with a flat or rounded face
- Dolly that matches the panel contour
- Marker, guide coat, or straightedge for finding highs and lows
- Clean rags and surface cleaner
- Eye protection and work gloves
- Hearing protection when working for longer periods
Most small hammer and dolly corrections take 30 to 90 minutes, depending on the damage. Larger quarter panel repairs can take longer because you need repeated checks and test fits.
Warning: Wear eye protection and gloves, and keep your free hand clear of the hammer path.
Fix the Rear Panel First
Start with the rear quarter panel and assess the damage carefully. One side may need more hammer and dolly work than the other.
Map dent severity, edge distortion, and stretched areas before you strike. Match your shaping method to the metal’s response instead of rushing the repair.
- Mark the dent area so you can track the shape.
- Place the dolly behind a small, sharp dent and tap with the hammer on dolly.
- Support larger bends or low spots, then work the hammer off dolly.
- Control pressure with each blow so you don’t stretch the metal.
- Recheck the contour often before you move to filler and primer.
You don’t force the panel into place. You guide it back to its intended form. Good surface preparation also helps if the repair includes welding.
Keep your strokes deliberate, your support solid, and your eye on the surface line.
Products Worth Considering

7 Piece Auto Repair Kit: Each pack comes with a standard bumping hammer, pick & finish hammer, reverse curve hammer, curved dolly, utility dolly, double end hand dolly, and shrink dolly to provide the perfect fit both large and small body car dent repairs.

AUTO-BODY REPAIR TOOLS: These comprehensive hammer and dolly repair tools help you fix physical damage on automobile fender and bumper parts and help you repair large or small car-body dings and dents.

Hickory handles are flame treated for reliable strength
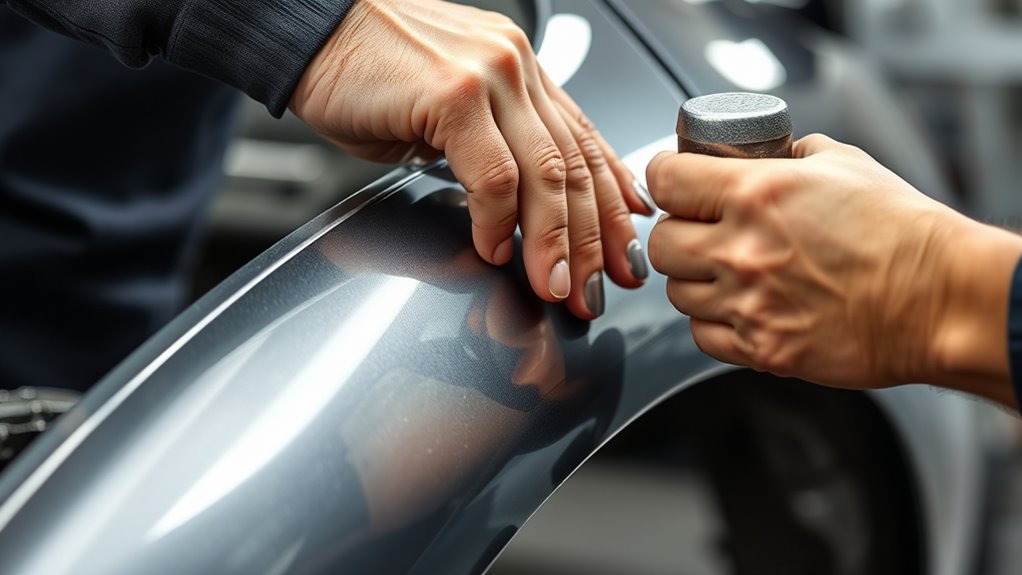
Use Hammer on Dolly for High Spots
Use the dolly as a stable anvil behind the panel, and strike the high spot with the hammer while you apply steady pressure. Match the dolly face to the panel shape, then work the metal with small, controlled hits.
Check the repair often so you don’t overwork the area or create new distortion. Careful control, much like monitoring operational parameters while grinding, helps you prevent extra damage.
Hammer On Dolly
Tap the high spot with the hammer while you hold the dolly directly behind it. The dolly gives the metal solid backing and absorbs the impact.
This hammer on dolly method gives you direct control for metal shaping. Your hammer strikes work best when your dolly position matches the dent.
Use the dolly’s flat face for broad highs and the rounded face for tighter areas.
- Brace the dolly firmly behind the spot.
- Strike with light, controlled blows.
- Keep pressure consistent as the crown drops.
- Stop before repeated hits stretch the panel.
You guide the sheet back to form instead of forcing it. Stop when the high spot settles and the surface responds evenly.
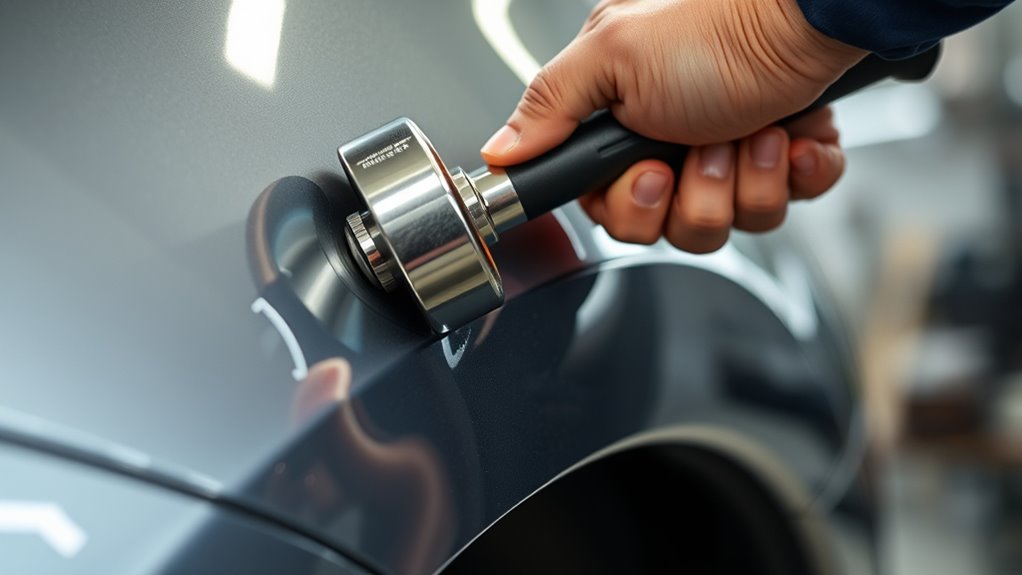
Level High Spots
To level a high spot, place the dolly directly behind the raised area. Then lightly strike the crown with a hammer to bring it down.
Read the panel by feel and sight before each blow. Match the dolly’s flat or round face to the contour so you support the metal without chasing distortion.
Use consistent pressure, not heavy force, to ease the peak down and limit stretch. Work slowly, make small corrective strikes, then pause to check the surface.
Check for new highs or lows after every pass. Switch dollies as needed for tighter curves or broader panels.
With disciplined control, you shape the panel cleanly and keep the repair accurate.
Use Hammer Off Dolly for Low Spots
For low spots, work hammer off dolly to raise the panel in a controlled way without over-stretching the metal. Start by finding the full low area, then choose a dolly that follows the panel contour.
Hold the dolly behind the dent and tap near the outside edge of the low spot. This method lets you lift the metal gradually and keep the repair clean.
Hold the dolly behind the dent and tap from the outside edge inward to lift the metal gradually.
- Clean the area and expose the full low spot.
- Place the dolly firmly behind the low area.
- Tap lightly from the outer edge toward the center.
- Check the surface often and stop before you overwork it.
Work with steady pressure, not force. Each strike should support the panel shape, not fight it.
When you stay deliberate, you lift the metal without causing warping. Wear flame-resistant clothing when heat, sparks, or welding work may follow the shaping step.
Shape Quarter Panels Without Stretching
Shape quarter panels by matching your hammering method to the size and type of damage. Small, sharp dents need different control than large bends.
For small dents, work on dolly and let the dolly back the strike. This keeps the metal tight and helps you bring high spots down.
For larger bends, switch off dolly and move the panel without thinning or stretching it. Choose a dolly whose contour follows the repair zone so your tools support the shape instead of fighting it.
Did you know that understanding wheel markings can also help you choose safer abrasive tools for metal work?
| Method | Use |
|---|---|
| Hammer on dolly | Tight, sharp dents and high spots |
| Hammer off dolly | Larger bends and low spots |
Apply steady, consistent pressure and build the shape gradually. Don’t overuse on-dolly blows because repeated direct hits can stretch the panel skin.
Pro tip: Stop every few minutes and sight down the panel from a low angle to catch small waves early.
Square the Deck Lid Opening
After rear-end damage, square the deck lid opening by inspecting the quarter panel for high and low spots. Note where the opening shape has shifted before you adjust the metal.
Read the metal, not the paint. Use careful shaping to restore deck lid alignment without forcing the panel.
Read the metal, not the paint, and use careful shaping to restore deck lid alignment without forcing the panel.
- Mark high spots, then place the dolly behind them as an anvil.
- Tap high areas with the hammer on dolly method to lower proud metal.
- Work low spots with hammer off dolly, using the dolly only for backing support.
- Fit the deck lid often, and make small corrections until the opening closes square.
Keep your blows controlled and your hand light. Each hit should move the metal only enough to improve the fit.
Understanding strong and permanent joints can help when a rear repair also includes welded sections. Recheck gaps after every pass because the opening can shift as the quarter panel responds.
If the lid still binds or sits crooked, repeat the same sequence. Stop when you get a clean, flush closing edge.
Finish the Metal With Light Filler
Once the metal sits close to shape, use a light automotive filler to smooth small flaws that remain. Choose a filler made for body repair so it bonds well and works with your paint system.
Spread thin coats, feather the edges, and avoid heavy buildup. Let each coat cure fully before you sand it.
Start sanding with a coarser grit, then move to finer grits as the surface improves. Follow the panel contour until the surface feels flat and consistent under your hand.
Clean the area and apply primer after sanding. Primer seals the surface, supports adhesion, and prepares the panel for final paint.
Keep the surface free from oil and contaminants so filler and primer can bond well.
Avoid Common Hammer and Dolly Mistakes
After you sand the filler and clean the panel, keep your hammer and dolly work controlled. Poor hammer work can undo the repair and stretch the metal.
Watch for common mistakes such as striking too hard, using the wrong dolly, or chasing every flaw with on-dolly blows. Use these repair habits instead:
- Back up the hammer with the dolly on small, sharp highs only.
- Switch to hammer off dolly for larger bends and low spots.
- Match the dolly shape to the panel so contact supports the metal correctly.
- Check fit and surface progress often, then adjust before final finishing.
If you overwork the panel, you can stretch the metal and create more damage. Stay deliberate, read the surface, and let each controlled blow move the panel out of distortion.
Use grinder-rated accessories when grinding or cutting near a body repair. The wrong accessory can damage the work and create a serious safety risk.
Frequently Asked Questions
How to Use Auto Body Dolly and Hammer?
Place the dolly behind the dent, then tap the panel with the hammer that matches the repair area. Use on-dolly strikes for sharp highs and off-dolly strikes for lows or larger bends.
How to Shrink Metal With Hammer and Dolly?
You can tighten a small high spot with careful on-dolly work, but you must avoid repeated heavy hits. If the metal has stretched badly, you may need heat shrinking or help from an experienced body technician.
What Is the Hammer Dolly Method of Repairing Vehicle Body?
The hammer and dolly method reshapes damaged body metal by using force from one side and support from the other. This gives you more control than hammering the panel without backing.
What Are the 4 Rules to Follow When Using Hammers?
Use the right hammer, match the dolly to the panel, wear safety gear, and control force with light strikes. These habits help you avoid new dents, stretched metal, and poor panel fit.
Can You Use a Hammer and Dolly on Aluminum Panels?
You can use a hammer and dolly on aluminum, but aluminum moves differently than steel and can stretch faster. Use clean tools, light pressure, and a cautious approach so you don’t contaminate or overwork the panel.
Conclusion
The most important rule is simple: control the metal from both sides and move it a little at a time. Match the dolly to the panel, use on-dolly work for highs, and use off-dolly work for lows and wider bends.
Check the surface often, test fit nearby panels when needed, and stop before you overwork the repair. With patience and light, accurate blows, you can restore cleaner body lines with less filler and less rework.


