What’s in This Article
- What Welding Process Is Best for Exhaust Systems?
- Why TIG Welding Gives the Cleanest Exhaust Welds
- When MIG Welding Makes the Most Sense
- When Stick Welding Exhaust Pipes Makes Sense
- How to Prep Exhaust Pipe for a Strong Weld
- How to Set Up for Thin Exhaust Tubing
- How to Avoid Burn-Through on Stainless Pipe
- How to Test Exhaust Welds for Leaks
- How to Choose TIG, MIG, or Stick for Your Build
- Frequently Asked Questions
- Conclusion
Choosing the wrong welding process can leave your exhaust pipe warped, weak, or full of small leaks. Thin tubing needs clean prep, steady heat, and a process that matches the metal. TIG welding usually gives the cleanest finish, while MIG gives you speed for general exhaust work. This guide shows you when to use TIG, MIG, or stick welding for exhaust systems.
Quick Answer
TIG welding is usually the best choice for exhaust systems when you need clean beads, precise heat control, and less warping on thin stainless tubing. MIG welding works well when you need faster setup and strong welds on thicker mild steel sections. Stick welding fits rough exhaust repairs, but it is not the best choice for thin or cosmetic exhaust work.
Key Takeaways
- Use TIG welding when you need the cleanest exhaust welds on thin stainless tubing.
- Use MIG welding when speed, simple setup, and repeatable welds matter most.
- Use stick welding only for rough repairs or thicker damaged sections.
- Clean, square, and tight joints reduce leaks, burn-through, and weak welds.
- Test every finished exhaust weld for leaks before you put the system back in service.
What Welding Process Is Best for Exhaust Systems?
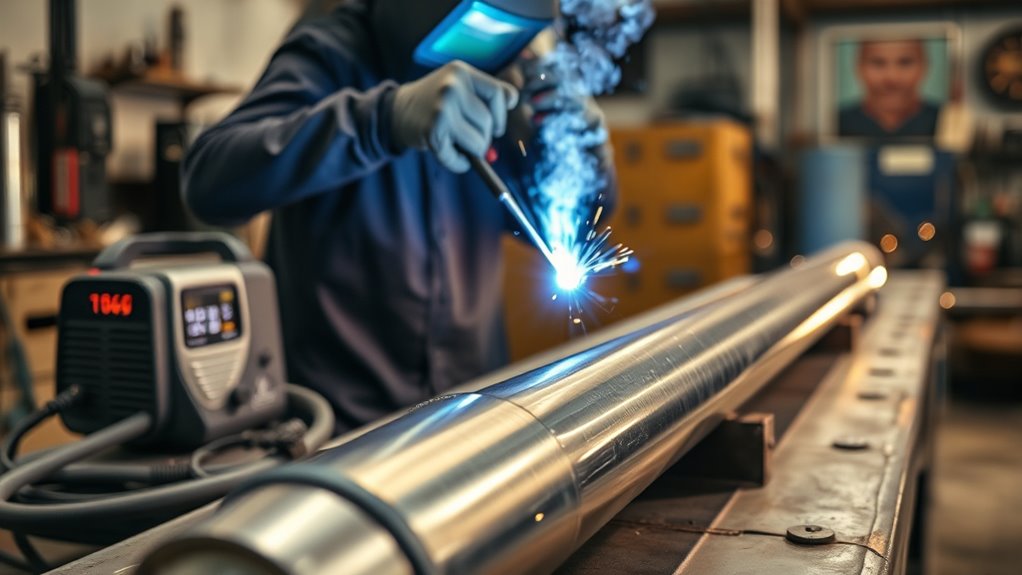
TIG welding is often the best process for custom exhaust systems because it gives you tight heat control and clean weld beads. That control matters most on thin stainless steel tubing, where too much heat can cause warping or burn-through.
MIG welding is often the most practical option for general exhaust fabrication. It is fast, easier to learn, and well-suited to thicker mild steel tubing.
Stick welding can work for rough exhaust repairs, but it is rarely the right choice for thin tubing. Its higher heat and less refined arc can make thin pipe harder to control.
You should fit joints accurately before you weld, because poor alignment invites leaks and weak connections.
Use consistent beads, wear proper gear, and work in a ventilated space. You should also understand the hazards of welding galvanized steel, because zinc fumes can create serious health risks and poor weld quality.
Why TIG Welding Gives the Cleanest Exhaust Welds
TIG welding gives you the cleanest exhaust welds because it uses a non-consumable tungsten electrode and an argon gas shield. You control the arc and filler metal by hand, so you can place the bead with more care.
On stainless steel, TIG helps limit oxidation when you use proper shielding gas. This improves weld quality and helps the joint resist corrosion.
You also shape the bead manually, which helps you create smooth, consistent profiles. A smooth bead can reduce cleanup and help the finished exhaust look more professional.
That control matters when you want clean fit-up, less grinding, and a finish that looks intentional. TIG takes practice, but it gives you the best control for precise exhaust work. Proper shielding gas flow also helps protect the weld pool from contamination.
Products Worth Considering

2pcs #12 Ceramic Tig Welding Cups.

201 STAINLESS STEEL - Made of Premium Type 201 stainless steel with excellent corrosion and heat resistance. Ideal for consistent practice across MIG, TIG, Stick, and wire-feed welding applications.

ER308L: Most popular stainless rod for general-purpose applications where corrosion is moderate and applications at cryogenic temperatures.
When MIG Welding Makes the Most Sense
You’ll get the most value from MIG welding when speed matters. The continuous wire feed lets you complete exhaust joints quickly in repair work or repeated fabrication.
MIG also works well on thicker tubing, where it can produce strong welds without the fine hand control TIG requires. With a simple setup and steady output, MIG welding stays practical when you need efficient, repeatable results.
You can also use self-shielded flux core wire for outdoor repairs, but it may create more spatter and cleanup than gas-shielded MIG.
Products Worth Considering

This gun is 8 ft long (Longer than the OEM Gun), and has 2 trigger wires, gas hose, wire liner and power cable all running up the inside of the hollow plastic hose. Generally speaking, these guns connect to a plastic wire feeder.
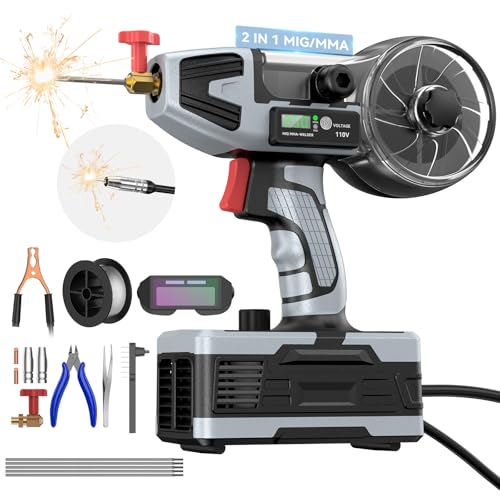
🔧【2-in-1 Professional Welder | MIG & Stick in One Machine】Eliminate the need for two separate machines. This versatile handheld welder seamlessly integrates gasless flux-core MIG and MMA (Stick) welding. Switch modes instantly with one button—perfect for going from thin sheet metal to thick outdoor repairs. Your all-in-one solution for DIY, automotive, fabrication, farm, and home projects

【2-in-1 Welder】 Unleash Your Welding Potential! Experience ultimate versatility with our 2-in-1 welder featuring both Flux Core MIG and MMA modes. Whether you’re tackling different materials or project types, this machine is designed to meet all your welding needs
Fast Production Welding
MIG welding works well for fast exhaust production because it combines speed, efficiency, and low setup time. You can move from one joint to the next without stopping to add filler by hand.
The continuously fed wire electrode helps you hold a steady pace. That steady feed can also support consistent weld quality across multiple pieces.
If you build exhaust parts in volume, MIG gives you practical control and repeatable results. You can keep the line moving and avoid extra setup steps.
Good for Thicker Tubing
When your exhaust work moves beyond thin tubing, MIG welding starts to make more sense. A MIG welder feeds electrode and filler wire together, so you can build weld metal faster on thicker tubing.
This helps when you join mild steel exhaust parts from about 0.045 inch up to 1/4 inch wall thickness. You can tune voltage and wire feed speed to control heat input and reduce burn-through.
MIG also asks less of your hand skills than TIG. Still, you need tight fit-up, clean edges, and the proper wire to get durable joints.
Simple Setup and Use
For exhaust work that needs speed and consistency, MIG welding stands out because the setup is simple. The wire feeds continuously, which makes the process easier to learn than TIG.
You can dial in the machine, set gas flow, and start work without a complex technique. That makes MIG practical for exhaust systems in a shop or fabrication line.
It also handles thicker sections well, giving you strong joints where durability matters. Keep your settings tight, because poor gas flow can cause porosity and exhaust leaks.
Pro tip: Practice on scrap tubing with the same thickness before welding the final exhaust joint.
When Stick Welding Exhaust Pipes Makes Sense

Stick welding makes sense on exhaust pipes when you face rust, poor access, or dirty conditions. These conditions can make MIG or TIG prep harder.
You can use stick welding for quick repairs on thicker damaged sections. It tolerates oil and dirt better than cleaner processes, so it can help when the job is not ideal.
The higher heat input can help fuse thicker sections and patch damaged joints. You also need less equipment setup, which helps when you must act fast. Flux core welding techniques can also help with outdoor exhaust repairs.
Stick welding will not give you the smooth, cosmetic bead TIG can deliver. When the goal is rough function instead of clean finish, stick welding can keep exhaust pipes working.
Warning: Do not weld galvanized or coated exhaust parts without proper preparation and ventilation, because fumes can harm you.
How to Prep Exhaust Pipe for a Strong Weld
To get a strong exhaust weld, start by exposing clean, bare metal. Use a wire wheel or grinder to remove rust, paint, oil, and other contamination until the joint area looks shiny.
Then wipe the exhaust pipe with acetone or isopropyl alcohol. Wear clean gloves so your skin oils do not contaminate the joint.
Accurate fit matters, so cut straight with a chain pipe cutter or angle grinder. Tight joints give the weld a better path and reduce leaks.
Deburr every edge with a file or deburring tool. This removes sharp edges and helps the pipe sections sit flush.
Before you strike an arc with a TIG welder, align the sections and clamp them in place. This keeps the joint from shifting while you weld.
- Clean metal bonds better.
- Square cuts and deburring reduce stress points.
- Clamping keeps your weld controlled.
Make sure all surfaces stay free from contaminants to support better metal fusion. Clean prep gives you a stronger and more durable weld.
How to Set Up for Thin Exhaust Tubing
Thin exhaust tubing needs careful setup because material around 0.028 inch can burn through or warp fast. Choose thin-walled stainless or mild steel tubing, and cut it so the ends meet with a tight, even fit.
Any gap weakens the weld and forces you to add more heat. Clean both surfaces to shiny bare metal with a wire wheel or grinder.
Handle the parts with clean gloves so you do not leave oil behind. For thin materials, TIG welding gives you the heat control you need.
Set your machine for low, stable amperage and watch heat control closely as you work. If you use MIG, proper wire speed and voltage settings help reduce burn-through.
Clamp the parts so they stay aligned, then check the seam before striking an arc. A stable joint helps you create a clean, leak-free exhaust weld.
How to Avoid Burn-Through on Stainless Pipe

Burn-through on stainless pipe happens fast, so you need to control heat from the start. Keep your puddle small and your travel speed steady, so heat does not collect in one spot.
Use low amperage for thin-wall stainless pipe and adjust it to the tubing thickness. Test your setting on scrap first, because one fixed amperage range will not fit every exhaust pipe.
- Fit the joint tightly: minimize gaps so you do not chase the arc and overheat the edges.
- Back purge with argon gas: protect the root side during TIG welding and reduce oxidation inside the pipe.
- Feed thinner filler rods: add enough metal to build the weld without flooding the puddle.
Watch the bead and move with purpose. Proper fillet weld sizing also helps you avoid excess heat and poor joint shape.
How to Test Exhaust Welds for Leaks
Once the exhaust has cooled, check the welds with a simple leak test before the system goes back into service.
Brush a soapy water solution over each weld and joint. If bubbles form, gas is escaping and you have found a leak.
For a running check, start the engine and listen near the welds for hissing. A hissing sound often points to a small exhaust leak.
You can also pressure test the system by blocking the outlet and adding low, controlled pressure. Watch the gauge, because any drop can mean the weld or seam does not seal.
Keep the system cool during testing so you avoid burns and get better results. Check exhaust pipe welds after repairs, then add regular leak testing to your maintenance routine.
That steady habit helps you protect the exhaust and preserve weld integrity.
How to Choose TIG, MIG, or Stick for Your Build
- MIG welding: Choose MIG for general builds, faster setup, and a lower learning curve.
- TIG welding: Choose TIG for custom turbo work, thin material, stainless steel, and a premium finish.
- Stick welding: Choose stick for rough repair on thicker damaged sections, not fine exhaust work.
Factor in shielding gas before you choose a process. MIG often uses a shielding gas mix for clean welds, while TIG commonly uses 100% argon.
You should also match the process to your skill level, material thickness, and finish goal. Choose the process that gives you a strong, clean weld without adding problems to the build.
Frequently Asked Questions
What Is the Best Welding Method for Exhaust?
TIG welding usually gives you the best exhaust welds, especially on thin stainless tubing. It offers precise heat control, clean beads, and better control over distortion and leaks.
Is MIG or TIG Better for Exhaust?
TIG is better when you want the cleanest finish and the most control on thin tubing. MIG is better when you need faster work, easier setup, and strong welds on thicker exhaust sections.
Is 304 or 316 Better for Exhaust?
304 stainless steel works well for many exhaust systems because it offers good corrosion resistance and heat tolerance. Choose 316 stainless only when the exhaust faces heavy salt, chemicals, or marine exposure.
What’s a Good Welding Setting for Exhaust?
A good setting depends on pipe thickness, metal type, joint fit, and welding process. Start low, test on scrap tubing, and adjust amperage, voltage, or wire speed until the weld wets in without burn-through.
Can You Weld Exhaust Pipe With Flux Core?
You can weld exhaust pipe with flux core, especially for outdoor repairs where shielding gas is hard to use. It can create more spatter, so clean prep and careful settings matter.
Conclusion
The best welding process for exhaust systems depends on your metal, tubing thickness, skill level, and finish goal. Choose TIG when you need clean, precise, leak-resistant welds on thin stainless tubing.
Choose MIG when you need speed, simple setup, and strong results on thicker sections. Use stick welding only when you need a rough repair and the pipe can handle the extra heat.
Prep every joint well, control your heat, and test every weld for leaks. A clean setup gives your exhaust system a better chance to last.


