To effectively use a wire brush after welding auto body, start by choosing the right brush for your metal type, like stainless steel for stainless steel or brass for softer metals. Prepare the surface by removing contaminants and dirt. When brushing, scrub in the direction of the metal’s grain to minimize scratches. Always wear protective gear and inspect the brush regularly for wear. Proper techniques guarantee cleaner, stronger welds, and there’s more to take into account for ideal results.
Choosing the Right Wire Brush for Your Metal Type

When you’re selecting a wire brush for your metal type, it’s crucial to match the brush to the material to avoid contamination and damage. For stainless steel and aluminum, use stainless steel wire brushes to prevent rust and maintain integrity.
Matching the wire brush to your metal type is essential to prevent contamination and ensure durability. Use stainless steel brushes for stainless steel and aluminum.
If you’re working with softer metals like copper, opt for brass or bronze wire brushes; these are gentler and minimize the risk of damaging the surface.
Consider the brush type as well—knotted wire brushes are aggressive, making them suitable for tough cleaning tasks, while crimped brushes offer a gentler touch for delicate areas.
Always select the appropriate size for the job; handheld brushes excel in small spots, while cup brushes cover larger surfaces efficiently. Additionally, using a wire brush after welding can help prepare the surface for clean welds on imperfect base metals, ensuring a better finish.
Regularly inspect the wire brushes used for wear and replace them when bristles become worn to guarantee peak performance and effective cleaning.
Preparing the Surface Before Brushing
Before you start brushing, inspect the surface for any contaminants like rust, dirt, or welding slag. Choose the appropriate wire brush based on the metal type to guarantee effective cleaning. Finally, remove all loose debris to prepare the surface for ideal results. Ensuring the surface is free of common contaminants enhances the effectiveness of the brushing process.
Inspect for Contaminants
To guarantee ideal results, you should start by visually inspecting the welded area for contaminants like slag, spatter, or oxidation that could compromise the surface finish. A clean surface is essential before you grab the brush.
Here’s what to look for:
- Visible Contaminants: Identify any slag, spatter, or oxidation that needs removal.
- Surface Cleanliness: Use a clean cloth to wipe away loose dirt or grease, making sure the brush effectively reaches the metal.
- Discoloration: Check for heat tint; these areas may need extra attention to restore corrosion resistance.
Also, confirm the surface is dry and free from moisture to prevent rust formation, which can jeopardize the integrity of the metal post-brushing.
Choose Appropriate Brush
Once you’ve confirmed the welded area is free of contaminants, selecting the right wire brush becomes your next priority. It’s essential to choose an appropriate brush tailored to the metal type and surface condition. For instance, use stainless steel bristles for stainless steel to avoid contamination, while brass brushes suit softer metals like copper. Assess the surface: heavily rusted areas need aggressive brushes, whereas cleaner surfaces require lighter options. Also, match the brush size to your work area; handheld brushes are ideal for small spots, while larger cup brushes handle expansive surfaces effectively.
| Brush Type | Best Use |
|---|---|
| Stainless Steel | Stainless Steel |
| Brass | Softer Metals (e.g., Copper) |
| Knotted Wire | Aggressive Cleaning |
| Crimped Wire | Delicate Work |
| Handheld Brush | Small Areas |
Clean Loose Debris
Start by removing any large loose debris like dirt, dust, or weld spatter to guarantee the wire brush operates effectively. Proper cleaning before brushing guarantees a smooth finish.
Here’s a quick guide:
- Use a Welder’s Hammer: Dislodge stubborn rust chunks or weld slag that could interfere with your brushing.
- Confirm Dryness: Make sure the surface is dry and free from moisture, as water can reduce the brush’s effectiveness and promote rust.
- Clear the Area: After dislodging debris, use a vacuum or compressed air to maintain a clean workspace.
Best Techniques for Brushing Welds to Remove Imperfections
To effectively remove imperfections from welds, you’ll need to choose the right brush for the material you’re working with. Focus on brushing techniques that follow the metal’s grain to minimize scratches and enhance the finish. Additionally, confirm you regularly inspect your brushes to maintain ideal cleaning performance. Remember that using the right plasma cutter drag tips can also improve the overall quality of your welds.
Choosing The Right Brush
Selecting the right wire brush is crucial for effectively removing imperfections from welds. Here are some key considerations:
- Material: Use a stainless steel brush for cleaning welds on stainless steel or aluminum surfaces. This helps prevent contamination and rust.
- Type: For heavy welds and slag removal, go for a knotted wire wheel brush. It offers aggressive cleaning without excessive material loss.
- Precision: A hand wire brush is great for tight spaces or small welds. Always scrub in the direction of the metal’s grain for ideal results.
Remember to maintain proper brush orientation; the tips should contact the weld without excessive pressure.
Regularly inspect and replace brushes to guarantee effective performance and avoid surface damage.
Effective Brushing Techniques
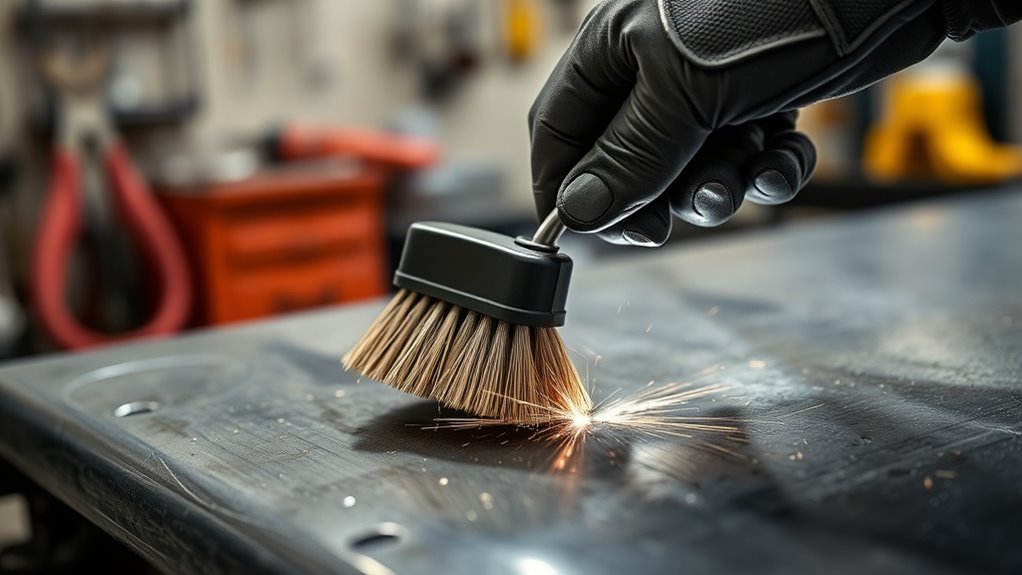
While brushing welds, using the right technique is essential for achieving a smooth, clean finish. Focus on weld cleaning by scrubbing in the direction of the metal’s grain. This prevents damage to the surface and effectively removes imperfections. For stainless steel and aluminum, opt for a stainless steel wire brush to avoid contamination. When dealing with intricate welds, use end brushes to access tight spaces without excessive abrasion. Always wear appropriate PPE, including gloves and safety glasses, to shield yourself from debris. Finally, after brushing, wipe the area with a clean rag to eliminate residual particles and prepare the surface for further treatment.
| Technique | Material Type | Purpose |
|---|---|---|
| Directional Brushing | Steel | Prevents surface damage |
| Stainless Brush | Stainless/Aluminum | Maintains corrosion resistance |
| End Brushes | Intricate Welds | Thorough cleaning of tight spots |
| PPE Usage | All Materials | Protects against debris |
| Final Wipe | All Materials | Prepares for finishing |
Staying Safe While Using Wire Brushes
When using wire brushes, prioritizing safety is essential to prevent injuries and health hazards. To guarantee your protection while working, always wear the appropriate personal protective equipment (PPE).
Prioritizing safety is crucial when using wire brushes; always wear the appropriate personal protective equipment (PPE) to ensure your protection.
Here are some key safety tips:
- Wear Protective Gear: Always don gloves, safety glasses, and a dust mask to shield against flying debris and harmful dust.
- Choose the Right Brush: Use wire brushes designed for the specific material you’re cleaning to avoid cross-contamination and enhance effectiveness.
- Ventilation is Key: Confirm your workspace is well-ventilated to minimize exposure to harmful particles and fumes.
Additionally, maintain proper brush orientation by keeping the tips in contact with the surface, and regularly inspect your brushes for wear.
Replacing worn bristles prevents breakage and potential injuries. Always ensure you are using grinder-rated accessories for safer operations. By following these guidelines, you can work confidently and safely.
Avoiding Common Mistakes When Cleaning Welds
After confirming your safety with proper gear and a suitable workspace, it’s important to focus on the techniques you use while cleaning welds.
Always scrub in the direction of the metal’s grain to maintain its integrity. Using a carbon steel brush? Make sure it’s appropriate for the material you’re cleaning—stainless steel brushes are best for stainless surfaces to prevent contamination.
Avoid applying excessive pressure; this can break bristles and slow your progress, leading to inefficient cleaning. Regularly inspect your brushes, and replace them when bristles show significant wear to guarantee peak performance. Transitioning from coarser to finer grits ensures a smoother finish, which can be beneficial after welding.
Once you’ve finished brushing, don’t forget to wipe the area with a clean rag. This removes any debris or loose particles that could lead to corrosion if left behind.
Maintaining Your Wire Brush for Long-Lasting Use
Maintaining your wire brush is essential for achieving peak performance and longevity. Proper care guarantees that your brushes can be used effectively over time. Here are three key practices to keep in mind:
- Regular Inspection: Frequently check your wire brush for bristle wear. Replace it when bristles become frayed or lose effectiveness to maintain peak performance.
- Cleaning After Use: After each session, remove debris and residue using a rag or compressed air. This simple step greatly prolongs the lifespan of your brush.
- Proper Storage: Store your wire brushes in a clean, dry place to prevent moisture-related damage. This helps maintain the integrity of the bristles, guaranteeing they stay sharp and effective. Additionally, higher voltage plasma cutters can produce cleaner cuts, making it easier to clean up welds before brushing.
When to Replace Your Wire Brush?
Replacing your wire brush is vital for maintaining effective cleaning and protecting your work surface. Monitor the condition of your brush regularly. If the bristles are worn or frayed, it’s time for a replacement. Worn bristles reduce cleaning effectiveness and can lead to surface damage.
Look out for missing or considerably bent bristles, as these are strong indicators that you need a new brush. For frequent users, consider replacing your wire brush every few months, depending on the intensity of use and the types of materials you’re cleaning.
Monitor for bent or missing bristles; replace your wire brush every few months for optimal cleaning performance.
Pay attention to the brush’s bristle density; a reduction can compromise its ability to remove impurities effectively. Using a worn wire brush can also lead to cross-contamination between materials, potentially affecting the quality of your welds. Timely replacement is essential to guarantee peak performance and maintain the integrity of your work, especially when considering essential safety gear for your tasks.
Effective Cleaning Methods After Brushing

While brushing is an essential first step in cleaning your welded surfaces, it’s crucial to follow up with effective methods to guarantee thorough preparation.
Here are three key actions to take after brushing:
- Wipe the Area: Use a clean rag to remove any residual debris and dust. This prevents interference with further treatment or painting.
- Apply Chemical Cleaners: Consider using degreasers or other chemical cleaners. They help ensure that all contaminants are thoroughly eliminated from the surface.
- Surface Preparation: After brushing, employ sanding or apply a rust-inhibiting primer. This enhances adhesion for subsequent coatings and prevents corrosion, promoting long-term durability. Proper surface preparation is essential for achieving cleaner, stronger welds that resist rust and enhance durability.
Frequently Asked Questions
Why Wire Brush After Welding?
You wire brush after welding to remove impurities and oxidation, ensuring a clean surface. This process enhances rust prevention and improves adhesion for coatings, ultimately boosting the durability and integrity of your welds.
How to Use a Wire End Brush?
To use a wire end brush effectively, scrub in the metal’s grain direction, maintain brush contact with the surface, and choose the right bristle material. Regularly check for wear to guarantee peak performance.
How to Clean Metal After Welding?
To clean metal after welding, scrub the surface with a wire brush, follow the metal’s grain, and guarantee thorough metal preparation. Always wear PPE, wipe away debris, and check for impurities before applying coatings.
What Is the Use of Wire Brush in Welding?
A wire brush in welding removes impurities like slag and oxidation. Using different brush types—cup, end, and hand—ensures you clean effectively, enhancing adhesion for primers and paints while preserving the metal’s integrity.
Conclusion
In conclusion, using a wire brush effectively after welding is essential for achieving a clean, professional finish. For instance, if you’re restoring a classic car and want to remove surface imperfections from the welds, following the right techniques guarantees ideal results. By selecting the correct brush, preparing your surface, and maintaining safety, you’ll enhance your welding projects considerably. Remember, a well-maintained wire brush not only lasts longer but also improves your work quality.