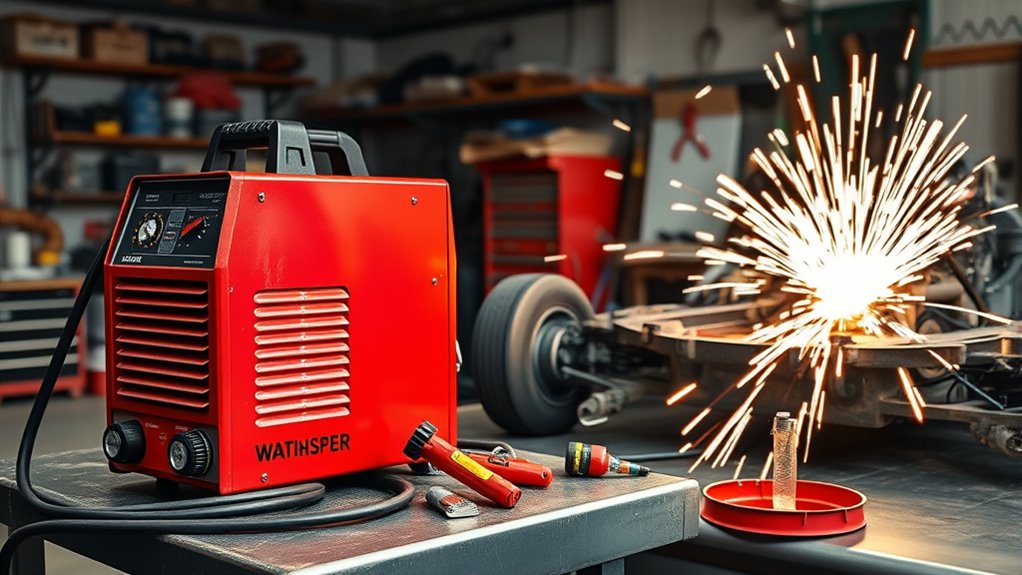
A plasma cutter lets you cut automotive steel, aluminum, and stainless fast with less heat than oxyfuel, so you’re less likely to warp panels. You can trim sheet metal, remove brackets, and cut exhaust tubing with clean, precise edges. Set up with proper ventilation, eye and hand protection, a solid ground clamp, and the right air pressure. Match amperage and tip size to thickness, and you’ll soon see why these tools fit shop work so well.
What Is a Plasma Cutter for Auto Work?
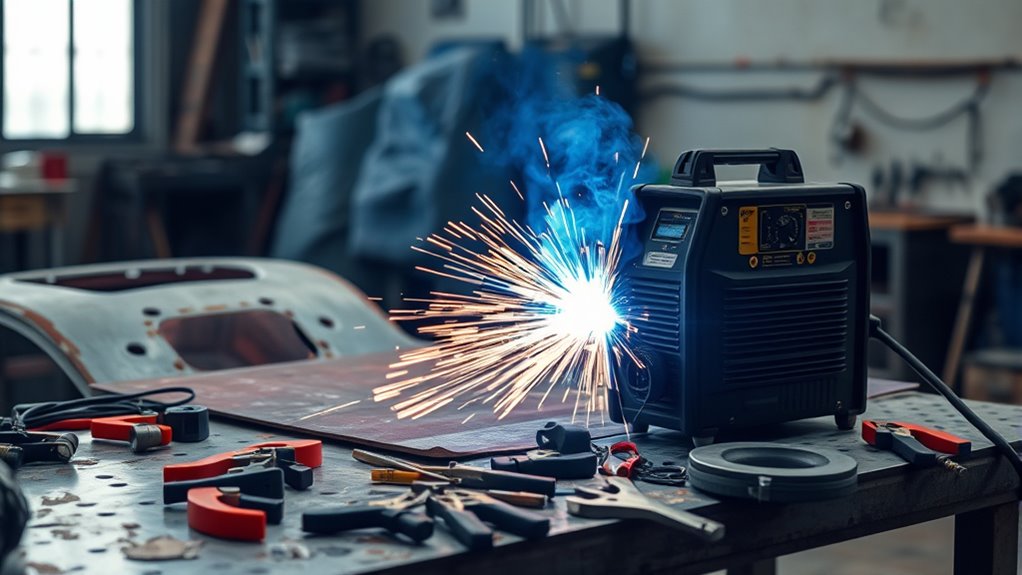
A plasma cutter for auto work is a portable tool that uses a high-temperature plasma arc to cut steel, aluminum, copper, and other vehicle metals quickly and cleanly. You feed compressed gas through a torch, and the plasma cutter works by ionizing that gas into an electrically charged stream that melts and blows away metal.
In automotive repair, you use it to trim panels, remove damaged parts, and shape custom pieces. It handles thin sheet metal without much heat spread, so you reduce warping and keep control. You still need to match metal thickness to the machine’s rating; some models cut 3/8 inch steel at about 10 inches per minute under ideal conditions, while heavier sections may need a stronger unit.
Because it’s portable, you can take it to the shop, driveway, or roadside and keep your work moving on your terms. Additionally, using a plasma cutter can significantly enhance cutting precision and efficiency, making it a valuable tool for automotive projects.
Why Plasma Cutters Are Great for Auto Repair
That clean, controlled cut is exactly why plasma cutters work so well in auto repair. You get clean cuts with less heat input, so panels stay flatter and you spend less time correcting warp.
With plasma cutting technology, you can slice steel, aluminum, and stainless fast, which frees you from tool swapping during metal fabrication. Handheld units move with you, letting you reach wheel wells, brackets, and cramped seams without fighting the vehicle.
Plasma cutters slice steel, aluminum, and stainless fast, while handheld units reach tight automotive spaces with ease.
On thin sheet metal, they can run up to 12 times faster than oxyfuel, so your shop keeps momentum.
- Cut a rusted fender edge with precision
- Trim a replacement bracket to fit cleanly
- Open tight access around a frame rail
- Shape custom parts for restoration work
That speed and control make plasma cutters ideal when you need clean cuts, faster turnaround, and the freedom to modify, restore, and build without dragging out the job. Additionally, plasma cutting technology ensures minimal waste, making it a cost-effective choice for automotive projects.
How to Set Up a Plasma Cutter Safely
Before you start, make sure your workspace is well ventilated and you’re wearing safety glasses, flame-resistant gloves, and a welding helmet.
Turn the plasma cutter off, confirm the correct 110V or 220V power connection, and set the air compressor to the manufacturer’s recommended 60–70 psi range.
Then connect the torch and ground clamp securely to the workpiece so you complete the circuit and reduce electrical risk. Additionally, always wear protective footwear to safeguard against falling metal and hot sparks.
Products Worth Considering

Cutting Kit: Includes IPT40 electrode tips for CUT 55DS Pro and for CUT 65DS plasma cutting machines, ensuring accurate and efficient cutting performance.

MULTIFUNCTIONAL USE: Ideal for a wide range of welders such as MIG welders,TIG welders, Stick Welders, plasma cutters, as well as welding tools. This versatile cart is designed for both indoor and outdoor applications, enhancing your welding versatility.
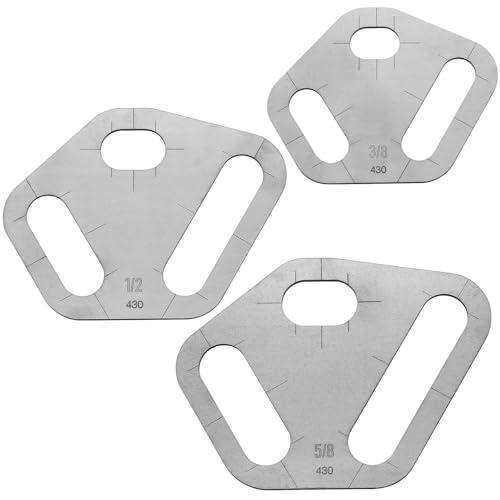
Packaging: you will receive 3 plasma templates in 9 different sizes: slot lengths of 2, 4, or 6 bolt lengths
Safety Gear Essentials
Safety gear is nonnegotiable when you set up a plasma cutter for automotive work. Your Safety Gear and Personal Protective Equipment should include safety glasses, flame-resistant gloves, and durable clothing to block sparks and heat.
Wear a Welding Helmet with the correct shade to shield your face and neck from the arc’s glare and UV output. Keep ventilation strong so fumes don’t build up around coated metal. Use hearing protection to cut noise fatigue.
- Safety glasses
- Flame-resistant gloves
- Welding helmet
- Earplugs or earmuffs
Inspect every item before each cut. Replace cracked lenses, worn gloves, or damaged straps.
When your gear works, you stay free to cut with control, confidence, and less risk.
Power And Air Setup
With your protective gear on, you can move on to the power and air setup. First, switch the plasma cutter off and connect it to the correct power supply, 110V or 220V, so you don’t create an electrical hazard.
Next, attach a compatible air compressor and set air pressure to 60-70 psi, or the range your machine specifies, for clean, efficient cuts.
Check that the electrode and nozzle are installed properly and aren’t worn out. Then secure the ground clamp firmly to the workpiece to complete the circuit.
Inspect all power and air connections for damage before you start, and keep checking them during use. A tight setup gives you control, safety, and the freedom to cut with confidence.
Torch And Ground Clamp
Set the torch and ground clamp only after you’ve turned off the plasma cutter and disconnected the power supply.
Secure the ground clamp to clean, bare metal on the workpiece so the electrical circuit closes cleanly and the cutting process stays stable. Inspect the clamp and cable for wear, cuts, or loose connections before every job.
Hold the torch at a steady, nearly perpendicular angle, with a fixed distance from the metal, to keep control and make a crisp cut.
- Bare metal contact
- Tight clamp jaw
- Straight torch path
- Clean, even arc
When you set up this way, you reduce erratic arcs, improve efficiency, and work with confidence. Your gear stays safer, and your hands stay free to guide the cut.
Common Auto Cuts You Can Make

You can use a plasma cutter to make clean panel and sheet cuts when you need to remove damaged body sections or shape replacement metal. It’ll also let you cut out brackets and mounts quickly for repairs or custom fabrication with accurate edges. For exhaust and pipe work, you can slice through tubing fast, which makes modifications and repairs much more efficient. Additionally, plasma cutting allows for precise cuts in ferrous metals, ensuring a smooth finish and reducing the need for additional cleanup.
Panel And Sheet Cuts
Panel and sheet cuts are where a plasma cutter really shines in automotive work, giving you clean, precise cuts in steel and aluminum with minimal heat-affected zones and less risk of warping.
You can shape patches, trim skins, and open custom profiles fast, often up to 12 times quicker than oxyfuel. Your cutting techniques matter: keep the torch steady, match speed to thickness, and use the right consumables to avoid dross.
A rated plasma cutter handles up to 3/8 inch; sever cuts reach 5/8 inch at slower travel.
- door skins
- floor pans
- fender sections
- curved custom openings
With proper maintenance, you get crisp edges and the freedom to fabricate without fighting the metal.
Bracket And Mount Removal
Bracket and mount removal is another job where a plasma cutter saves time, letting you slice through welded supports with clean edges and minimal heat damage to surrounding panels.
You clamp the part firmly, set amperage for the metal thickness, and keep the torch moving with a drag tip for control. On thicker steel, raise current to preserve speed and cutting quality; on lighter mounts, stay conservative to limit distortion.
This approach gives you clean bracket removal without fighting seized hardware or grinding forever.
Check nozzles and electrodes often, because worn consumables hurt arc stability and edge finish.
With the right setup, you cut free stubborn brackets, reclaim space, and work with more freedom, precision, and confidence on every repair.
Exhaust And Pipe Work
Exhaust and pipe work is one of the most useful plasma-cutter tasks in auto repair, because it lets you make precise cuts on stainless and mild steel tubing without preheating. Your plasma cutter slices cleanly through exhaust sections, bends, and custom pipe runs.
Clamp the tube in a vice or with clamps so it won’t shift, and set amperage to match thickness; 40 amps usually handles 1/8- to 1/4-inch wall pipe. You’ll get better control when you guide the torch by hand around curves.
- Bright arc on stainless steel
- Pipe held solid against vibration
- Clean edge with little dross
- Tight bend traced in one pass
How to Cut Clean Edges With a Plasma Torch
To cut clean edges with a plasma torch, keep a steady travel speed of about 10–15 inches per minute, adjusting for material thickness and type. Hold the torch at 90 degrees to the workpiece so the arc cuts evenly and dross stays low.
Match amperage to the job; for example, 40 amps works well on 1/4-inch steel. Use a drag tip to keep the right standoff distance, which sharpens cut quality and reduces heat distortion.
Match amperage to the material—40 amps suits 1/4-inch steel—then use a drag tip for cleaner cuts and less distortion.
Keep your motion smooth and let the plasma torch do the work instead of forcing it. Check nozzles and electrodes often, and replace worn consumables before they start ruining clean edges. Remember, maintaining the correct standoff distance is crucial for preventing angular cuts and ensuring uniformity.
When you control speed, angle, amperage, and tip condition, you cut faster with less rework and more freedom to move on to the next panel.
Plasma Cutter Safety Tips for Beginners
Clean cuts matter, but safe setup matters just as much when you’re new to plasma cutting. Follow these plasma cutter safety tips so you can work with control and confidence.
Wear personal protective equipment: safety glasses, gloves, and a welding helmet. Keep proper ventilation flowing so fumes don’t build up around you. Clear your bench and floor, then move flammables well away from the arc.
Inspect your torch, leads, and consumables before each cut; replace worn parts before they fail. Know your emergency shutdown steps before you strike an arc, so you can stop fast if something acts up.
- Bright sparks snapping across clean steel
- A helmet shielding your face from glare
- Fresh air moving through the shop
- A clear floor free of oily rags
Stay alert, work methodically, and let your setup support your freedom to cut without fear. Remember, proper ventilation is crucial to mitigate harmful fumes during cutting.
How to Choose the Best Plasma Cutter for Your Shop
How do you choose the best plasma cutter for your shop? Start with material thickness: match the cutter’s capacity to the steel you cut most, from 20 gauge to 1/2 inch.
Then check power output. A 20 to 80 amp machine gives you enough range for rated cuts and sever cuts on common automotive metals. Don’t buy more amps than you need, but don’t starve the torch either.
Next, look at duty cycle. Aim for at least 60% at maximum output so you can keep working without overheating or stopping your flow.
If you repair cars on-site, choose a compact, lighter unit that you can move easily.
Finally, compare consumable costs. Tips and electrodes should be easy to find and affordable, because a tool that’s cheap to run keeps your shop free to move, fix, and build without dependence on waste or downtime. Additionally, ensure that the tip size to amperage selection is appropriate for the materials you frequently cut to optimize performance and consumable life.
Products Worth Considering

fit SG-55 AG-60 WSD-60 Plasma Cutter Torch

PT31 Plasma Torch: standard length: 16ft; air pressure: 4.5-5.5bar; duty cycle for 60% with 30A

Wide Compatibility:Fits SG-55, AG-60, WSD-60 torches and Bestarc BTC500DP plasma cutter,supports pilot arc starting
Frequently Asked Questions
Is It Hard to Learn How to Use a Plasma Cutter?
No, you’ll usually learn it quickly if you practice basic cutting techniques, follow safety precautions, and match material compatibility to amperage. You’ll gain control fast, and steady hands plus repetition’ll improve your cuts.
What Is a Good Plasma Cutter for Beginners?
You’ll want a portable plasma cutter from reputable plasma cutter brands, with 20–40 amps, 1/4–3/8 inch cutting thickness, and a 60% duty cycle. Wear safety equipment, choose intuitive controls, and keep it practical.
Will a 30 Gallon Air Compressor Run a Plasma Cutter?
Yes—your 30-gallon compressor can run a plasma cutter if its air compressor specifications meet 4-6 CFM at 70 psi. You’ll face cutting thickness limitations with larger plasma cutter types, but you can still cut freely.
What Is a Common Issue When Plasma Cutting?
Dross is a common issue when you plasma cut. You can reduce it by matching amperage and speed to material thickness, keeping arc quality steady, and following safety precautions so you don’t ruin cuts.
Conclusion
When you add a plasma cutter to your auto shop, you can cut faster, cleaner, and with less grinding than many other tools. That matters, especially when 1/8-inch steel can often be sliced in seconds with the right machine. If you set up your cutter safely, keep your hand steady, and choose the right amperage, you’ll handle most repair jobs with confidence. Start simple, practice often, and you’ll see why this tool earns its place.


